 Battle
of Liegnitz (1241 AD)
Battle
of Liegnitz (1241 AD)Fast Play Rules for Students
Battle
of Liegnitz (1241 AD)Version 2: This is the second version of the Battle of Liegnitz Rules. The original version can be found here. The rules were not changed, they seem to work fine. New battle reports and pictues were added to the original file.
 Historical
Background: In 1241 the
mighty Mongol army launched an invasion into Europe. While the
main force headed for a showdown in Hungary a smaller army was
sent into Poland as a diversion. A large Polish and Germany army,
led by Henry the Pious of Silesia, marched off to link up with
King Wenceslas of Bohemia's army. The Mongols confronted them
as they passed the town of Liegnitz. Although outnumbered, the
Mongols fought brilliantly and inflicted a devastating defeat
on their opponents.
Historical
Background: In 1241 the
mighty Mongol army launched an invasion into Europe. While the
main force headed for a showdown in Hungary a smaller army was
sent into Poland as a diversion. A large Polish and Germany army,
led by Henry the Pious of Silesia, marched off to link up with
King Wenceslas of Bohemia's army. The Mongols confronted them
as they passed the town of Liegnitz. Although outnumbered, the
Mongols fought brilliantly and inflicted a devastating defeat
on their opponents.
Battle 1: The Polish knights advanced recklessly on both flanks. Predictably, they were soon isolated and destroyed. On the left one unfortunate unit followed the Mangudai division into a fatal trap. The Mongol commanders reveled in their success. King Henry ordered his army to switch to the defensive. The command was unnecessary since none of the surviving knights was willing to advance. Even the Teutonic knights showed little taste for battle. Henry sent his archers and crossbowmen into the center of the field to take pot shots at the Mongols. The Mongols were unimpressed. They knew they were winning the battle and were content to force the Poles to attack.
Henry rallied his men for an all
out offensive. The Teutonic knights vowed that they would break
the Mongol lines and charged right toward the center of the enemy
line. Henry, Boleshaw of Moravia, and Mieszko of Opole led their
men in support of the Teutonic knights. The attack quickly lost
cohesion. Henry was relying on his heavy infantry, since so many
knights had been lost earlier in the battle, and he couldn't keep
pace with the hard charging Teutonic knights. The Mongols seized
on the opportunity; cutting off the knights and wiping them out
before the infantry could rescue them. Mieszko led a counterattack
but it was too late, and he lost his life in the melee. A small
number of heavy infantry, led by Boleshaw, managed to break through
the Mongols. The battle was a solid victory for the Mongols.
Baidar ordered his men to start collecting ears from the fallen
enemy, and sent Kadan's division to hunt down Boleshaw and his
men.
 Battle 2: .Henry and his
commanders were familiar with Mongol tactics and determined to
fight a smart battle. They settled on a strategy to hold the
flanks while advancing cautiously in the center. The Mongol commanders
entered the battle with no plan for victory. None of the commanders
seemed to know what to do, and there was no cooperation. Kadan
was commanding the Mongol left wing. He launched an attack on
the enemy but received no support from his compatriots. His division
was demolished. Meanwhile the Mangudai division was spotted in
the rear of the Mongol lines scratching their heads in confusion.
Battle 2: .Henry and his
commanders were familiar with Mongol tactics and determined to
fight a smart battle. They settled on a strategy to hold the
flanks while advancing cautiously in the center. The Mongol commanders
entered the battle with no plan for victory. None of the commanders
seemed to know what to do, and there was no cooperation. Kadan
was commanding the Mongol left wing. He launched an attack on
the enemy but received no support from his compatriots. His division
was demolished. Meanwhile the Mangudai division was spotted in
the rear of the Mongol lines scratching their heads in confusion.
Having defeated the Mongol left wing, the Poles decided to shift their reserves for a decisive blow on the Mongol right wing. The maneuver was accomplished with no interference from the disorganized Mongols. Henry led a massive and devastating charge of Polish knights, backed by his heavy infantry. They blasted through the panic stricken Mongols. The Poles were on their way to an amazing victory. Baidar wondered how he would explain his failure to the Great Khan. This prodded him into action and he led his elite cavalry in a desperate counterattack. They couldn't stop the Polish onslaught, but his men managed to fight their way to King Henry and kill him. This was a hard blow to the Poles, and saved face for the Mongols, but the battle was still deemed a Polish victory.
 Rules
Rules
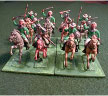
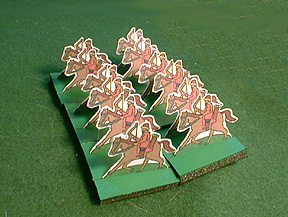
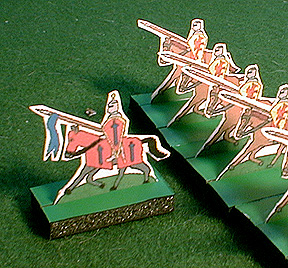
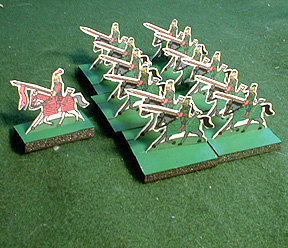
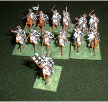
The Miniatures: The figures used were 1/72-scale plastics mounted two per stand, a mix from several sets. The Mongol figures came from Italeri (#6020) and Zvezda (#8003). I needed eleven boxes of Mongols to build my army and still had to use some Italeri Saracens (#6010) to fill out my units! If you're on a tight budget you may want to mount the Mongols one figure per stand. The Zvezda has better combat poses, and very nice leader figures, but unfortunately also includes infantry. Mongol infantry? Sounds like an oxymoron to me. The Italeri Mongols give you more cavalry figures per box. The Polish army was made up figures from Italeri's "The Knights" set (#6009), Revell's English Foot Knights and French Knights, and Italeri's Teutonic Knights (#6019). A better choice for the Polish knights might be the newly released Zvezda Livonian Knights (#8016). The set includes 9 mounted knights, 15 infantry, and 4 crossbowmen. All units were six stands in size - 3 stands in the front rank, three in the rear rank. Here are some paper soldiers you can print and use.
|
Mongols: Baidar (Commander in Chief) Kadan Orda General X General Y (Mangudai Division) |
Poles: King Henry the Pious of Silesia
(Commander in Chief) Boleshaw of Moravia Sulishaw of Cracow Mieszko of Opole Poppo van Ostern |
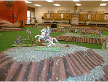
The Board: A 7.5 X 5 foot table was used. I placed a number of hills on the table. Some were large enough to give an advantage in melee to the unit with a height advantage, most were smaller and only blocked line of sight.

 Deployment:
Each army must deploy in their box.
The Poles must put the knights in front of the infantry. The Mongols
may secretly conceal four units behind the hills outside their
box, out of sight of the Poles. These units are only revealed
when they move, or after a Polish unit moves into a position
where it can see one of the units. Once revealed, the unit may
place itself facing any direction and may make its normal move
and charge during its move and charge phases.
Deployment:
Each army must deploy in their box.
The Poles must put the knights in front of the infantry. The Mongols
may secretly conceal four units behind the hills outside their
box, out of sight of the Poles. These units are only revealed
when they move, or after a Polish unit moves into a position
where it can see one of the units. Once revealed, the unit may
place itself facing any direction and may make its normal move
and charge during its move and charge phases.
Sequence of Play:
1. Poles Move
2. Poles Shoot
3. Mongols Move
4. Mongols Shoot
5. Charge into Melee
6. Melee
7. Light Cavalry retreat from Melee & Pursuit
Movement: All infantry move and charge 6", cavalry move and charge 12".
Shooting: All the Mongol units have bows and may shoot. The only Polish units with missile fire weapons are the archers and crossbowmen. Roll 1D6 for each stand in range (up to 12"). Every 6 is a hit and one enemy stand is removed. If any part of a unit is in range the entire unit may fire. Units that are engaged in melee may not fire, and may not be targeted.
Charge into Melee: Both sides may charge into melee. If it makes a difference the Mongols make their charges first. This is the only way to get into hand-to-hand fighting. Foot units may charge up to 6", cavalry may charge 12". Units may only charge if they can reach an enemy unit.
 Melee:
Each side rolls 1D6 for each stand in the fight. The Close Combat
table shows the number needed to score hits. Remove one enemy
stand for every hit . Both sides roll simultaneously. If both
units still have stands left they remain engaged and fight again
next turn.
Melee:
Each side rolls 1D6 for each stand in the fight. The Close Combat
table shows the number needed to score hits. Remove one enemy
stand for every hit . Both sides roll simultaneously. If both
units still have stands left they remain engaged and fight again
next turn.
Light Cavalry Retreat From Melee: A Mongol light cavalry unit may decide to retreat after melee. This is a free 12" move backwards. If they were fighting a unit of knights the knights may pursue if they wish. If the don't want to pursue there is still a chance that they will disobey orders and pursue. Roll 1D6, the unit makes an unwanted pursuit if the die roll is a 6. If the retreating unit is from the Mangudai division then the unwanted pursuit occurs on a roll of 4 - 6. If there is a pursuit roll 1D6 to see if they catch the retreating unit. If the roll is a six the pursuit succeeds, both units move 6" and the pursuers get to immediately attack the fleeing unit in the rear. If the pursuit fails the pursuing unit moves 9" towards the retreating unit.
Higher Ground: A unit has an advantage in melee if it is fighting on higher ground than its opponent. A unit in such a position gets to roll one extra die in melee. This only applies to the large hills indicated on the map.
 Last
Stand: If a unit is reduced
to one stand this last stand is removed immediately.
Last
Stand: If a unit is reduced
to one stand this last stand is removed immediately.
Generals: Generals may not be targeted individually if they are attached to a unit. If they are attached to a unit they count as an extra stand in melee (but not shooting). If the unit they are attached to loses stands in melee roll 1D6. If the roll is a 6 then the General is eliminated. If the general is charged while alone he may be eliminated just like any other stand.
Victory Conditions: The Poles would like to either exit the Mongol side of the board with a sizable force so they can link up with the Bohemian army or defeat the Mongols and hold the field at the end of the fight. The Mongols want to destroy the Polish army and kill Henry the Pious of Silesia without losing their own army.
Resources: I received a lot of useful advice and a map of the battlefield from Jeff Ball. A search of the Internet, and Magweb, turned two very useful resources for wargaming Liegnitz.
|
|
|