 Battle of Agincourt (1415 AD)
Fast Play Rules for Students
Battle of Agincourt (1415 AD)Historical Background: In 1415 Henry V’s invasion of France wasn’t going well. His exhausted army desperately needed to get to the safety of Calais if they were to survive. The French were determined to prevent their escape. A large French army intercepted the English and forced a battle. Henry deployed his army so that heavy woods would protect both of his flanks, forcing the French to attack across a narrow front, negating much of their manpower advantage. To make matters worse for the French heavy rains had reduced the battlefield to a muddy quagmire. As the ill-disciplined French advanced through the mud the deadly English archers shot them to pieces. The French found it next to impossible to close with the English and their heavy armor turned into a handicap. Many high-ranking French nobles were killed or captured by the English, and King Henry lived to fight another day.
 Battle
1: As the battle began
the Duke of Orleans led a wild cavalry charge against the archers
on the English left. He was confident that his knights would be
able to scatter the archers with ease. Instead his men were buried
under an avalanche of arrows and wiped out. The French were stunned.
The attack wavered as the Duke of Alencon lost his nerve and began
to withdrawal. The French were close to routing off the battlefield
without striking a single blow. The English archers took full
advantage of their opponent’s confusion and began picking
apart the French front line units.
Battle
1: As the battle began
the Duke of Orleans led a wild cavalry charge against the archers
on the English left. He was confident that his knights would be
able to scatter the archers with ease. Instead his men were buried
under an avalanche of arrows and wiped out. The French were stunned.
The attack wavered as the Duke of Alencon lost his nerve and began
to withdrawal. The French were close to routing off the battlefield
without striking a single blow. The English archers took full
advantage of their opponent’s confusion and began picking
apart the French front line units.
Charles D’Albret, the Constable of France, rallied the French for an attack on the English right. This time they advanced in good order and, despite heavy loses, managed to reach the English lines. The knights waded into the English archers with a vengeance, forcing the English to send in their reserves to stop the onslaught. Count Dammartin led a charge against the center that broke the English lines, forcing King Harry into the melee on the English right.
The heavy casualties had sapped
the French strength, and the English fought valiantly. The attack
lost momentum, and the French began to melt away. A small group
of French mounted knights managed to get to King Henry, but the
King’s luck held and he survived their assault. A review
of the carnage showed that this battle closely matched the historical
outcome – a decisive English victory.
Battle 2: The French generals in this battle had an excellent
plan. Swallowing their pride, the French noble cavalry allowed
the infantry to lead the attack. The French advanced steadily
all along their front, in perfect order. The English archers cut
large gaps in the French lines, but the attack didn’t falter.
The English watched with growing concern as the French slogged
forward through the mud with deadly intent.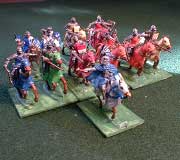
Charles D’Albret and Count Dammartin gathered a large mass of cavalry on the French left, with infantry screening them from the frustrated archers. King Harry, seeing the danger, shifted his reserves to meet the threat. The feeble remnants of the French front line hit the English archers and were scattered. Then, with a cheer, the virtually untouched second line thundered into the archers. The cavalry recklessly rode past the stakes to get at the hated English archers. The Duke of York tried to stem the tide but was killed. The French, led by the Duke of Alencon, broke the English center. The English retreated into two groups clustered around King Harry and the Duke of Gloucester on the right, and Lord Camoys on the left.
Lord Camoys and his men were hopelessly outnumbered and surrounded. The French demanded that he surrender. He defiantly shouted “For King Harry” and charged the startled French knights. He was eventually overwhelmed. Henry and Gloucester weren’t faring much better. The French army was exhausted, and close to breaking. But they knew that all would be for naught if they couldn’t kill or capture the King. A final charge, led by Charles D’Albret, the Count of Marle, and the Duke of Alencon fought their way to King Henry and beat him to his knees. The shattered French army headed for home with Henry V, King of England, as their prisoner.
Rules
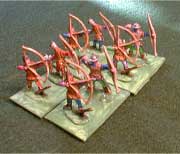
The Miniatures: The figures used were 1/72-scale plastics mounted two per stand, a mix from several sets. Most of the figures were from Revell's English Men at Arms and French Knights. Italeri also has a box of French Hundred Years War soldiers. It's difficult to get enough longbow men for this battle. Matt Driedger reports that the old Airfix Robin Hood set includes 17 archers, and several other figures that can be converted to archers. You may have to substitute, or mount them one figure per stand. All units were six stands in size - 3 stands in the front rank, three in the rear rank. Here are some paper soldiers you can print and use.
|
English: (all units have 6 bases) Left: Center: Right: |
French: (all units have 6 bases) Front Line: Second Line: Third Line: |
The Board: A 5 X 5 foot table was used. The terrain is flat and clear of obstacles.
Deployment: The English deploy at one table end. The French deploy at the opposite end and must be at least 24" from the English. They should be in three lines. The mounted knights units in the first line should be on the left and right wings.
 Sequence
of Play:
Sequence
of Play:
1. French Move
2. French Shoot
3. English Move
4. English Shoot
5. Charge into Melee
6. Melee
Movement: All infantry move and charge 6", cavalry move and charge 12". The French had a terrible time moving across the muddy battlefield, but playtesting showed that there was no need to reduce their movement.
Shooting: English longbow units can fire up to 24". French crossbow units have a maximum range of 12" Roll 1D6 for each stand in range. The shooting table shows the number needed for a hit. Every hit removes one enemy stand. If any part of a unit is in range the entire unit may fire. Units that are engaged in melee may not fire, and may not be targeted.
Charge into Melee: Both sides may charge into melee. If it makes a difference the French make their charges first. This is the only way to get into hand-to-hand fighting. Foot units may charge up to 6", cavalry may charge 12". Units may only charge if they can reach an enemy unit.
Melee: Each side rolls 1D6 for each stand in the fight. The Close Combat table shows the number needed to score hits. Remove one enemy stand for every hit. Both sides roll simultaneously. If both units still have stands left they remain engaged and fight again next turn.
Stakes: The English longbow men used sharpened stakes to
break up the French cavalry charges. All longbow units have stakes
protecting them at the start of the battle. If they ever move
the lost the benefit of having stakes for the remainder of the
battle. Any mounted knight unit attacking a longbow unit with
stakes from the front rolls one less die in melee. Here are some
stakes you can print and use.
Here are some
stakes you can print and use.
Last Stand: If a unit is reduced to one stand this last stand is removed immediately.
Generals: Generals may not be targeted individually if they are attached to a unit. If they are attached to a unit they count as an extra stand in melee (but not shooting). If the unit they are attached to loses stands in melee roll 1D6. If the roll is a 6 then the General is eliminated. If the general is charged while alone he may be eliminated just like any other stand.
Victory Conditions: The French win if they eliminate King Henry. The English win if they prevent this from happening.
Resources: A search of the Internet, and Magweb, turned up some useful resources for wargaming Agincourt.
|
|
|