 Historical Background: Verdun (1916
AD)
Historical Background: Verdun (1916
AD)
Historical Background: Verdun (1916
AD)
During World War I both sides dug a line of trenches along the Western Front extending from the English Channel to Switzerland. Each side tried repeatedly to breakthrough their opponent's line of defenses, suffering terrible casualties. In 1916 the Germans planned an attack on the French fortress city of Verdun. Their aim was to "bleed the French army white" by inflicting so many casualties that France would be unable to continue the fight. Vowing that "they shall not pass" the French were eventually able to stop the German advance, and after ten months of bloody combat the German gains had been virtually wiped out. In the worst war in human history Verdun stands out as the worst battle of all. The battle caused nearly a million casualties, more than half of them French. Verdun was a "victory" that would haunt French military and political leaders for a generation. This scenario is designed to give the students a taste of what it was like on the first day of the battle.
Battle 1: Before the battle started the Germans gathered an unprecedented concentration of artillery. This firepower was unleashed at the start of the battle in a ferocious "hurricane" barrage. The French could only wait in their trenches for the awful shelling to stop. Meanwhile the Germans raced across no man's land, determined to reach the French trenches before the French could recover. They cringed as some of their shells fell short, landing among the German first wave. When the worst of the barrage was over the French survivors looked out of their trenches and saw that the Germans had already reached the barbed wire. Immediately they opened fire with their rifles and machine guns, tearing large holes in the advancing German lines as they struggled through the wire. In one location the barrage had opened a gap in the wire and the Germans rushed through it, only to be mowed down by French machine gun fire.
Still, the Germans advanced as
artillery shells rained down on both sides. Some Germans paused
to fire at the French trenches, but most continued to move forward;
knowing their only hope of survival was to capture the first line
of trenches. As the German advance guard reached the French lines
they revealed their secret weapon - flamethrowers. With a flash
of fire the flamethrowers drove the French out of the trenches
in several places and the German infantry exploited the opening.
Soon the Germans, led by elite assault units, were rolling up
the first line of trenches. The exhausted Germans barely had time
to catch their breath before they were ordered to go over the
top again to attack the second line of French trenches. They bravely
pushed forward but were unable to gain a foothold in the second
line of trenches. This battle was a narrow victory for the French.
 Battle 2: The second battle
was very similar to the first battle. Unfortunately for the Germans
their opening barrage was not very effective, and as a result
the French were able to considerably slow down the German attack.
The lone bright spot for the Germans was the incredibly accurate
artillery fire of one of the German artillery officers. No French
machine guns were safe from his deadly salvoes. His accurate gunnery
opened the door for the Germans to seize control of parts of the
first French trenches, but they were unable to gain a foothold
in the second line of trenches, or even take full control of the
first line. This battle was a decisive victory for the French.
Battle 2: The second battle
was very similar to the first battle. Unfortunately for the Germans
their opening barrage was not very effective, and as a result
the French were able to considerably slow down the German attack.
The lone bright spot for the Germans was the incredibly accurate
artillery fire of one of the German artillery officers. No French
machine guns were safe from his deadly salvoes. His accurate gunnery
opened the door for the Germans to seize control of parts of the
first French trenches, but they were unable to gain a foothold
in the second line of trenches, or even take full control of the
first line. This battle was a decisive victory for the French.
Rules
The Miniatures: Most of the figures were 1/72 scale plastic figures. The German figures came from Revell 2504 WWI German Infantry. This is a great set that includes two Maxim machineguns. All the figures were mounted individually on 3/4" square bases (except for the machine gun crew). I wanted to include flamethrowers in the battle and these came various WWII sets. At least some of them came from Revell 2508 German Pioneers. This set also has a figure with wire cutters which would also be appropriate for the battle. Most of the French figures came from BUM (Barcelona Universal Models) WWI French Army. These figures are also available as Hat 7002 French WWI Infantry. This is a lousy set that has many figures that will be useless, including bicyclists. Plastic surgery or deceptive paint jobs can be used to convert some of the others into useful figures - trim the shovel and flag and paint as rifles, turn the guy with the homing pigeon into a machine gun loader, etc. Incredibly this set doesn't include a machine gun! To make up for this glaring omission I used figures from Esci's WWII French Soldiers. They're wearing the Adrian helmet, so just paint them horizon blue and nobody will notice. You will probably not want to use the bazooka team, or the guy with the submachine gun, but most of the figures will fit right in. Best of all it includes light machine guns. I also used several 20 mm metal French machine gun crews I had purchased years ago. I don't remember what company produces them. You could easily substitute figures from other armies using these rules to create another WWI battle, Hat industries sells a line of WWI figures. All the figures were mounted individually on 3/4" square bases (except for the two and three man machine gun crews). I selected impressive looking figures from each army to represent "elites" and these were marked by clipping off the corners of their bases. Here are some paper soldiers you can print and use. Flamethrower figures also had their corners clipped to make them easy to identify. Here's some barbed wire you can print and use: colored wire, black & white wire.
|
German: 290 "regular" figures 55 "elite" figures 12 Flamethrowers 9 machine guns (2 man crews) |
French: 150 "regular" figures 23 "elite" figures 6 light machine guns (2 man crews) 3 heavy machine guns (3 man crews) |

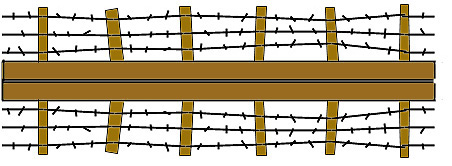
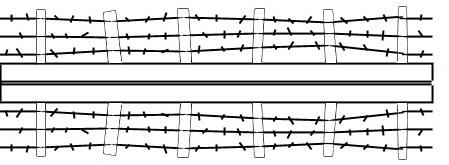
The Board: A 7.5 X 5 foot table was used. 2/3 of the table was occupied by the French trenches (two lines). The remaining third was no man's land, with a line of barbed wire.
Deployment: All the French must deploy in the trenches or dugouts. The figures should be evenly spread among the first and second trench lines. The German figures begin at the opposite end of the table. The German machine guns are not deployed, they are substituted for the French machine guns when these are captured by the Germans.
Sequence of Play:
Preliminary Bombardment
1. Germans Shoot
2. Germans Move
3. Melee
4. French Shoot
5. French Move
6. Melee
7. Artillery
Preliminary Bombardment: The Germans start the battle with a massive artillery bombardment. This is done only once, before the first turn. The German players get 100 regular size cotton balls, and 25 large "triple-size" cotton balls. Each represents an artillery shell. The players must stand an arm's length away from their table edge, then they throw the balls onto the battlefield. Continue throwing the balls until all of them have been used. It doesn't matter if they bounce or roll, their final resting place is all that counts. If some of the balls end up off the table that's too bad, those shells went astray. When all the balls have been thrown the damage is assessed. Any figure that is touching a cotton ball, or whose base is under a ball is removed. If a cotton ball is touching or covering a part of a machine gun crew then one crewman is eliminated, unless the ball is directly on top of the crew in which case the entire crew and the gun are eliminated. If a cotton ball lands on or is touching the barbed wire a 2" gap is created by removing a section of wire and replacing it with a shorter piece, or shifting the wire so the sections overlap and a gap is formed. If any balls land on the Germans that's too bad, this often happened in WWI, the figures are still eliminated. Dug outs are vulnerable to artillery fire. If two regular or one large ball ends up on the roof of a dugout it collapses. Roll 1D6 for each figure. Eliminate the figure if the roll is 1-3, the figure survives if the roll is 4-6 (place them in a nearby section of trench).
 Shooting:
Machine guns roll 4 dice for each figure in their crew, all other
figures get roll one die. If the target in is a trench then they
are hit only on a 6, if they are not in a trench they are hit
on a 4-6. Casualties should be removed from the front ranks, with
the player losing figures choosing which to remove. There are
some limits to firing. German figures may not fire at the French
until they pas through the barbed wire. Also remember that trenches
only have a fire step at the front, so figures in a trench can
not fire out the back, and may not fire out of a communication
trench. French figures in the second trench may only fire at figures
(or be fired at by figures) that have moved past the first trench
line. Flamethrower attacks are resolved using a template that
is a rounded cone 6" long with a semi-circle at the end with
a 1" radius. Lay the narrow end at the feet of the flamethrower
and point the other end at the enemy. Any figures whose base is
partially or fully under the cone is eliminated. After firing
once the flamethrower figure is removed, he is out of fuel.
Shooting:
Machine guns roll 4 dice for each figure in their crew, all other
figures get roll one die. If the target in is a trench then they
are hit only on a 6, if they are not in a trench they are hit
on a 4-6. Casualties should be removed from the front ranks, with
the player losing figures choosing which to remove. There are
some limits to firing. German figures may not fire at the French
until they pas through the barbed wire. Also remember that trenches
only have a fire step at the front, so figures in a trench can
not fire out the back, and may not fire out of a communication
trench. French figures in the second trench may only fire at figures
(or be fired at by figures) that have moved past the first trench
line. Flamethrower attacks are resolved using a template that
is a rounded cone 6" long with a semi-circle at the end with
a 1" radius. Lay the narrow end at the feet of the flamethrower
and point the other end at the enemy. Any figures whose base is
partially or fully under the cone is eliminated. After firing
once the flamethrower figure is removed, he is out of fuel.
Movement: Figures may move 12". Machine gun figures may not move if they fired this turn, other figures may move if they fired. The Germans must stop their movement when they reach the barbed wire, unless there is a gap in the wire. On the following turn all of their movement is used in crossing the wire. On the next turn they can once again move a full 12". Figures may not move over or through enemy figures without fighting them in melee.
Melee: If two figures are in contact at the end of movement
they will fight a melee. Each figure rolls 1D6 and the high roll
wins, the loser is removed. If there is a tie both figures roll
again, unless one of them is elite in which case the elite figure
is the winner, and his opponent is removed.
Capturing Machine Guns: The Germans sent their machine gun crews in with the attacking infantry so they could operate any captured French machine guns. If the crew of a French machinegun is eliminate the machine gun remains on the battlefield. The German play may move two elite figures onto the machine gun and capture it. This is done by removing the two elite figures and replacing the machine gun with a German machine gun model. The gun can be operated normally for the remainder of the game. The French cannot recapture a machine gun, and the Germans must use two elite figures to capture the weapon.
Artillery: The French get 15 regular cotton balls to throw, and the Germans get 20 regular and 10 large balls. The procedure for throwing the balls and resolving the effects are the same as in the preliminary bombardment phase.
Elite figures: This is a catch-all description used to indicate exceptional figures, such as officers, elite assault troopers, and heroic individuals.
Making Barbed Wire: The wire was based on strips of illustration
board 6" long and 1" wide painted brown to match my
battlefield. I used 30 gauge nichrome wire for the wire. I cut
a piece about 30" long and wound it around a magic marker,
winding back and forth a few times. I then slid the wire loops
off the marker and gave them a little crimp to help them keep
their shape. The roll of wire was then spread along the length
of the illustration board and held in place by three or four spots
of glue from a hot glue gun. I also made some 4" lengths
of wire which could be substituted for the longer pieces to create
gaps.
Making Shell Holes: I cut a small piece of cardboard box into 6" squares (the size isn't very important). Then I cut concentric rings out of the square to represent the edges of shell holes of various sizes. These were painted brown to match my battlefield and liberally sprinkled over no man's land. Don't worry if they overlap, this is more realistic anyway.
Making Trenches: My original plan was to simply draw the trenches with magic marker onto some chart paper. However the week before the battle we had a blizzard and I was homebound for three days. During this time I put together some crude trenches using the materials I had on hand. They were based on foam core. Then I cut the trenches out of 3/4" thick shelter foam (white Styrofoam). I didn't have enough foam to cover the battlefield, so instead I cut front and back pieces to represent the sandbags of the parados and parapet. I laid out the center section of the first line trench, then marked where the trenches would continue on the left and right sections so the trench line would line up. Pieces of foam were also cut for the communication trenches, second line of trenches, and dugouts. The dugouts received a roof of illustration board to show that they were underground. You can't spray paint Styrofoam so I brush painted the foam using Rustoleum leather brown, then used the same color of spray paint to cover the rest of the illustration board.
Resources: A search of the Internet, county library, and Magweb, turned up many useful resources for wargaming Verdun