Historical
Background: In the year
216 BC the Second Punic War had become a stalemate. The Romans
could not defeat Hannibal's Carthaginian army in the field, and
Hannibal could not capture Rome. Growing impatient, Rome raised
a large army and set them under the command of Caius Varro to
battle Hannibal. The result was one of the most devastating defeats
ever inflicted on an army. Varro was determined that his army
would not be outflanked and defeated by Hannibal, as happened
at the battle of Trebbia. But Hannibal was one of the greatest
generals in military history, and that's exactly what happened.
The Romans were encircled and massacred. The Romans would get
their revenge later when Hannibal was forced to leave Italy to
defend Carthage against a Roman army led by Scipio. At the battle
of Zama the Romans would defeat Hannibal and win the war.
Battle 1: Both sides sent their cavalry on the attack at the start of the battle. The Carthaginian heavy cavalry, under the direction of Hannibal, crushed their opposition, but their reserves were too far behind the lead units to exploit the opportunity. Roman infantry was rushed to the scene to prevent a breakthrough. Marcus Regulus and Lucius Paulus took personal command of the legionaries. The desperate gambit worked, temporarily, but soon both commanders were mortally wounded, and the Carthaginian cavalry began to pick up momentum. On the other flank the Numidian cavalry ran into trouble. Caius Varro aggressively attacked, preventing them from using their preferred hit and run tactics. Carthaginian infantry was sent in to save the Numidian horsemen. They succeeded in salvaging the situation. In one dramatic development a unit of Hannibal's African veterans was able to maneuver and charge the flank of a Roman cavalry unit that was engaged with the Numidians. In the center the Roman infantry was strong and began grinding up the Carthaginians. The Romans were able to hold steady in the center for a long time, but when Varro fell leading the defense on the Roman left flank their fate was sealed. The Carthaginian heavy cavalry was an unstoppable force, and both flanks collapsed in on the center, leading to a Carthaginian victory.
Rules
The Armies: The battle can be played with plastic 1/72 scale figures. There are many sets of Roman and Carthaginian figures available. Check out the Plastic Soldier Review to see all the possibilities. Figures should be mounted two per base, cavalry bases are 1.5" square, infantry bases are .75" x 1.5". Mounted commanders are based singly on .75" x 1.5" bases. All units were six bases in size - 3 bases in the front rank, three in the rear rank. Here are some paper soldiers you can print and use.
|
Romans (all units 6 stands) Left Wing Center Right Wing |
Carthaginians (all units 6 stands) Left Wing Center Right Wing |
The Board: The terrain was flat and a 7.5' X 5' foot table was used.
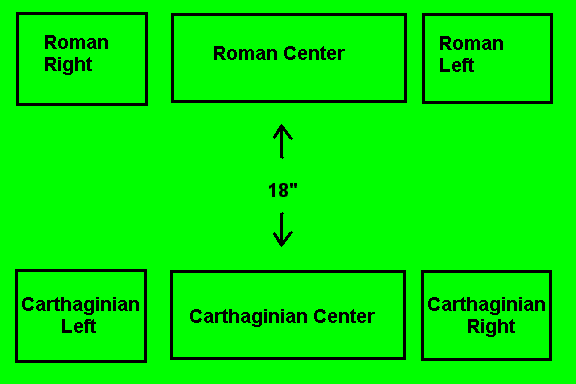
Deployment: The armies deploy as shown on the map. The armies begin at least 18" inches apart.

Sequence
of Play:
1. Roman Move
2. Roman Shoot
3. Carthaginian Move
4. Carthaginian Shoot
5. Charge into Melee
6. Melee
Movement: All foot units move 6". Commanders and cavalry move 12." A unit can not move closer than 1" from the enemy except during charges.
| Infantry | 6" |
| Cavalry & Commanders | 12" |
Shooting: Only skirmishers and light cavalry are allowed to shoot. Eligible units may only fire at targets in front of them, they can not fire to the side or rear. Roll 1D6 for each base that shoots. Every 6 rolled is a hit and one base is removed from the targeted unit. If any part of a unit is in range the entire unit may fire. Units that are engaged in melee may not fire, and may not be targeted.
| Unit | Range |
|
| Skirmishers | 6" |
|
| Light Cavalry | 6" |
|
Charge into Melee: Both sides may charge into melee. This is the only way to get into melee. Foot units may charge up to 6," cavalry may charge 12". Units may only charge if they can reach an enemy unit.
Melee: Each side rolls 1D6 for each base in
the fight. The Melee table shows the number needed to score hits.
Remove one enemy base for every hit. Both sides roll simultaneously.
If both units still have bases left they remain engaged and fight
again next turn. If a unit is attacked on the flank or rear it
may only fight with two bases during the first turn of melee.
On subsequent rounds of melee all the bases may fight.
| Weapon |
|
| Heavy Infantry & Cavalry | 5-6 |
| Infantry & Skirmishers | 6 |
| Light Cavalry | 6 |
| Heavy Cavalry & Commanders |
|
| Any vs. Skirmishers | 4-6 |
Last Stand: If a unit is reduced to one base this last base is removed immediately.
Commanders: Commanders may not be targeted individually. If they are attached to a unit they count as an extra base in melee (but not shooting). Hannibal counts as two extra bases in melee. If the unit they are attached to fights in melee or is completely eliminated by shooting roll 1D6. If the roll is a 6 then the commander is eliminated.
|
|
|
Resources