 Battle of Trafalgar (1805 AD)
Fast Play Rules for Students
Battle of Trafalgar (1805 AD)Historical Background: Battle of Trafalgar (1805)
The decisive naval battle of the Napoleonic era occurred when a British fleet of 27 ships under the commander of Admiral Horatio Nelson engaged a Franco-Spanish fleet of 33 ships. Nelson devised a daring strategy to overcome his opponents. He divided his force into two squadrons, which attacked the center of the Allied fleet at right angles. Nelson led one of the squadrons into action aboard the Victory. The plan was a smashing success. The Allied fleet was crushed, losing twenty ships. The British didn't lose any ships, but a French sniper killed Nelson. This battle ended forever Napoleon's dream of invading Britain, and the Royal Navy would dominate the seas for the next century.
Battle 1: Prior to the start of the battle the Allied fleet captains deployed their ships in a wide, disorganized column rather than the orderly battle line their admiral had wanted. The British, on the other hand, were determined to carry out Admiral Nelson's orders. Their ships were arranged in two squadrons positioned to cut the Allied line. The battle began with the British making a perpendicular approach to the Allied line with the wind at their backs.
As the British moved into cannon range the Allies opened fire. The British sailed on into the teeth of their broadsides, with the flagships Victory and Royal Sovereign leading the way. The Victory, with Nelson himself at the helm, sailed for a gap in the line but was hit by a massive broadside from the Santissima-Trinidad at close range. One of the balls must have breached the magazine, for the Victory suddenly exploded in a shower of splinters and smoke.
The British captains leading the two columns were undaunted. They sailed on, determined to mix it up with the Allies and get revenge for the death of their revered commander. They hit the line with a vengeance, using their superior seamanship to maneuver into position to rake the hapless Allied ships again and again. One by one the Allied ships struck their colors and surrendered. The Allied ships at the front of the fleet wanted to reverse course and join the savage battle taking place behind them. Some attempted to take turn to port, but had difficulty tacking into the wind. Most of the ships took the easier but slower alternative and turned to starboard.
However the strange Allied formation turned out to have some advantages as it provided a sort of defense in depth. For the British it was like sticking their heads into a hornet's nest. They were taking fire from all directions as they weaved through the Allied ships. Meanwhile the ships at the back of the British squadrons were showing a strange reluctance to follow their comrades into the thick of the battle. One group sailed about aimlessly, the other turned and sailed parallel to the Allied line, trading fire with their opponents at long range. The lead British vessels were thus robbed of reinforcements precisely when they needed them the most. They continued to flail away at the Allied ships around them, but they were taking fearful casualties, and slowly they began surrendering. At one point the Belle Isle found itself fighting alone in the middle of the Allied fleet.
The battle ended and both sides
counted their losses. The British had won the engagement, but
barely. The Allies celebrated their performance, knowing they
done much better than their counterparts at the real battle. For
the British the loss of Nelson and their failure to win a decisive
victory could have dire consequences for the future of Britain.
 Battle
2: In the second battle
the British followed Nelson's plan to the letter. Both British
squadrons hit the Allied line, decapitating it. While the head
of the Allied line struggled to come about and join the fight
it was harassed without mercy by the Africa, which successfully
engaged and dispatched three Allied ships in quick succession.
Farther back the British squadrons tore into the rest of the line,
scattering the ships. The British captains made the most of their
superiority, ruthlessly out maneuvering the Allies in a chaotic
swirling melee and raking them with murderous fire.
Battle
2: In the second battle
the British followed Nelson's plan to the letter. Both British
squadrons hit the Allied line, decapitating it. While the head
of the Allied line struggled to come about and join the fight
it was harassed without mercy by the Africa, which successfully
engaged and dispatched three Allied ships in quick succession.
Farther back the British squadrons tore into the rest of the line,
scattering the ships. The British captains made the most of their
superiority, ruthlessly out maneuvering the Allies in a chaotic
swirling melee and raking them with murderous fire.
As the Allied ships began surrendering
in bunches they realized that they would not be able to win this
battle. They were desperate to knock out at least one of the British
ships, something the Allies were unable to do in the real battle.
The captains of the Santa Anna and Heros teamed
up on the Thunderer and forced her to strike her colors.
Then the Algeciras delivered a devastating bow rake to
the unfortunate Revenge, forcing her surrender. Tonnant
and Mars were also defeated before the shattered remains
of the Allied fleet gave up the battle and attempted to flee.
This battle was a decisive British victory comparable to the historical
outcome.
Rules
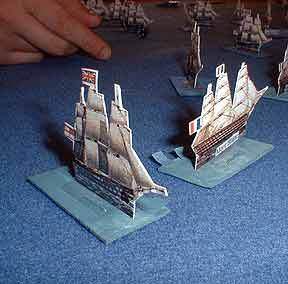
The Miniatures: Here are some paper ships you can print and use. If you don't have a good color printer try the black and white version. It can be reproduced on a photocopier and then colored by hand (a good job for the kids). If you have limited table space then their size can be reduced. If you want to identify the ships by name it would be a good idea to do this on the computer. I didn't think of this until after the ships had been printed, so I put the names on address labels and pasted them on afterwards. You'll want to identify the flagships. I did this with a gold star after their name. Ships shold be mounted on 2" x 1" bases. You'll need a way to mark the hits on the ships. The method I used was to draw circles on the bases (six for flagships, five for regular ships) and assign a couple of reliable students to mark the hits with dry erase markers. You might also try using double sided tape to attach some kind of markers, or having the kids keep a written record for their own ships.
|
British Fleet (27 ships) British North Squadron (12 ships) British Southern Squadron (15 ships) |
Franco-Spanish Fleet (33 ships) French Fleet (18 ships) Spanish Fleet (15 ships) |
 The
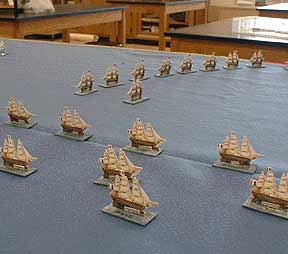
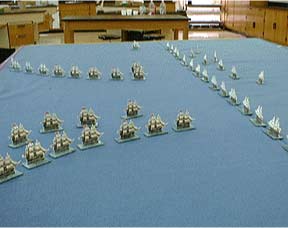
Board: I covered a 7.5' x 5' table with a blue table cloth
and used colored yarn taped around the edges to indicate the wind
direction. Green yarn marked the East and South table edges (wind
at your back, full speed). Yellow yarn bordered the North edge,
and 2/3 of the West edge (close quartered, half speed). Red yarn
ran 2.5' south from the northwest corner (can't move directly
into the wind).
The
Board: I covered a 7.5' x 5' table with a blue table cloth
and used colored yarn taped around the edges to indicate the wind
direction. Green yarn marked the East and South table edges (wind
at your back, full speed). Yellow yarn bordered the North edge,
and 2/3 of the West edge (close quartered, half speed). Red yarn
ran 2.5' south from the northwest corner (can't move directly
into the wind).
Deployment: The French and Spanish ships are deployed in an untidy line a bit west of the middle of the table starting about 6" from the northern edge extending all the way to the south edge. The ships should be 2" - 4" apart. The British are in two squadrons headed perpendicular to the Franco-Spanish line. The North Squadron should be led by the Victory and Brittania, the South Squadron is led by the Royal Sovereign. The British squadrons don't need to be in a single file column, spread them out a bit. The Africa was off by itself near the head of the Franco-Spanish fleet. When I ran this battle the second time I had a smaller group of students. I removed 1/2 of the ships from each side and every student was still able to command two ships. The battle ran smoother and easier with the smaller number of ships.
Sequence of Play:
1. Drift
2. Franco-Spanish Move
3. British Move
4. British Shoot
5. Franco-Spanish Shoot
6. Boarding Actions
Drift: Any ships that are fouled or grappled may attempt to get loose. The commander wishing to get loose rolls a die. The ships remain fouled or grappled if the rolls 1-4, they will only drift this turn. If the roll is a 5-6 the ships are freed and may move normally this turn. Both captains may roll (but not drifting wrecks), and if either is successful the ships are free. Any ships that remain fouled or grappled and any ships that surrendered on a previous turn now drift downwind 3" (SE). If a drifting ship's base hits another ship it may become fouled or grappled, see that section of the rules for the procedure.
Movement: The speed of movement depends on what direction the ship is pointing at the start of the turn. If the ship is pointing towards the green then the wind is behind the ship and it may move up to 6" and make one turn up to 90 degrees. If the ship is pointing towards the yellow it is close quartered and may move up to 3" and make one turn up to 90 degrees. If a ship is pointing towards the red then it is "locked in irons." If pass a skill check to move. French and Spanish ships need to roll a 5-6, British need to roll a 4-6. If the roll is successful the ship may move up to 3" and make one turn up to 90 degrees. If the roll fails the ship does not move. Note: ships may not turn through the red during their move. If they turn towards the red during their move the ship must end its move pointed in that direction and attempt a "locked in irons" roll next turn.
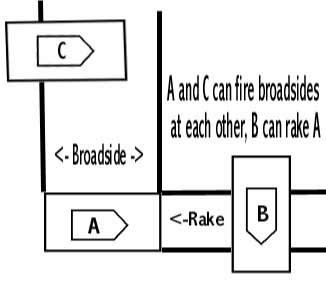 Shooting: Ships may only fire to the broadside.
This is defined as the area to the sides of the ship as defined
by the base (see diagram). Ships may only fire at an enemy ship
if part of target ship's base is in this area. British ships roll
seven dice when firing, French and Spanish ships roll five dice.
Flagships get to roll one extra die. The firing ship rolls its
dice to determine hits. Long range is 6"-12" and 6's
are required for hits. Short range is 0" - 6" and a
5-6 is a hit. A rake is defined as fire at short range from a
ship whose base is mostly in the front or rear of a ship as defined
by the target ship's base (see diagram). Raking fire hits on a
4-6. Flagships can take 6 hits, other ships can take five hits.
When a ship loses its last hit point it surrenders (strikes its
colors). This can be marked by putting some cotton on it. A ship
which has surrendered can no longer move or fire. It is not removed
from the board, however, since it will drift and can become an
obstacle. Note: each ship may only fire once per turn, and ships
may not fire through or "over" other ships, or fire
fire through narrow gaps between ships.
Shooting: Ships may only fire to the broadside.
This is defined as the area to the sides of the ship as defined
by the base (see diagram). Ships may only fire at an enemy ship
if part of target ship's base is in this area. British ships roll
seven dice when firing, French and Spanish ships roll five dice.
Flagships get to roll one extra die. The firing ship rolls its
dice to determine hits. Long range is 6"-12" and 6's
are required for hits. Short range is 0" - 6" and a
5-6 is a hit. A rake is defined as fire at short range from a
ship whose base is mostly in the front or rear of a ship as defined
by the target ship's base (see diagram). Raking fire hits on a
4-6. Flagships can take 6 hits, other ships can take five hits.
When a ship loses its last hit point it surrenders (strikes its
colors). This can be marked by putting some cotton on it. A ship
which has surrendered can no longer move or fire. It is not removed
from the board, however, since it will drift and can become an
obstacle. Note: each ship may only fire once per turn, and ships
may not fire through or "over" other ships, or fire
fire through narrow gaps between ships.
Fouling & Grappling: If at the end of the any drift or movement phase the bases of two ships are in contact there is a chance they will become entangled. If one of the ships wants to grapple the other the captain should roll one die and he is successful on a roll of 5-6. Both captains may roll to grapple, and if either or both are successful then the ships are grappled. If neither side wants to grapple, or one of the ships is a drifting wreck then there is still a chance they will become accidentally fouled. Roll one die, the ships are fouled on a 6. If two or more ships are fouled or grappled then this is indicated by placing their bases so they overlap. Fouled and grappled ships do not move (they drift) but they may fire. Ships may attempt to cut themselves loose during the Drift phase.
 Boarding
Actions: If two or more
ships are grappled together they must fight a boarding action.
Each ship may attack once, and may target any enemy ship that
is directly grappled to them. Each captain rolls one die for each
remaining hit points. Hits are scored on a 4-6. Ships that lose
their last hit point surrender. If all the ships in a boarding
action surrender on the same turn then the captain's roll one
die. The high roller is the winner (re-roll ties) and survives
with one hit point.
Boarding
Actions: If two or more
ships are grappled together they must fight a boarding action.
Each ship may attack once, and may target any enemy ship that
is directly grappled to them. Each captain rolls one die for each
remaining hit points. Hits are scored on a 4-6. Ships that lose
their last hit point surrender. If all the ships in a boarding
action surrender on the same turn then the captain's roll one
die. The high roller is the winner (re-roll ties) and survives
with one hit point.
Resources: I received some very useful suggestions and assistance from Prior Aelred Glidden, to whom I am grateful. A search of the Internet and Magweb turned up some useful resources for wargaming Trafalgar:
|
|
# Dice |
| British | 7 |
| French, Spanish | 5 |
|
|
|
|
|
To Hit |
| Long Range 6"-12" | 6 |
| Short Range 0"-6" | 5-6 |
| Rake | 4-6 |
| Start Turn Pointing at |
|
| Green | 6" |
| Yellow | 3" |
| Red | Pass Check or 0" |
|
|
|
| British | 4-6 |
| French, Spanish | 5-6 |
|
|
|
| Fouling | 6 |
| Grappling | 5-6 |
| Cut Loose | 5-6 |