Day of the Dreadnoughts - The
Battle of Jutland (1916)
Fast and Easy Rules for Students
< Home
>
By Matt
Fritz
 Historical
Background: In the early 1900's Germany began to build a fleet
of warships to challenge the mighty British navy. When World War
I began both sides anticipated a decisive battle of dreadnoughts
that would leave one side in control of the Atlantic. The two
fleets met in 1916 at the Battle of Jutland. The conflict was
marked by poor visibility and communications errors that created
confusion on both sides. The battle was not decisive. Although
Germany claimed victory her fleet was unable to defeat the British.
Unable to beat the British on the surface, Germany resorted to
unrestricted submarine warfare. This controversial decision would
hasten the entry of the United States into the war. Jutland was
the last major naval battle that was determined by the guns of
the battleships. In World War II submarines and aircraft carriers
would surpass the battleships as masters of the sea.
Historical
Background: In the early 1900's Germany began to build a fleet
of warships to challenge the mighty British navy. When World War
I began both sides anticipated a decisive battle of dreadnoughts
that would leave one side in control of the Atlantic. The two
fleets met in 1916 at the Battle of Jutland. The conflict was
marked by poor visibility and communications errors that created
confusion on both sides. The battle was not decisive. Although
Germany claimed victory her fleet was unable to defeat the British.
Unable to beat the British on the surface, Germany resorted to
unrestricted submarine warfare. This controversial decision would
hasten the entry of the United States into the war. Jutland was
the last major naval battle that was determined by the guns of
the battleships. In World War II submarines and aircraft carriers
would surpass the battleships as masters of the sea.
Battle 1: The German battle cruisers turned to fire broadside
at the fleeing British 1st Battle Cruiser Squadron while the German
dreadnoughts steamed ahead. The British ships turned to starboard,
dueling the German battle cruisers at close range. The exchange
left the British ships in ruins and the Germans lost one ship.
The German survivors headed for a showdown with the approaching
British 3rd Battle Cruiser Squadron. As the German dreadnoughts
passed they delivered the killing blows to the smoldering British
Battle Cruisers. Morale on the German fleet soared. Their battle
line turned to starboard and began firing on the approaching British
Grand Fleet from long range. Their shots were wildly off target,
and the British response was devastating. British shells pounded
the leading German ships as the lead to British dreadnought squadrons
returned fire. The third squadron steamed forward to close the
range.
The battle cruiser skirmish continued
to the North. The British commander on the Invincible,
due to an apparent communications error, was unaware of the danger
ahead and sailed straight at the German cruisers. The Germans
turned broadside and clobbered the British, destroying them while
suffering little damage. Then they turned South, determined to
help the main fleet. The German High Seas Fleet was having a bad
day and the situation was getting desperate. There was talk of
running away, but just as they were losing heart their luck turned.
Suddenly the German gunnery starting hitting their targets and
the British starting losing ships. The Germans blasted the British
but escaped with only three battleships, one of which was badly
damaged. The British were confident that their untouched third
squadron of battleships would finish the job.
The remaining British dreadnoughts
were attacked by the German battlecruisers. They tried to ignore
the pests, but the gunnery commander on board Lutzow was
having a superb day and scored damaging hits on the lead British
ship. At this point the British got confused, tried to engage
the battle cruisers, and underestimated the speed of the approaching
German dreadnoughts. As a result the Germans dreadnoughts were
able to cross their T at close range! But amazingly the Germans
blew this golden opportunity for victory with abysmal gunnery.
The British were able to turn broadside and return fire with devastating
results. The battle was a British victory. The German High Seas
Fleet was destroyed, and the British lost nearly half of their
dreadnoughts in the battle.
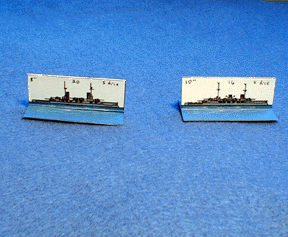
The Fleets: Right now there aren't any cheap plastic models
available in a small enough scale for this battle. Here are some
paper ships you can print and use. Ships should be mounted
on 2" x 1" bases.
The Board: The battle was fought on the open seas,
so there is no need to model any terrain features. The battle
needs a lot of room - play on the floor if this is possible. We
used two 7.5' x 5' tables set up near each other - ships were
allowed to move and fire off one table and onto the next.
Deployment: The fleets should begin as shown on the
map. The arrows indicate the direction the ships are moving at
the start of the battle. Each group of 2 - 4 ships should start
in a single file column and should move together, although this
is not mandatory. The British 1st Battle Cruiser Squadron is being
chased by the German Fleet and should start 24" from their
lead ships. The other British ships should start at least 36"
from the German fleet.

Order of Battle: This is a simplified order of battle
that does not include the cruisers, destroyers, and pre-dreadnought
battleships. The battle is meant to represent the action that
took place starting around 1700 Hrs. If you don't have enough
space for all the ships reduce the OB in half: reduce the British
battle cruiser squadrons to 2 ships each and the Germans BCS to
three ships, eliminate half of the battle ship squadron on each
side (this is how we played the battle).
|
British Grand Fleet
* = Flagship ** = Fleet Commander
3rd Battle Cruiser Squadron
3 Battle Cruisers (Indomitable, Inflexible, Invincible*)
1st Battle Cruiser Squadron
4 Battle Cruisers (Princess Royal, Lion*, Tiger, New Zealand)
Main Fleet
4 Battleships (Ajax, Centurion, Erin, King George V*)
4 Battleships (Conqueror, Monarch, Orion*, Thunderer)
4 Battleships (Iron Duke**, Canada, Royal Oak, Superb*)
4 Battleships (Bellerophon, Benbow*, Temeraire, Vanguard)
4 Battleships (Agincourt, Hercules, Marlborough*, Revenge)
4 Battleships (Collingwood, Colossus*, Neptune, St. Vincent) |
German High Seas Fleet
* = Flagship ** = Fleet Commander
5 Battle Cruisers (Derfflinger,
Lutzow*, Moltke, Seydlitz, Von der Tann)
4 Battleships (Grosser Kerfurst, Konig*, Kronprinz, Markgraf)
4 Battleships (Kaiser*, Kaiserin, Prinz-Regent Leopold, Thuringen)
4 Battleships (Friedrich der Grobe**, Helgoland, Oldenburg,
Ostfriesland*)
4 Battleships (Nassau, Posen*, Rheinland, Westfalen)
Reduce both fleets by 50% if
you don't have enough space |
 Rules
Rules
Sequence of Play:
1. Germans Move
2. Germans Shoot
3. British Move
4. British Shoot
Movement: Battleships can move 6" per turn, Battle Cruisers
can move 8" per turn. Each ship can make one turn of 90-degrees
or less during its move.
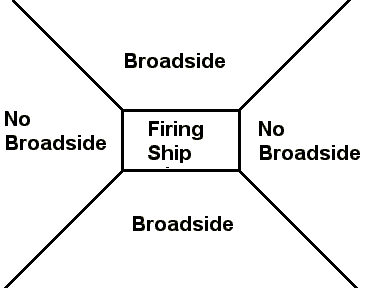
Shooting: Each ship may fire at one enemy ship .
Battleships and Battle Cruisers have a range of 36." The
broadside of a ship is the area to the side of the ship defined
by 45-degree lines from each corner of the base. When firing a
broadside Battleships roll 5 dice, Battle Cruisers roll 4 dice.
When firing ahead or behind Battleships roll 2 dice, Battle Cruisers
froll 1 die. Ships score hits on the target for every roll of
5 or 6 at close range (less than 18"), or rolls of 6 at long
range (up to 36"). Ships do block line of sight for purposes
of firing, so you can't fire over a ship to hit a more distant
ship.
Firing at Same Ships: It was more difficult to score hits on
a target if more than one ship was firing at it. Each ship that
fires at a target after the first rolls one less die. For example
the first ship to fire at a target rolls the normal number of
dice. If a second ship fires at it on the same turn it rolls one
less die. If a third ship fires at the same target it rolls two
less dice than normal.
Hits: Battleships are eliminated if they receive five
hits, Battle Cruisers are eliminated with three hits. Hits can
be recorded on the base with markers or small counters. We used
small cotton balls. When a ship is eliminated roll one die. If
the roll is 1 - 3 it sinks, remove it from the table. If the roll
is 4 - 6 it is still afloat (but abandoned and on fire) so it
stays on the table and is an obstacle for movement and shooting.
Optional Rules (suggested by John Palomino)
Time Limit: The battle began late in the day. Poor
visibility and darkness were important factors in the battle.
End the battle after 16 turns.
Victory Conditions: To determine the winner after the battle
total up the number of hits inflicted by each side. The side that
inflicted the most damage on the opposing fleet is the victor.
Movement and Shooting
|
Ship Type |
Speed |
# Firing Dice |
Hits to Eliminate |
|
Broadside |
Ahead / Rear |
|
Battleship |
6" |
5 |
2 |
5 |
|
Battle Cruiser |
8" |
4 |
1 |
3 |
Gunnery Table
|
Range |
<18" |
18" - 36" |
|
Miss |
1 - 4 |
1 - 5 |
|
Hit |
5 - 6 |
6 |
Eliminated Ships:
1 - 3 Sinks (remove)
4 - 6 Burning (leave on table) |
< Home
>
Resources
- "Fear God and Dread Nought,"
simple rules sent to me by Rev. Aelred Glidden which were the
basis for this scenario
- Jutland 1916 - Clash of the
Dreadnoughts by Charles
London, Osprey Campaign Book #72
- "Easy Ships - Simple Naval
Battle Rules" by Mike Fischer
- "GUNFIR(E) - SImple Naval
Battle Rules" by Mike Fischer (simpler than "Easy Ships")
- "Dreadnought - Turn of
the Century Naval Rules" by Andy Watkins
- "World War I and II Naval
Rules" by Steve Burt
- "There's Something Wrong
with Our Bloody Ships Today" rules by Tony Cullen