SINK THE BISMARCK!
TEAM RULES
< Home
>
By Pete Pellegrino
(Naval War College)
 Game Description: Sink the Bismarck! is based upon the
Battle of the Denmark Straits, May 1941. The game is designed
to be played by a team or 'Flag Staff' determining the actions
of each ship in their force. The Flag Staff can consist of any
number of players; though recommend not more than 8 - 10 per staff.
The staff must have one Admiral in charge of the staff and acting
as commander of one ship, and a Flag Captain, commanding the second
ship. The remainder of the staff is divided among three departments;
the Navigation Department (NAV DEPT) responsible for ship movements,
the Engineering Department (ENG DEPT) responsible for battle damage
repairs and generating smoke screens, and the Operations Department
(OPS DEPT) responsible for guns, torpedoes, and air operations.
Each department executes its duties through the use of 'action
cards' which they hold. These cards are described below.
Game Description: Sink the Bismarck! is based upon the
Battle of the Denmark Straits, May 1941. The game is designed
to be played by a team or 'Flag Staff' determining the actions
of each ship in their force. The Flag Staff can consist of any
number of players; though recommend not more than 8 - 10 per staff.
The staff must have one Admiral in charge of the staff and acting
as commander of one ship, and a Flag Captain, commanding the second
ship. The remainder of the staff is divided among three departments;
the Navigation Department (NAV DEPT) responsible for ship movements,
the Engineering Department (ENG DEPT) responsible for battle damage
repairs and generating smoke screens, and the Operations Department
(OPS DEPT) responsible for guns, torpedoes, and air operations.
Each department executes its duties through the use of 'action
cards' which they hold. These cards are described below.
During each turn, or hand, only
up to two departments may contribute to the four action cards
forming the hand for each ship. These four cards are placed next
to the ships face down. Each round a ship commander turns over
a card from the hand and the actions resolved. The commanders
may, based on the course of events, change the order of the remaining
cards to the played, or declare emergency maneuvers (see Optional
Rules), however they cannot consult any other member of the staff
unless using the Send Signals Card (see below). As play progresses,
game umpires may wish to shorten the time available for hand selection.
The game can be played with either paper or model ships of various
sizes on a large table top or floor. Scale can be set to whatever
units are convenient for play; all movement and hit probability
charts are based on generic 'unit distances.' One unit can equal
1 inch, 1 foot, 1 yard or any other unit of length which suits
the dimensions of the playing area. For table top play, 6 inches
per unit is recommended. For floor play, 1 foot per unit can be
used.
To simulate the pace of combat
operations, admirals and their staffs have only three minutes
to select and order all their cards. If any ship's commander is
not ready at the end of the three minutes, play begins with the
ready commanders. Once the late commander is ready, he may join
the battle at the next round; however he forfeits the opportunity
to play a card from any round his missed.
Historical Scenario Notes: In May 1941, Bismarck and Prinz
Eugen had broken out of the North Sea and were attempting to reach
the open waters of the Atlantic while evading the British Royal
Navy. Passing between Greenland and Iceland, the German ships
were finally intercepted by HMS Hood and HMS Prince of Wales.
As the ships exchanged salvos, HMS Hood was struck with the round
penetrating her upper decks and setting off a cataclysmic explosion
which destroyed the ship. Only three crew members survived.
After the destruction of Hood,
Bismarck and Prinz Eugen escaped to the south east toward France.
Prinz Eugen detached and proceeded into the Atlantic to hunt Allied
commercial shipping, while the Royal Navy continued to pursue
Bismarck. Swordfish torpedo planes from HMS Ark Royal and HMS
Victorious launched several attacks against Bismarck, with the
final damaging her rudders and essentially immobilizing her. Four
British warships closed on the crippled Bismarck, among them the
battleships HMS King George V and HMS Rodney, to finally sink
Bismarck.
Playtest Battle Part 1: The HMS Prince of Wales and HMS Hood sailed
directly towards the Prinz Eugen and Bismarck. Bismarck turned
to face the attackers, but the Prinz Eugen continued to steam
ahead. Hood turned to chase the Prinz Eugen and the battle developed
into a pair of one-on-one duels. Bismarck and Prince of Wales
closed to point blank range before both turned and sailed alongside
each other exchanging broadsides. It was deadly work. In mere
moments both ships had suffered serious damage. Prince of Wales
lost 2 of her three guns, and Bismarck was reduced to just two
functioning turrets. A torpedo struck the Bismarck but failed
to detonate, sparing her further damage. The Hood was not so lucky.
Prinz Eugen crossed her T as she tried to dash into close range.
She lost three of her turrets to accurate fire from the Prinz
Eugen before she could turn broadside and start returning fire.
It was already too late. Prinz Eugen left her dead in the water,
escaping with light damage from Hood's guns and a torpedo hit.
Playtest Battle Part 2: Morale was low on board the Bismarck.
She had just two functioning turrets, and one of those was damaged.
The HMS King George V and HMS Rodney were steaming in her direction.
The Captain rallied his men for the task ahead just as a lookout
reported Swordfish torpedo planes were attacking the ship. "Turn!
Turn!" was the order from the Captain. One Swordfish was
shot down but the other dropped her torpedo at close range. The
crew watched in relief as it narrowly missed the ship. King George
V and Rodney split up to maneuver around a minefield Bismarck
has left directly in their path. This initiated a spirited discussion
on the Bismarck. The Executive Officer urged the Captain to seize
the opportunity and attack King George V before the Rodney could
come to her aid. The Captain overruled him, reasoning that the
Bismarck was too weak to destroy the King George V quickly enough
to make the strategy work. Instead he decided to put up a smokescreen
and try to dash through their minefield. HMS Rodney caught up
to Bismarck and pounded her with accurate gunnery, score hits
on the boiler. Bismarck slowed to a crawl, allowing King George
V to catch up and join in the mauling. Soon Bismarck had lost
all her guns and she was almost dead in the water, with a fire
raging on deck. Rodney and King George V decided to steam into
point blank range to finish the kill. It was madness. The Bismarck's
Captain insisted that all the torpedoes must be fired before they
abandoned ship. The order was carried out, and four torpedoes
streaked towards Rodney and King George V. It could have been
a catastrophe for the British, but three of the four torpedoes
were duds. As the Bismarck slipped under the water forever the
British began searching for survivors.
 Ships and Planes: You can download the ships and planes as a PowerPoint
file Ships.ppt or as sixteen GIF files
ship1.gif, ship2.gif,
ship3.gif, ship4.gif,
ship5.gif, ship6.gif,
ship7.gif, ship8.gif,
ship9.gif, ship10.gif,
ship11.gif, ship12.gif,
ship13.gif, ship14.gif,
ship15.gif, ship16.gif.
Slides / GIF Files 1-9 are for use on large floors, 10-16 are
scaled for table top play. 1-10 just fold into tents. 11-16 fold
into "tents with feet" which form the base. (A curse
with PowerPoint. If you don't have the same font sets that were
used to build the slide, your computer will use some other font,
which may change the alignment and spacing on a slide.).
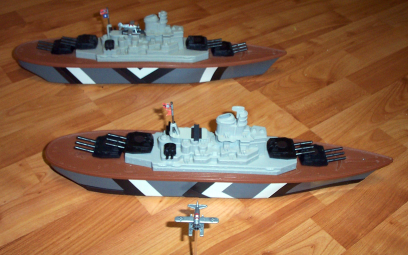
You can
also use plastic models, which are unfortunately rather fragile. Another
option are Strombecker toy battleships manufactured in the 1970s and 80s.
Made for rough wet or dry play, the 19 inch ships are made of plastic and are
fairly rugged. While not strictly accurate
for the ships of the period, they have been individually modified to resemble
their historic counterparts, at least with regard to number and placement of
turrets, number of smoke stacks and use of scout planes. Magnets can be
discreetly added to the ship in order to hold damage markers in place during
rough seas and violent maneuvering.
The scout planes
(and torpedo planes, when used) can be modeled using modified Micro Machines toys which are
either carried by their respective battleships on magnetized catapult tracks, or
are mounted atop four inch acrylic flight stands when flying about
Ships and Planes: You can download the ships and planes as a PowerPoint
file Ships.ppt or as sixteen GIF files
ship1.gif, ship2.gif,
ship3.gif, ship4.gif,
ship5.gif, ship6.gif,
ship7.gif, ship8.gif,
ship9.gif, ship10.gif,
ship11.gif, ship12.gif,
ship13.gif, ship14.gif,
ship15.gif, ship16.gif.
Slides / GIF Files 1-9 are for use on large floors, 10-16 are
scaled for table top play. 1-10 just fold into tents. 11-16 fold
into "tents with feet" which form the base. (A curse
with PowerPoint. If you don't have the same font sets that were
used to build the slide, your computer will use some other font,
which may change the alignment and spacing on a slide.).
You can
also use plastic models, which are unfortunately rather fragile. Another
option are Strombecker toy battleships manufactured in the 1970s and 80s.
Made for rough wet or dry play, the 19 inch ships are made of plastic and are
fairly rugged. While not strictly accurate
for the ships of the period, they have been individually modified to resemble
their historic counterparts, at least with regard to number and placement of
turrets, number of smoke stacks and use of scout planes. Magnets can be
discreetly added to the ship in order to hold damage markers in place during
rough seas and violent maneuvering.
The scout planes
(and torpedo planes, when used) can be modeled using modified Micro Machines toys which are
either carried by their respective battleships on magnetized catapult tracks, or
are mounted atop four inch acrylic flight stands when flying about
Status Sheets:
You can download the status
sheets as a PowerPoint file sheets.ppt
or as six GIF files sheet1.gif, sheet2.gif,
sheet3.gif, sheet4.gif,
sheet5.gif, sheet6.gif.
You can laminate the status sheets, or print new ones for each
game.
Game Card Decks:
. Each ship will
need one complete card deck, with the exception that no Swordfish
cards are needed for the German decks. The cards are designed
to be double printed on card stock. Alternately, the face of the
cards can be printed on white paper, adhesive or label paper and
fixed to pre-cut red and blue colored card stock blanks. In this
case, simply write a '1' or '2' on the backs to distinguish the
decks. You can download the decks as a PowerPoint file Deck.ppt
or as 30 GIF files: deck1.gif, deck2.gif,
deck3.gif, deck4.gif,
deck5.gif, deck6.gif,
deck7.gif, deck8.gif,
deck9.gif, deck10.gif,
deck11.gif, deck12.gif,
deck13.gif,
deck14.gif, deck15.gif,
deck16.gif, deck17.gif,
deck18.gif, deck19.gif,
deck20.gif, deck21.gif,
deck22.gif, deck23.gif,
deck24.gif, deck25.gif,
deck26.gif, deck27.gif,
deck28.gif, deck29.gif,
deck30.gif
Gun Card Decks:
. You can download the Gun Card Deck as a PowerPoint file
guncards.ppt or as
or as 10 GIF files: gun1.gif, gun2.gif,
gun3.gif, gun4.gif,
gun5.gif, gun6.gif,
gun7.gif, gun8.gif,
gun9.gif, gun10.gif.
,
NAV DEPT CARDS:
Movement (3 Ahead, 3 Turn per
deck)
1. Ahead Full: Ships move
1-2 units forward per Ahead Card (see Optional Rules for Ahead
Flank rules).
2. Turn: A "turn" is any movement other than
straight ahead. Ship moves ahead 1 unit, rotates a maximum of
90 degrees, then 0-1 units forward on new heading.
3. If movement results in a collision, both ships receive
hull damage equal to a torpedo hit.
4. Movement Cards may be reused.
OPS DEPT CARDS:
Fire Main Batteries(3-4 per deck)
1. A Main Guns Card can
be played anytime. All operational turrets able to aim at the
target fire a single salvo per card played.
2. If both ships fire guns, action occurs simultaneously.
3. Gun attacks can be made against scout planes (3 units
max range) or enemy ships (10-12 units max range, depending on
ship).
4. Roll the number of six sided dice (d6) equal to the
number of operating gun turrets able to aim at the target (If
target is within plus or minus 45 degrees of the bow or stern,
only the forward or aft guns respectively can be fired. Targets
within plus or minus 45 degrees of the beam can be fired at by
all guns). Each turret can engage only one target per salvo, though
different turrets may fire at different targets in the same action.
5. If a hit is scored, roll 1d6 to determine location of
hit (see Hit Zone Cards).
6. Fire Main Batteries Cards may be reused.
Torpedo Attacks (4 per deck):
1. A Torpedo Attack Card
must be used as the first card of a turn. No more than two torpedoes
(aerial or ship) can be launched per hand.
2. A Torpedo Marker is placed in the water next to the shooter. See below for Swordfish aerial launched torpedoes.
3. Torpedoes have a maximum range of 5 units.
4. At the end of the hand, any Turn Cards used by the targeted
ship and final distance between the torpedo's launch point and
the targeted ship determines outcome (see Torpedo Hit Chares).
Each torpedo is evaluated separately. While a torpedo may physically
hit the target, it may not properly fuse and detonate. Roll 2d6
to determine if torpedo explodes (2-8 explodes, 9-12 dud).
5. Once used, the Torpedo Attack card is discarded.
- Scout Plane Operations (3 per deck)
1. A scout plane has unlimited range as soon as it is launched
(i.e.: can fly to the other battleship in the same hand it is
launched.)
2. A scout plane must be within 3 units of the target to
be able to pass spotting information. A scout plane may spot for
more than one ship.
3. Once launched and initially positioned, another Scout
Plane Ops card is needed for each repositioning or return of the
plane to the ship.
4. If damaged by ant-aircraft fire, the plane cannot spot
until recovered, repaired, and launched again.
- 5. Scout Plane Ops Cards may be reused.
ENG DEPT CARDS:
Lay Smoke Screen (2 per deck)
1. Decreases enemy's chances
of hitting with guns. Subtracts 1 from the shooter's "To
Hit" die roll (e.g. if at a distance of 4 units, shooter
needs a 4-6 to hit. If smoke screen is obscuring target, shooter
now needs 5-6 to hit. Roll requirements greater than 6 are automatic
misses.)
2. Remains in effect from moment played till end of hand
3. No effect on torpedo attacks or mines.
4. Once used, the Smoke Screen Card is discarded.
- Call Away Repair Team
(4 per deck)
1. Battle damage results
in cards being temporarily or permanently removed from the decks.
Cards are first removed from the deck, i.e. cards not in the hand
being currently played. If no cards remain in the deck but are
held by the player in his hand, then they are removed from the
hand. If the damaged is repaired, the appropriate cards are returned
to the decks.
2. Scout Planes: If damaged, immediately remove all Scout
Plane Ops Cards from the deck/hand. If destroyed, permanently
discard. One Repair Card to fix.
3. Gun Turrets: Two gun hits permanently disables a gun
turret. Additional hits to a disabled turret have no effect. For
each turret disabled, surrender one Main Gun Attack Card from
that ship's deck. Guns cannot be repaired.
4. Boilers: For each hit to the superstructure/boiler,
surrender one Movement Card from that ship's deck. Two Repair
Cards to fix.
5. Fire: If a boiler has taken six unrepaired hits, the
seventh starts a fire. The fire must be put out before any repairs
to restore Movement Cards. Two Repair Cards extinguish the fire.
If the fire is not put out, the eighth boiler hit sinks the ship!
6. Hull: Each torpedo, mine or collision removes any three
Movement Cards from the deck. Three Repair Cards to fix.
7. Repairs are cumulative (e.g. to fix a boiler, play either
1 Repair Card per hand for 2 hands, or 2 cards in 1 hand.) Damage
and repairs are tracked on appropriate Status Sheets. Once the
required number of Repair Cards has been played, Scout Plane Operations
Cards or Movement Cards (1 Movement Card for each completed boiler
repair, 2 for each hull repair) are returned to the deck for use
during the next hand.
8. Repair of torpedoes, mine, or collision damage only
arrests flooding and restores movement. Resultant buoyancy instability
remains; therefore one Movement Card is permanently discarded
(i.e. lose 3, repair restores 2) and ship can only withstand two
hits total, regardless of repair status. Third hit sinks the ship!
- 9. Call Away Repair Team Cards may
be reused.
-
- Deploy Mines (2 per deck)
1.
One German
and one British ship are capable of laying mines. Mines are laid by
dropping a Mine Filed Marker into the same square as the mine layer
currently occupies. If a second Mine Field Marker is laid up to 5 squares
away a Mine Barrier is formed in a straight line between the two markers.
Otherwise a Mine Field Marker is effective only in the square it occupies.
- 2. An enemy ship passing through a mine barrier rolls 2d6.
A roll of 1-9 indicates the ship has struck a mine, which is treated
the same as torpedo damage. A of the same side can pass safely
through his own mine field.
3. Mines cannot be swept or otherwise moved once deployed.
- 4. Once played, the Deploy Mines
Card is discarded.
SPECIAL CARDS:
 Send
Signals (1 per deck)
Send
Signals (1 per deck)
1. During normal play,
once the hand has been selected and put into play, neither the
Admiral or nor Flag Captain can confer with any other member of
the staff while turning over cards. It is his sole decision if
he wants to change the order of cards remaining, or declare emergency
maneuvers (see Option Rules).
2. However, each ship commander (Admiral and Flag Captain)
holds one Send Signals Card. At any time the commanders wish to
'send a signal' to their staff and reconsider the move, they may
play the Send Signal Card.
3. Once played, the Flag Staff has one minute to confer,
and may change any of the unplayed cards remaining in their hand.
Any changes must conform to the limitation of no more than two
department class of cards in play in one hand.
4. While one Flag Staff is meeting, the opposing Flag Staff
cannot help their commanders unless they also play their Send
Signals Card.
5. Once played, the Send Signals Card is discarded.
Swordfish
Air Attacks (1 per deck)
1. TMust be played as first card of the
first hand by the British players in the second half of an extended game.
If playing both ship and aerial torpedoes in the same hand, aerial attacks are
played first.
2. Bismarck automatically defends with anti-aircraft fire (as long as at
least one gun turret is operational). Roll 1d6: 1-2 miss and attacker penetrate
defenses and launches its torpedo 2 units away from the target, 3-4 damages the
aircraft and forces it to launch its torpedo from 4 units away, 5-6 shoots down
attack
3. Place a Torpedo Marker to indicate the point of attack.
Score same as Torpedo Attacks above.
4. Once used, the Swordfish Attack Card is discarded.
Sequence of Play
Battle 1: Set Prinz Eugen at one end of the play area heading
south west with Bismarck 4 units behind on the same courses. Place
HMS Hood south east of Prinz Eugen at a range of 15 units, heading
north west. Place HMS Prince of Wales on a parallel course one
unit off HMS Hood's starboard beam. Remove the Swordfish Attack
Card from the British decks. All scout planes begin on deck. At
the end of each hand, if HMS Hood was hit at any time during that
hand, roll one additional 1d6. A roll of 6 indicates Hood has
exploded and sunk. As HMS Hood historically was sunk six minutes
into the engagement, this phase of the battle ends with the sinking
of the Hood or 5 hands, which ever occurs first.
Battle 2: To set the game conditions for the second half
of the battle, place Bismarck at one end of the play area heading
north west. Fifteen units off Bismarck's bow place HMS King George
V with a south east heading. Place HMS Rodney on a parallel course
one unit off HMS King George V's port beam. All scout planes begin
on deck. Bismarck's status remains as it was at the end of the
previous battle (damage, ammo expended, fuel remaining, etc.)
while HMS King George V and HMS Rodney start with fresh Status
Sheets. Remove the Ahead Full cards from Bismarck's deck. Bismarck
can only execute standard or hard over turns to the left (see
Optional Rules for Flank and Hard Over descriptions). Return one
Swordfish Attack card to each of the two British ship card decks.
One the first hand, the British players must each play their Swordfish
Attack Cards.
 |
 |
To Start
1. Game requires four six sided dice.
2. Select appropriate measurement tools for each side (rulers
or measuring tapes).
3. A clock or timer set for three minutes.
4. Determine rules in use (see Optional Rules).
5. Position ships. Scout planes are on ships to start.
6. Distribute a Status Sheet and pencils or, if Status Sheets
are laminated, dry erase markers, for each ship.
7. Distribute card decks, one per ship.
8. Lay mine fields.
 Planning
Phase
Planning
Phase
1. Staff selects four cards for each ship.
2. Cards are placed next to ship.
3. Time limited to three minutes.
Less Than Four Cards
1. If a ship has less than four cards in a hand, either due to
battle damage limits or tactical choice, simply play the cards
until none remain, and the other ships continue to play cards
until all have been turned over.
Execution Phase
1. Ship commanders turn over first cards. Play any Torpedo Attacks
(air/ship) first. If successfully launched, place Swordfish Attack
Card or Torpedo Attack Card at launch point. Card Precedence to
determine which card to resolve first in a pair is (in case of
tie, events are simultaneous):
Swordfish Attack
Torpedo Attack
Smoke Screen
Main Guns
Scout Plane Ops
Any Movement Card
Repair Card
2. Decrease optional ammo/fuel counters as required.
3. Play next card round.
4. Continue until all actions have been played. Commanders may
change order of cards after each action.
5. After last card of hand is played, resolve torpedo hits.
6. Return to Planning Phase.
Winning
Team inflicting
the most damage in the time allotted wins. Points shall be awarded accordingly:
| Enemy vessel sinks
(3 torpedo/mine hits or 8 un-repaired superstructure/boiler
hits): |
25 points |
| Each
un-repaired torpedo or mine hit: |
3 points |
| Each repaired
torpedo or mine hit: |
2 points
|
| Each destroyed
turret: |
2 points |
| Each fire burning:
|
2 points |
| Each damaged
turret: |
1 point |
| Each un-repaired
superstructure hit: |
1 point |
| Scout plane
destroyed: |
1 point |
Ship Characteristics: The British and German ships had varying
degrees of armor, gun caliber, fire control systems, and speed.
To reflect these differences, adjustment factors are given below
for each vessel.
|
|
Bismarck |
Prinz Eugen |
Hood |
Prince of Wales King
George V |
Rodney |
|
Max Gun Range |
11 |
10 |
11 |
10 |
12 |
|
Fire Control |
+1 |
0 |
+1 |
0 |
+2 |
|
Flank Speed |
4 |
5 |
4 |
3 |
0 |
|
Armor |
-2 |
0 |
0 |
-1 |
-2 |
|
Scout Plane |
Yes |
Yes |
No |
Yes |
Yes |
Fire Control and Armor values
are applied against one another, then added or subtracted to the
shooter's To Hit dice roll. For example, HMS Hood is firing at
Bismarck from a range of 6 units. Hood's fire control advantage
(+1) against Bismarck's armor (-2) results in a net -1 adjustment
to the shooter's rolls. Using the 11 Unit Max Range Table for
HMS Hood, at 6 units distance, hits are scored with a roll of
4 or better. With the adjustment, HMS Hood now needs a 5 or better
to hit.
Flank Speed: If playing Maneuver Speed/Limited Fuel
rules, the Flank Speed number represents the maximum number of
units the ship may travel straight head when declaring Flank Speed.
There is no change to the Hard Over values, i.e. all ships (with
the exception of Rodney) move over 3 units when executing a Hard
Over Turn. Fuel consumption also remains the same, i.e. 2 fuel
units for every unit transited at Flank Speed or Hard Over. HMS
Rodney was underpowered for the weight of armor and guns she carried.
As such, Rodney is limited to standard speeds at all times and
cannot use Flank Speed or Hard Over Turns.
Optional Rules:
Limited Gun Ammunition
1. One salvo from one turret = 1 Ammo Unit.
2. Each time a turret fires, color in one Ammo Unit on the Status
Sheet.
Limited Fuel
1. Ships burn 1 fuel unit every hand, separate from any other
fuel demands (even when stationary).
2. Each distance unit transited requires 1 additional unit of
fuel.
3. After each maneuver, color in Fuel Units burned on the Status
Sheet.
Emergency Maneuvers
1. A commander can elect to declare that a straight ahead move
is being conducted "AHEAD FLANK." This increases the
straight ahead range to 3, 4 or 5 units, depending on the ship,
but doubles fuel consumption per unit (2 fuel units/unit traveled).
2. Likewise, a turn can be conducted as "HARD OVER."
The turn is executed as follows: 1 unit ahead; rotate 45 degrees,
advance 1 unit, rotate a second 45 degrees in the same direction,
followed by 1 final unit ahead. Fuel consumption is 2 fuel units/unit
traveled (6 units of fuel). For turn counting purposes when determining
torpedo hits, a "HARD OVER" turn counts as two turns.
3. Based on an enemy's action, the commander can change a previously
declared maneuver from standard to flank or hard over before the
maneuver has been executed. For example, on the first round of
cards played in a hand, Team 1 plays a Turn Card and declares
it to be a right standard turn, and Team 2 launches a torpedo.
The Team 1 commander can make an emergency call and change both
the direction and speed of the turn to left HARD OVER in an attempt
to evade the torpedo.
10 Range Gun Hit
|
10 |
Distance (grids) |
|
D6 |
1 |
2 |
3 |
4 |
5 |
6 |
7 |
8 |
9 |
10 |
|
1 |
|
|
|
|
|
|
|
|
|
|
|
2 |
|
|
|
|
|
MISS |
|
|
|
|
3 |
|
|
|
|
|
|
|
|
|
|
|
4 |
|
|
|
|
|
Hit With |
|
|
|
5 |
|
|
HIT |
|
|
|
Scout |
|
|
6 |
|
|
|
|
|
|
|
|
|
|
|
Anti-Aircraft Fire
|
1 |
Miss |
|
2 |
Miss |
|
3 |
Damaged |
|
4 |
Damaged |
|
5 |
Shot Down |
|
6 |
Shot Down |
|
11 Range Gun Hit
|
11 |
Distance (grids) |
|
D6 |
1 |
2 |
3 |
4 |
5 |
6 |
7 |
8 |
9 |
10 |
11 |
|
1 |
|
|
|
|
|
|
|
|
|
|
|
|
2 |
|
|
|
|
|
|
|
MISS |
|
|
|
3 |
|
|
|
|
|
|
|
|
|
|
|
|
4 |
|
|
|
|
|
|
Hit With |
|
|
|
5 |
|
|
HIT |
|
|
|
|
Scout |
|
|
6 |
|
|
|
|
|
|
|
|
|
|
|
|
Repairs
|
Cards |
|
Scout Plane |
1 |
|
Boilers |
2 |
|
Fire |
2 |
|
Hull |
3 |
|
12 Range Gun Hit
|
12 |
Distance (grids) |
|
D6 |
1 |
2 |
3 |
4 |
5 |
6 |
7 |
8 |
9 |
10 |
11 |
12 |
|
1 |
|
|
|
|
|
|
|
|
|
|
|
|
|
2 |
|
|
|
|
|
|
|
MISS |
|
|
|
|
3 |
|
|
|
|
|
|
|
|
|
|
|
|
|
4 |
|
|
|
|
|
|
|
Hit With |
|
|
|
5 |
|
|
HIT |
|
|
|
|
|
Scout |
|
|
6 |
|
|
|
|
|
|
|
|
|
|
|
|
|
|
Torpedo / Mine Attack
|
Distance (grids) |
|
T |
|
1 |
2* |
3 |
4* |
5 |
6 |
7 |
8 |
|
U |
0 |
|
|
|
|
|
|
|
|
|
R |
1 |
|
|
|
|
|
|
|
|
|
N |
2 |
|
|
|
|
Roll 2D6:
9 - 12 Dud |
|
S |
3 |
|
|
|
|
|
* Values for use with Swordfish |
|
|
< Home
>
Online Resources