 Rules
RulesHistorical Background: The first English Civil War (1642 - 1645) was a power struggle between King Charles I and his Royalist supporters on the one hand, and Parliament and its supporters on the other. At the battle of Naseby (1645) the Parliamentarian New Model Army scored a major victory, thanks in large part to the exploits of Oliver Cromwell's cavalry. With his army on the brink of defeat King Charles was prepared to personally lead his reserves into battle. A subordinate asked the King "Will you go upon your death?" The King decided to retreat instead of continue the fight. This defeat effectively ended the hopes of the Royalists. The first English Civil War ended with the Parliamentarians in control of England. Charles became a prisoner, and was executed in 1649. In 1653 Oliver Cromwell took control of the country as Lord Protector. After Cromwell's death in 1658 a new power struggle led to the restoration of the monarchy under Charles II. Although a King was put back on the throne, the monarchy would never be the same. England was on the path to democratic rule.
Battle Report: Fairfax and his commanders look at the army of King Charles and realized they had a numerical advantage. They decided to launch an all out attack to overwhelm the enemy. The cavalry rode our on the wings and the infantry trudged forward. Cromwell and his ironsides slammed into their opponents. After a brief but ferocious battle they routed the enemy and captured Langdale. On the other flank Ireton and Rupert clashed. The dragoons hidden behind the hedge opened fire on Rupert's second line, tipping the balance in favor of the Parliamentarians. King Charles had no choice but to send in his reserves to try and stabilize the situation. In the center the infantry began a slugfest. Casualties mounted rapidly on both sides. The Royalist reserves were not enough to reverse the tide of battle, and the Parliamentarians won a decisive victory.
Rules
The Miniatures: You can find 1/72 scale plastic figures from this battle from A Call to Arms, and Revell's Thirty Years War sets. Mounted commander were based individually, all figures were mounted two per stand. The cavalry were mounted on a 1.5" square base. Mounted commanders, musketeers, pikemen, and artillery crews were mounted on bases 1.5" wide by .75" deep. Here are some paper soldiers you can print and use.
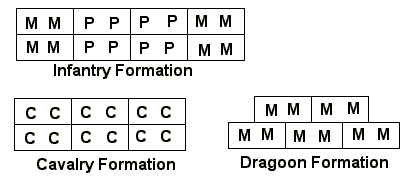
Formations: Cavalry are six bases in a double rank line. Dragoons fought on foot so they can be represented by five musketeer bases in a double rank line (3 in front, 2 in back). You can put a horse holder figure with the dragoons, but it isn't necessary. Infantry are eight bases in a double rank line. Four pike bases are in the middle, and two musketeer bases are on each end.
|
Royalist Army King Charles I (Overall Commander) Left Wing: Center: Right Wing: |
New Model Army (Parliamentarian) Sir Thomas Fairfax (Overall Commander) Left Wing: Center: Right Wing: |
The Board: A 7.5 X 5 foot table was used. The only terrain feature that should be modeled is the hedge
Deployment: Both sides deploy as indicated in the diagram and order of battle. All units must start at least 18" from the enemy except the dragoons (see below).

Sequence of Play:
1. Parliamentarians Move
2. Parliamentarians Shoot
3. Royalists Move
4. Royalists Shoot
5. Charge
6. Melee
Movement: All cavalry, dragoons, and commanders move 12". Infantry move 6". Cannons can not move. Units cannot move closer than 1" to the enemy except when charging.
Shooting: Cavalry can shoot 3", musketeers and dragoons can shoot 12". Units may only shoot at enemy targets in front of them. If the wish to shoot at a target to the side they are only allowed to fire with two bases. They may not fire to the rear at all. Roll 1D6 per stand and remove one enemy base for each 6 rolled. Pike bases may not fire. If any unit in a formation is in range then all the bases in the formation may fire if they are not pike bases. Cannons have unlimited range and roll 2D6 per cannon, hitting on a 6. Cannons cannot fire between friendly units unless they have at least a 3" gap, they may not fire over units. Once a unit has fought a round of melee they may not shoot, or be shot at, until the melee is finished (note this means that both sides can shoot at each other during the turn that the units move into contact, but not on subsequent turns if the melee continues past the first round).
Cannons: Rules for cannons are include in this scenario, but the cannons didn't have any significant impact on the battle. For this reason they are not included in the order of battle. If you want to include cannons you can give each side 4 of them and deploy them with the infantry in the center.
Charge: Units may charge the enemy only if they can reach an enemy unit with their charge move. Cannons may not charge. Infantry can charge 6", cavalry and dragoons can charge 12". Both sides make their charges at the same time. If it matters, the Parliamentarians charge first. When a unit charges it is moved into contact with the enemy unit.
Melee: Enemy units that come into contact after a charge are locked in melee. All stands in a formation participate in the melee (unless hit on the flank or rear, see below). Roll 1D6 for each base and commander in the melee. Both sides should roll at the same time. Musketeers and Dragoons hit on a roll of 6, pikemen hit on a roll of 5 or 6. Cavalry hits on a 4, 5 or 6 on the first round of melee. If the melee continues after the first round then the cavalry hit on a 5 or 6. Commanders involved in a melee always hit on a roll of 4, 5, or 6. Cannons do not fight in melee. If they are contacted by a charge they are eliminated without a fight. If both sides still have bases remaining they remain locked in melee and cannot move or shoot. The survivors will fight again in the next melee phase. If a unit is fighting a melee with more than one enemy unit each base still only gets to roll once, they don't get to roll to hit each enemy unit. The commander can choose to divide his hits against the enemy units in any way he chooses.
Flank and Rear Attacks: If a unit is charged on its flank or rear it's ability to fight back is limited on the first turn of melee. A unit charged on the flank can fight back with only two bases. A unit charged in the rear can not fight back at all. On the following turns the unit can change facing and fight with all its surviving bases.
Removing Casualties: When a unit is reduced to a single base this last base is automatically removed. When an infantry unit takes hits the bases removed should be split evenly between pikemen and musketeers.
Commanders: Commanders are represented by single cavalry figures on white horses. They may join a unit during movement or charges to help them in melee. A unit with a commander attached rolls an extra die in melee and the commander hits on a 4, 5, or 6. Commanders participating in a melee can become casualties. Roll 1D6 after the melee rolls, he is a casualty on a roll of 6. This is the only way that a commander can be eliminated, they may not be shot or attacked in melee if they are not with a regular unit.
Dragoons Behind the Hedge: The Parliamentarians deployed some dragoons behind the hedge which was on Prince Rupert's right flank. The hedge is an impediment to movement. Units may move and shoot through the hedge, but they cannot charge through it. The dragoons can be considered to be concealed and left off the table until they shoot or move, and reveal their presence.
Resources: This scenario was developed with several useful suggestions from Reverend Aelred Glidden. A search of the Internet, library, and Magweb, turned up some useful resources for wargaming the English Civil War
|
|
Move & Charge |
| Cavalry, Commanders | 12" |
| Dragoons | 12" |
| Infantry | 6" |
| Cannons | 0" |
|
|
Range | To Hit |
| Musketeer, Dragoon | 12" | 6 |
| Cavalry | 3" | 6 |
| Cannons (roll 2 dice) | Unlimited | 6 |
| Melee |
|
| Musketeer, Dragoon | 6 |
| Pikemen | 5-6 |
| Commanders | 4-6 |
| Cavalry, first turn of melee | 4-6 |
| Cavalry, after first turn of melee | 5-6 |