Historical Background: Pickett’s charge will always be remembered as a tragic desperate maneuver. After the failure of the Confederate artillery to destroy the Union defenses, and the quick counter fire from the Union artillery, Lee entrusted Longstreet with three divisions: Trimble, Pettigrew, and Pickett. Those three divisions charged across a field of fire a mile in length, and up a sloping hill towards the muskets and cannons waiting for them at the top. Armistead rallied his troops, and made it to what became the high water mark of the charge. Mortally wounded, Armistead led his troops further than any other brigade in the entire charge. The day ended in defeat for the Confederates. Pickett’s Division was utterly destroyed and Lee took the blame for the failure stating, “This is all my fault!” Afterwards Lee decided to retreat back to the South and remain on the defensive.
Battle Report 1: The Confederates charged sustaining few casualties from the cannons until reaching the fence. Then the sharpshooters picked them off and they moved in range of infantry fire. With 8 units left, they made it up the hill and prepared to cross the stone wall. Two more units went down. They went up the flank and charged. Between short range artillery, melee and, and valiant charges, the confederates made it to four bases against three and a cannon. Choosing to fight the cannon they defeated, but were defeated in melee against three bases. Thus ended a close battle with devastating effect on both sides on the third day of Gettysburg.
Battle Report 2: The Confederates charged across the field and the Union artillery failed to stop them. They went over the fence and reformed on the left flank of the enemy infantry. They charged up the flank and engaged in melee. The Unions broke and the cannons were rendered useless. This was an major Confederate victory.
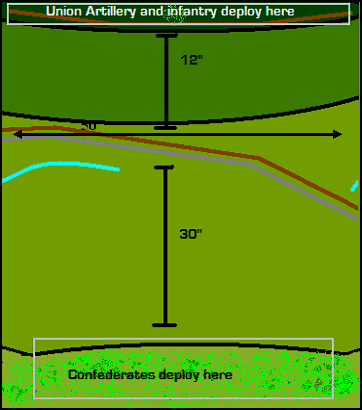
The Map: I marked out lines for the hills on carpet and used pencils for the fence and the wall. Alternately we used the game table at my friend’s house with Styrofoam marking the elevation and fence. Either side can deploy as far as 24” but cannons have no range and the distance in the middle must remain the same.

Building the Armies: Mount two figures on each base for infantry, cavalry, and gun crews. Infantry and gun crews should be on bases 1.5" x .75". Mount commanders on bases by themselves. Commanders on foot can be based on .75" squares, mounted commanders can be based on .75" x 1.5" bases. There are many companies that have manufactured 1/72 scale plastic figures. Visit the Plastic Soldier Review to see what's available. The figures I used were from Imex. Here are some paper soldiers you can print and use.
OOB: The first Order of Battle is for a fast game and can be completed in 45 - 90 minutes. The second order of battle is for a longer game.
Fast Player Order of Battle: Union units represent 1 - 3 regiments, Confederate units represent 4 regiments.
|
Union Army
|
Confederate Army
|
Longer Order of Battle: Union units represent 1 regiment, Confederate units represent 2 regiments.
|
Union Army (all units 6 bases except where noted)
|
Confederate Army (all units 6 bases)
|
Objective: The side that controls Cemetery Hill at the end of the game is the winner.
Deployment: The Union units deploy on Cemetery Hill, as shown on the map. The Confederates deploy in the woods at the bottom of the hill (far end of the table).
Turn Sequence:
1. Confederates Move
2. Confederates Shoot
3. Union Move
4. Union Shoot
5. Charges
6. Melees
Formations: Infantry should be deployed in a double rank line, with 3 bases in front and 3 bases behind. Artillery and Commanders do not have formations and may be deployed as individual bases.
Sharpshooters: The two Union Sharpshooter units may be deployed as units or they may be broken up. If they are broken up one or two sharpshooter bases may be added to any Union unit that is deployed at the start of the game. If they are broken up they must stay with their adopted unit for the remainder of the game. They are treated as a part of their adopted unit for all purpose, but continue to shoot as sharpshooters.
Movement: Infantry can move 6", Commanders may move 12". Artillery can move 12" but it may not fire on a turn when it was moved. Artillery can pivot in place during movement and still fire. Units may about face (turn 180 degrees) once per turn. Units may move backward while still facing to the front at half speed. Units lose half their movement when moving between the fence and the wall, they also lose half their movement when they cross the fence or wall. Units may not move within 1" of an enemy unit except when charging.
| Unit |
|
|
| Infantry, Sharpshooters |
|
|
| Artillery, Commanders |
|
|
Fire: Infantry and Sharpshooter units may fire. Also artillery that didn't move this turn may fire. Range is measured from the center of a unit to the nearest part of the target unit. Units may only fire to the front and may not fire through narrow gaps between friendly units, or over the heads of friendly units. Roll one die per base or three dice per gun model. The chart indicates the number needed for a hit. Remove one base for each hit rolled by the firing unit. It takes three hits in the same turn to remove an artillery base. Note that you only use the 1" firing column when shooting at a charging unit. If a unit is reduced to a single surviving base then the last base is immediately removed.
| Shooting |
|
|
|
| Infantry | 5-6 |
|
|
| Sharpshooters | 4-6 |
|
|
| Artillery (3 dice) | 4-6 | 5-6 |
|
Morale Checks: If a unit has to take a morale check Roll one die. If the roll is less than or equal to the number of bases (plus a commander if one is present), then it has passed. If the role is greater then it fails. Artillery must roll a 4 or less to pass a morale check (test each gun model separately).
Melee: Each side rolls one die and adds in any bonuses. High roll wins. The loser removes one base and retreats 12". If it's a tie each side loses a base and rolls again. When counting bases each gun model counts as one base.
| Melee Bonuses |
|
| Has more bases than the enemy |
|
| Terrain Advantage (higher ground, in cover, etc.) |
|
| Officer attached |
|
| Hitting the flank or rear |
|
| Opponent is artillery |
|
Captured Cannons (Optional Rule): When one of the confederates reaches the cannons, the player on the confederate side may roll a die. 4, 5, or 6, the cannon is captured and may be turned around on that turn, otherwise, nothing happens.
Removing Casualties: When a unit is reduced to a single base this last base is automatically removed.
Commanders: Each of Pickett’s Brigade Commanders is represented on the table. A Brigade Commander may join or leave one of his units during movement. This unit gets a +1 bonus on all melee rolls and the officer counts as a base when testing morale. Every time a unit with an attached commander is completely eliminated by enemy fire (last base removed), or is engaged in a melee (win or lose) roll one die. If the roll is a 6 the commander is a casualty and is removed from play. This is the only way a commander can be eliminated.
Resources: This battle was suggested by visitor to the website. A search of the library and Magweb, turned up some useful resources for simulating First Bull Run: