The Simulation: This simulation uses a combination of
map movement and matrix arguments to give the students a sense
of the battle that took place in the Easter Theater in 1862. The
students should be divided into seven groups and assigned one
of the commanders in the order of battle. It's a good idea to
include a good student on each team. The simulation can be played
in one period (one hour or less), but this will most likely not
lead to a victory for either side. This is just fine, since the
real civil war was a long and bloody affair. The simulation could
be continued for a longer period of time, or stretched out by
playing just one turn per class period. Each team should be given
a copy of the map and their commander's information. The teacher
should also track the location of the armies on a map that the
whole class can see, and should also keep track of the Fighting
Spirit and Supply of each side. After the simulation the students
should be asked to discuss their strategy. Compare and contrast
their decisions to the real historical events. This simulation
makes use of matrix arguments. Matrix games were invented by Chris
Engle, and you can learn more about them on his website: Hamster
Press - Engle Matrix Games. Chris helped with the design of
this simulation.
The Battle Report: This simulation
was played with one seventh grade class of 24 students. The class
was divided into seven teams, and the simulation lasted on period
(40 minutes). Listed below are the movements and successful arguments
made by the students. The battles were resolved with a die roll
rather than matrix arguments. We were able to complete three turns.
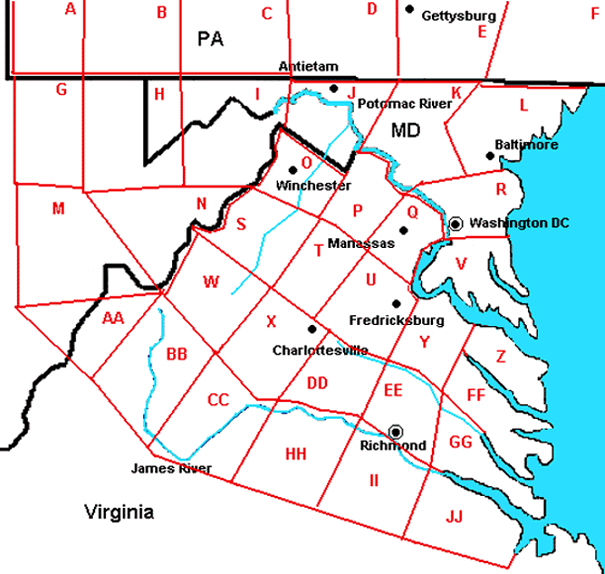
Turn 1: Burnside and Hooker moved south across the Potomac
into areas P and Q. Porter moved to area V. Jackson move to area
O and occupied Winchester, while Longstreet stayed at Richmond.
The Fighting Spirit of the Confederates rose one point because
of their victories earlier in the war (most notably First Bull
Run). The Union naval blockade began to take effect, and the Confederate
Supply level dropped one point.
Turn 2: Jackson moved to area T and his men dug in to wait
for the Yankees. Longstreet also dug trenches around Richmond.
The Union armies all moved south into areas T, U and Y. McClelland
came up with a secret plan for his armies to surround Richmond.
A Confederate spy found out about the plan and passed the information
to Lee. Hooker attacked Jackson in area T. Jackson was in a strong
position, but Hooker's men won the battle. Jackson's army lost
a strenght point and were forced out of their trenches. They retreated
to area X.
Turn 3: Lee made up a fake plan that said Jackson was going
to move north and attack Washington DC. This fake plan was successfully
delivered to McClelland, who fell for the trick. McClelland developed
a new plan for his armies to move south along a broad front so
the Confederates could slip past them and threaten Washington
DC. Union scouts lost contact with Jackson's army, raising concerns
that he was indeed headed for Washington. Secretly he was actually
headed towards Richmond, and moved to area DD. Hooker moved back
to area Q and posted scouts to guard the Potomac river crossings
so Jackson couldn't sneak past him. Burnside moved to area EE,
the outskirts of Richmond, where Longstreet was waiting in his
entrenchments. Burnside was careful to avoid a battle until Porter
could join him for the siege of Richmond. Threatened by two armies,
Longstreet put out a call for volunteers to join the army. With
Richmond in danger the population responded, and Longstreet's
army strength increased by one.
Battle of Richmond: Burnside and Porter attacked Richmond, which was defended by its garrison and Longstreet's corps. The two sides were evenly matched, but Longstreet managed to win the battle, and saved Richmond, at least for the moment.
Historical Outcome: The Union moved by water to area GG, the peninsula east of Richmond. The Peninsular Campaign was nearly successful, but bad weather, indecisiveness, and Confederate resistance stopped the march on Richmond. Robert E. Lee too command of the army after Gen. Johnston was wounded at the battle of Seven Pines. He succeeds in turning the tables on the Union, and after a victory at Second Bull Run the Confederates are in a position to threaten Washington DC. Lee's invasion of the north ends in a bloodbath at the battle of Antietam where Lee is defeated by the Union, now under the command of Gen. Pope. The Union, now commanded by Gen. Burnside, goes on the offensive and suffers a bloody defeat at Fredericksburg. In 1863 Gen. Hooker is in charge of the Army of the Potomac and he leads the Union to another defeat at the battle of Chancellorsville. The battle is also a setback for the Confederacy because Jackson is mortally wounded. Lee then goes on the offensive and invades Pennsylvania. He gets as far north as Gettysburg, where he is defeated by Gen. Meade. Lee retreats back into Virginia. In 1864 General Grant takes command of the Union army. Lee and the Army of Northern Virginia are forced on the defensive. The war in the East eventually becomes a stalemate at Peterburg. An attempt by Gen. Early to go on the offensive is initially successful. He is able to attack up the Shenandoah Valley and threaten Washington DC before being soundly defeated by Gen. Sheridan. By 1865 Lee's position has become hopeless. He is threatened by both Gen. Grant and Gen. Sherman. The Confederates abandon Richmond and Petersburg on April 2, and surrender a week later at Appomatox Courthouse.
The Map:
Rules
Objective: The winner is the side that captures the enemy capitol: Washington DC or Richmond.
Fighting Spirit and Supply: These two essential factors are each rated on a scale of 1 to 12. The confederates start with a Fighting Spirit of 7 and a Supply of 6. The Union starts with a Fighting Spirit of 5 and a Supply of 7. These scores may rise or fall during the war (see below).
Starting Forces: The starting strengths of the armies are a secret from the enemy. The enemy might be able to find out the strength of their opponents during the course of the war (see below). The students should be divided into seven teams and each is given one of the commands listed below. The Commanders (Lee and McClelland) do not have armies of their own, but they can direct their subordinates. They also get to make TWO matrix arguments each turn. The other commanders each have an army and can make one matrix argument each turn. Each capitol has a garrison (which cannot move) with strength of 4.
Turns: During each turn the commander make their moves and arguments one at a time. First McClelland, then Lee, then alternating opposing generals until each has had a turn.
Movement: On their turn a commander may move his army one area. An army may move into any adjacent area, and they move diagonally. More than one army may occupy an area, even if they are enemies. If an army is in the same area as an enemy army they may not pass through the enemy army during movement, they may only move back or to the side (no leapfrogging).
Battles: A battle can occur if two or more opposing armies are in the same area and a player makes a successful matrix argument for there to be a battle. The winner is determined using one of these methods (the teacher should decide which method to use for all battles before beginning the simulation). The Die Roll method is faster, but the Argument method is more interesting:
Die Roll: Each side rolls one 6-sided die and adds their roll to their current Fighting Spirit plus current Supply level plus their total army strength in the area plus or minus any arguments currently in effect: (Die Roll + Fighting Spirit + Supply + Strength +/- Arguments). Each positive or negative argument currently affecting an army is worth plus or minus one point. An example of a positive argument: "We train our men so they can fight better." An example of a negative argument: "Their army is tired because they marched all the way here from Richmond without a rest." These arguments must have been made in a previous turn; the players don't get to make extra arguments because there is a battle. The highest total is the winner. The winner loses one strength point, the loser of the battle loses two strength points and must immediately retreat one area. If the two sides end up in a tie then the battle was a draw – each side loses one strength point and neither side has to retreat.
Argument: The teacher determines which side is stronger. For each side add their Fighting Spirit plus current Supply level plus their total army strength in the area plus or minus any arguments currently in effect: (Fighting Spirit + Supply + Strength +/- Arguments). Each positive or negative argument currently affecting an army is worth plus or minus one point. An example of a positive argument: "We train our men so they can fight better." An example of a negative argument: "Their army is tired because they marched all the way here from Richmond without a rest." The side with the higher total is considered stronger. The stronger side gets to make a matrix argument describing the outcome of the battle and why their side wins. Normally the outcome of the battle will include the loss of up to 2 strength points by both sides, and may include the losing side having to retreat one area. The teacher should judge the strength of the argument and the commander will roll to see if their argument succeeds. If the argument succeeds the effects are applied immediately. If the argument fails the weaker side gets a chance to make an argument about the outcome of the battle. If their roll also fails then the battle was indecisive and each side loses one strength point.
Matrix Arguments: During their turn each team gets to make one matrix argument (Lee gets to make two). The team says something that happens, usually giving a reason why it happens. The referee immediately judges the strength of the argument (how likely it is to happen) and the team rolls one 6-sided die to see if the argument succeeds. If the argument succeeds it becomes a part of the story of the war, and can have an effect on the outcome.
| Strength of Argument | Die Roll Needed to Succeed |
| Very Strong | 2, 3, 4, 5, 6 |
| Strong | 3, 4, 5, 6 |
| Average | 4, 5, 6 |
| Weak | 5, 6 |
| Very Weak | 6 |
| Impossible | Make up another argument |
Some examples of arguments:
Supply – Increase your team's score or lower your opponent's
("The Confederate Supply goes down because our navy is blockading
their ports")
Fighting Spirit – increase your team's score or lower your
opponent's ("Our Fighting Spirit goes up because we just
won a battle")
Spying and Scouting ("We send out scouts to find out the
strength of the enemy army")
Fortifying and entrenching ("We build trenches around the
city")
Movement – secret moves, or forced marches to move farther
("Our army secretly moves out at night so the enemy doesn't
know where we are")
Recruiting ("Our army strength increases because the Yankees
have invaded our home so lots of men volunteer to fight")
Anything else the students can think up
Post Game Wrap Up: After the game discuss what happened. Ask the students to explain their strategy.
|
Union: Army of the Potomac Commander: Maj. Gen. George McClelland I and VI Corps: Maj. Gen. Joseph Hooker IX and XII Corps: Maj. Gen.
Ambrose Burnside Second and Fifth Corps: Maj.
Gen. Fitz Porter |
Confederates: Army of Northern Virginia Commander: Gen. Robert E.
Lee I Corps: Maj. Gen. James Longstreet II Corps: Maj. Gen. Thomas
"Stonewall" Jackson |
Useful Resources: