 Battle
of Breitenfeld (1631 AD)
Battle
of Breitenfeld (1631 AD)Fast Play Rules for Students
Battle
of Breitenfeld (1631 AD)The Thirty Years War was a complicated period of military conflict in Europe. The war was fought primarily in Germany as the various German Principalities allied themselves with the Holy Roman Empire or their opponents, France, Sweden, and Denmark. A religious conflict between Protestant and Catholic forces was an important factor early in the war, but later it developed into a struggle for power among the great nations of Europe. During the war armies fought in massive, slow moving formations called Tercios. The Tercio consisted of a large oblong formation of pike men with smaller formations of musketeers at the corners. During battle the Tercios would trudge together and battle it out "at push of pike" until one side broke. King Gustav of Sweden changed everything, however, by introducing revolutionary tactics that relied on smaller formations and emphasized movement and firepower instead of brute strength. The genius of his innovations was demonstrated in 1631 at the battle of Breitenfeld when his Swedish army handily defeated Tilly's larger old style Imperial army.
 Battle
1: The Imperials deployed with their cavalry on the wings
and their infantry in the center. The Swedish deployment mirrored
the Imperials but with detachments of musketeers mixed in with
their cavalry (one of Gustav's innovations). After an ineffective
artillery duel the battle began. The powerful Imperial Tercios
lumbered forward while their cavalry advanced swiftly on the enemy.
When the cavalry got to within pistol range they were hit with
a devastating volley from the Swedish musketeers. In short order
the Imperial cavalry was crushed on both wings, freeing the Swedish
cavalry to maneuver freely. On the Swedish right the cavalry retreated
to await further developments. On the left the more aggressive
Swedish officers sent the cavalry and commanded muskets around
the flank to attack the Tercios. After a short and bloody series
of charges they were wiped out. In the center the Tercios continued
forward while trading musket fire with the Swedish infantry, getting
the worst of the exchange. As the infantry came together the burden
shifted to the pike men. In some encounters the Swedish battalions
smashed the battered Tercios, but more often the Imperials clobbered
their opponents with their massive pike formations. The Swedes
began to retreat under the constant pressure. As the battle ended
the outcome was unclear and the decision was left to the judges.
The Imperials were awarded a slim victory since they had outperformed
their historic counterparts.
Battle
1: The Imperials deployed with their cavalry on the wings
and their infantry in the center. The Swedish deployment mirrored
the Imperials but with detachments of musketeers mixed in with
their cavalry (one of Gustav's innovations). After an ineffective
artillery duel the battle began. The powerful Imperial Tercios
lumbered forward while their cavalry advanced swiftly on the enemy.
When the cavalry got to within pistol range they were hit with
a devastating volley from the Swedish musketeers. In short order
the Imperial cavalry was crushed on both wings, freeing the Swedish
cavalry to maneuver freely. On the Swedish right the cavalry retreated
to await further developments. On the left the more aggressive
Swedish officers sent the cavalry and commanded muskets around
the flank to attack the Tercios. After a short and bloody series
of charges they were wiped out. In the center the Tercios continued
forward while trading musket fire with the Swedish infantry, getting
the worst of the exchange. As the infantry came together the burden
shifted to the pike men. In some encounters the Swedish battalions
smashed the battered Tercios, but more often the Imperials clobbered
their opponents with their massive pike formations. The Swedes
began to retreat under the constant pressure. As the battle ended
the outcome was unclear and the decision was left to the judges.
The Imperials were awarded a slim victory since they had outperformed
their historic counterparts.
 Battle 2: : In the second battle the
Swedish artillery were more active. They started by winning a
decisive victory in the artillery duel that preceded the battle.
Once the armies began to move the immobile Imperial artillery
was useless, but the Swedish commanders managed to shift their
lighter guns into more favorable positions and continue to fire
on the Imperials. This did little damage to the Tercios but it
infuriated the Imperial commanders who vowed to capture the Swedish
guns. On the wings the Swedes were again victorious thanks to
the careful coordination between their cavalry and musketeer detachments.
The Swedish cavalry prowled the battlefield like hungry wolves,
picked off any infantry units that looked vulnerable. The musketeers
nimbly maneuvered onto the flanks of the plodding Tercios and
harassed them without mercy. Still the brave Imperial Tercios
continued to advance, grinding down the Swedish battalions in
front of them. It was another very close contest, but slowly the
Swedes gained the upper hand. Sensing the change in momentum Tilly
himself entered the fray, rallying the Tercios as his veterans
fought for their lives. It wasn't enough. As time ran out Gustav
led the Swedish cavalry across the field to capture the Imperial
artillery and turn it against its former owners, as he had done
in the real battle. Only the clock prevented him from recreating
this bit of history. This battle was a narrow victory for the
Swedes.
Battle 2: : In the second battle the
Swedish artillery were more active. They started by winning a
decisive victory in the artillery duel that preceded the battle.
Once the armies began to move the immobile Imperial artillery
was useless, but the Swedish commanders managed to shift their
lighter guns into more favorable positions and continue to fire
on the Imperials. This did little damage to the Tercios but it
infuriated the Imperial commanders who vowed to capture the Swedish
guns. On the wings the Swedes were again victorious thanks to
the careful coordination between their cavalry and musketeer detachments.
The Swedish cavalry prowled the battlefield like hungry wolves,
picked off any infantry units that looked vulnerable. The musketeers
nimbly maneuvered onto the flanks of the plodding Tercios and
harassed them without mercy. Still the brave Imperial Tercios
continued to advance, grinding down the Swedish battalions in
front of them. It was another very close contest, but slowly the
Swedes gained the upper hand. Sensing the change in momentum Tilly
himself entered the fray, rallying the Tercios as his veterans
fought for their lives. It wasn't enough. As time ran out Gustav
led the Swedish cavalry across the field to capture the Imperial
artillery and turn it against its former owners, as he had done
in the real battle. Only the clock prevented him from recreating
this bit of history. This battle was a narrow victory for the
Swedes.
Rules
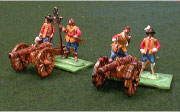
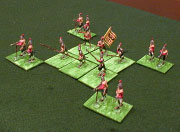
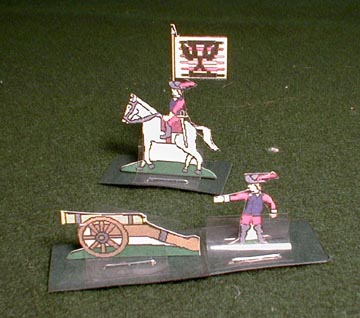
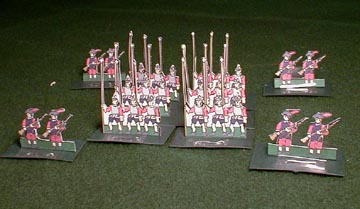
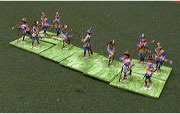
The Miniatures: The figures used were 1/72-scale plastics from Revell - eight boxes of #2567 Swedish Cavalry were used for the cavalry of both armies, boxes of #2556 Imperial Infantry and #2557 Swedish Infantry made up the rest of the armies. One box of #2566 Imperial Artillery provided enough gun crews for both armies, but only three cannons, so I also used some cannons from an IMEX civil war set. The infantry sets are very nice, but have too many musketeers and too few pike men. I compensated by mounting the musketeers two per stand, but the pike men (and drummers, flag bearers, etc.) one per stand. I also used some of the Swedish pikes on the Imperial side. The cavalry were mounted two per stand on a 1.5" square base. The musketeer bases were 1.5" wide by .75" deep. The pike men were mounted singly on a base .75" wide and 1.5" deep. Gun crews were mounted like the musketeers. I did not deploy any Saxons since they ran away without putting up much of a fight. Here are some paper soldiers you can print and use. Fabrizio Davi has created some very nice paper soldiers for the battle of Lutzen which could be used for this battle. You can find them at www.paperworlds.com, look for the "TYW Lutzen Project."
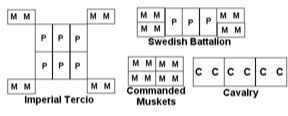 Formations:
Cavalry units should have six stands (double rank line) but I
didn't have enough stands so I deployed them in lines of three
and treated each stand as two (when they take a casualty turn
one stand backwards and count that one as a single stand). Imperial
Tercios are made of six stands of pikes with one stand of musketeers
at each corner. I made 6" x 5" movement trays for them
out of illustration board to make it easier to move them. Swedish
battalions have three pikes at the center with two musketeers
stands on each end. Swedish commanded muskets are four stands
in size in a double rank line.
Formations:
Cavalry units should have six stands (double rank line) but I
didn't have enough stands so I deployed them in lines of three
and treated each stand as two (when they take a casualty turn
one stand backwards and count that one as a single stand). Imperial
Tercios are made of six stands of pikes with one stand of musketeers
at each corner. I made 6" x 5" movement trays for them
out of illustration board to make it easier to move them. Swedish
battalions have three pikes at the center with two musketeers
stands on each end. Swedish commanded muskets are four stands
in size in a double rank line.
|
Imperial Army Tilly (Overall Commander) Left Wing: Center: Right Wing: |
Swedish Army King Gustavus Adolphus (Overall Commander) Left Wing: Center: Right Wing: |
The Board: A 7.5 X 5 foot table was used. This table
was wider than necessary, so use a narrower table if you can.
The terrain was flat.
Deployment: Both sides deploy as indicated in the diagram and order of battle. Each side also gets six cannons which should be deployed behind the first line of infantry.
Sequence of Play:
Preliminary Bombardment
1. Imperials Move
2. Imperials Shoot
3. Swedes Move
4. Swedes Shoot
5. Melee
Preliminary Bombardment: Before the battle begins both sides get to bombard the enemy with their cannons. The Imperials roll 2D6 per cannon (12 dice total) and the Swedes roll 4D6 per cannon (24 dice total). Hits are scored on a roll of 5 or 6. Remove one enemy stand for each hit, spread the hits over the infantry in the center. Each side rolls three times. The Preliminary Bombardment phase is not repeated after the battle begins.
 Movement: All cavalry and commanders move 12",
Swedish infantry moves 6", Imperial Tercios move 3".
Spanish cannons can move 3", Imperial cannons cannot move
at all.
Movement: All cavalry and commanders move 12",
Swedish infantry moves 6", Imperial Tercios move 3".
Spanish cannons can move 3", Imperial cannons cannot move
at all.
Shooting: Cavalry can shoot 3", roll 1D6 per stand and remove one enemy stand for each 5 or 6 rolled. Musketeer stands can shoot 12". The Swedish musketeers roll 2D6 per stand, the Imperials roll 1D6 per stand, both hit on a 5 or 6. Pike stands may not fire. If any unit in a formation is in range then all the musketeer stands in the formation may fire. Cannons have unlimited range and roll 1D6 per cannon, hitting on a 5 or 6. Cannons cannot fire between friendly units unless they have at least a 3" gap, they may not fire over units. Once a unit has fought a round of melee they may not shoot, or be shot at, until the melee is finished (note this means that both sides can shoot at each other during the turn that the units move into contact, but not on subsequent turns if the melee continues past the first round.
Melee: If two opposing units have been moved into contact then they will fight a melee. All stands in a formation participate in the melee. Roll 1D6 for each musketeer stand, and 2D6 for each pike stand or cavalry stand. Rolls of 5 or 6 are hits and remove one enemy stand. Both sides should roll at the same time. If both sides still have stands remaining they remain locked in melee and cannot move or shoot. The survivors will fight again in the next melee phase. Cannon crews will not fight for their cannon, the crew is removed if they are contacted by an enemy unit. The enemy may assign one stand to operate the cannon. The captured cannon may fire in the shooting phase (1D6 only), but it cannot be moved.
 Commanders:
Commanders are represented by single cavalry figures on white
horses with a flag. They may join a unit to help them in melee.
A unit with a commander attached rolls an extra 2D6 in the melee
phase. Commanders participating in a melee can become casualties.
Roll 1D6 after the melee rolls, he is a casualty on a roll of
6. This is the only way that a commander can be eliminated, they
may not be shot or attacked in melee if they are not with a regular
unit.
Commanders:
Commanders are represented by single cavalry figures on white
horses with a flag. They may join a unit to help them in melee.
A unit with a commander attached rolls an extra 2D6 in the melee
phase. Commanders participating in a melee can become casualties.
Roll 1D6 after the melee rolls, he is a casualty on a roll of
6. This is the only way that a commander can be eliminated, they
may not be shot or attacked in melee if they are not with a regular
unit.
Removing Casualties: When a Spanish battalion or Imperial Tercio loses stands the casualties should be evenly spread among the pike and musketeer stands, with the owner deciding which to lose if there are an odd number of casualties.
Remove the Last Stand: When a unit is reduced to a single surviving stand this last stand is removed.
Caracole: The Imperial cavalry were still using the caracole - stopping in front of the enemy to fire their pistols. The Imperial cavalry may not move directly into contact with an enemy unit. They must stop at pistol range (3"). After firing their pistols for one turn they may move into contact with the enemy on their next turn. Swedish cavalry may move directly into contact with an enemy unit, they don't have to stop and caracole.
 Resources:
This scenario was developed with several useful suggestions from
Dan Frater. A search of the Internet, library, and Magweb,
turned up some useful resources for wargaming Breitenfeld and
the Thirty Years War.
Resources:
This scenario was developed with several useful suggestions from
Dan Frater. A search of the Internet, library, and Magweb,
turned up some useful resources for wargaming Breitenfeld and
the Thirty Years War.
|
|
Movement |
| Cavalry, Commanders | 12" |
| Imperial Tercios | 3" |
| Swedish Infantry | 6" |
| Swedish Cannons | 3" |
| Imperial Cannons | 0" |
|
|
Range |
|
To Hit |
| Swedish Musketeers | 12" |
|
5-6 |
| Imperial Musketeers | 12" |
|
5-6 |
| Cavalry | 3" |
|
5-6 |
| Melee |
|
|
| Pikes, Cavalry | 2 | 5-6 |
| Commanders | 2 | 5-6 |
| Musketeers | 1 | 5-6 |