Washing of the Spears:
The Battle of Isandlwana (1879
AD)
Simulation Rules for
Students
By Matt Unsworth
Washing of the Spears:
The Battle of Isandlwana (1879
AD)
Simulation Rules for
Students
By Matt Unsworth
Historical Background: Zulu Wars (1879 AD)
During the reign of Queen Victoria Great Britain built an impressive empire that spanned the globe. One of their most colorful military campaigns took place in 1879 when the British provoked a war with the Zulus in South Africa. The British expected a quick and easy victory but the Zulu warriors were no push-overs. The British advanced into Zululand and camped near a rocky hill known as Isandlwana. The British strategy was to win the war by forcing the Zulus to attack them after they had taken up a secure defensive position so that their firepower advantage would be decisive. The Zulus didn't cooperate, however, and attacked the unprepared British camp. Using their battle tested "horns of the buffalo" encirclement attack the Zulus overwhelmed the British before they could mount an effective defense. The British rushed reinforcements to Africa and eventually won the war, but Isandlwana was the most disastrous defeat the British ever suffered at the hands of a native force.
 This
battle hasn't been playtested yet.
This
battle hasn't been playtested yet.
Rules
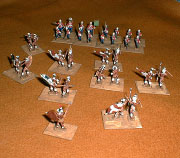
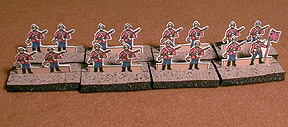
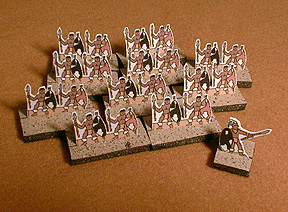
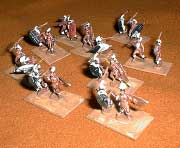
The Miniatures: The figures used were 1/72-scale plastics mounted two per stand from Esci miniatures. The figures can be hard to find these days, but they're worth the effort. Eight boxes of Zulus made up my native force. The figures that had uniform coats and rifles were painted red and used for the Natal Native Contingent. This made them a lot better armed, dressed, and equipped than their historical counterparts, but it made it easy to pick them out on the battle field. Zulus were mounted two per stand, but if you have a hard time finding enough go with one per stand. Sixteen regal looking Zulus were picked out and mounted individually to represent Zulu leaders. A red feather made them easy to spot in the thick of battle. My British force was built with five boxes of Esci British colonials. They were all painted with red uniforms and green facings and mounted . These figures were used for the British regulars and also the native horse units. I painted two horses I had left over from an Imex cavalry box, put them each on a stand, and put them with the native horse units to indicate that they had mounts. Ten command stands were made by adding a flag (from www.warflag.com) to one of the figures. The British box also contained figures kneeling beside boxes and these were used for artillery crew. The two 7 pdr cannons came from another box of figures, probably an Imex civil war set. Here are some paper soldiers you can print and use.
|
Imperial British: Each British company includes : Each Native Horse Unit includes : Each Natal Native Contingent (NNC)
includes : In Front of Camp On Right Flank
|
Zulus: Right Horn: Left Horn: Head: Loins: |
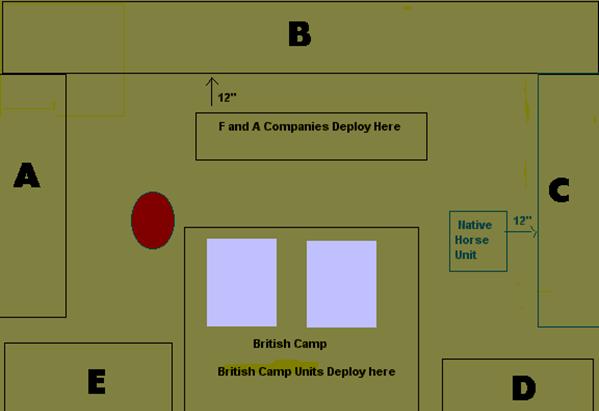
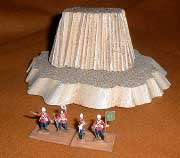
The Board: A 7.5 X 5 foot table was used. The terrain was flat except for Isandlwana, which was a foam hill. A piece of felt would be a reasonable substitute. Two rectangles of felt were used to indicate the location of the British camp.
Deployment: The Zulu player secretly records where he wants the Head to deploy in any one of the possible deployment zones (A-E); the Right and Left Horn are then recorded in adjacent sectors. The Zulu player then writes down the order in which the Head, Right Horn and Left Horn appear. The first “body part” (section) is then set up on the board. The remaining sections appear (in order) on the table edge when the Zulu player draws a face card for his turn. Deploying a section counts as a full turn for the Zulu player. The Loins are deployed last and can appear in any deployment zone that was used previously. The British setup their units in their appropriate boxes.
Sequence of Play:
Draw cards to activate unit
Movement or Fire
Draw Cards: Shuffle a deck of playing cards and place between players. A red suit allows the activation of a British unit; a black suit activates a Zulu unit. Reshuffle the deck after playing an Ace.
Activation: Activated units move OR fire. A card activates one of the following, even if the unit(s) were activated on the previous turn:
Any 1 unit the player desires
Any group of units
Deploy a Zulu section (if a black suit face card)
Replenish Imperial ammo (if a red suit face card)
Single Unit Moves: Single unit moves have a great deal of flexibility in how they are moved; just move the unit with the following restrictions:
The unit cannot exceed its maximum move distance.
The unit cannot pass through another friend or gaps that are narrower than the unit’s width.
The unit can end facing any direction
Group Contact Two or more units are in group contact when:
All of the units are facing the same direction.
Every unit is in edge-to-edge and corner-to-corner contact with one another.
Groups are contiguous without any gaps.
Group Moves: Two or more elements may make a group move if:
No element of the group exceeds its maximum movement distance for the turn.
The units begin and end in group contact.
No unit in the group may change position relative to other units in the group.
The group may move directly forward or wheel 2“, never both.
Groups may move up to 2” left or right in order to line up opposite an enemy unit.
Wheeling occurs on the outside front corner of the leftmost or rightmost unit of the front rank.
Imperial Movement: Imperial infantry move 6" if there are no Zulu units within 9“. Imperial infantry within 9” of any Zulu can only move 6” straight towards the Zulu unit or directly away. British infantry moving backwards move 1-3” each move; NNC infantry moving backwards move 1-6” each move (they were less steady than the regulars). Roll separately for each unit that moves backward, even when moving as a group. Native horse units, Rocket, Gatling and British artillery move 12".
Zulu Movement: Zulu units without casualty markers move 6". Zulu units without casualty markers within 9" of an enemy can declare a charge and move into contact. Zulus units with casualty markers choose of the following when activated:
Spend the turn hugging the ground and remove 1 casualty marker.
Remove 1 figure for each casualty marker and then move the unit’s full distance.
Move the unit forward, minus 1” for each casualty marker carried.
Fire: British units shoot at the closest enemy unit they can see that is not in a melee (facing is irrelevant). Roll dice according to the range table and score hits on a 5 or 6; units are never required to roll all the listed dice if facing a shortage of ammunition (see below). Cannons do not shoot independently but add dice to any adjacent infantry unit that shoots. Rockets hit on a 4-6, and then inflict 1-6 hits. Each hit places 1 casualty marker on the targeted Zulu stand.
| Range Table | 0-6” | 6-12” | 12-18” | 18-24” |
| British Infantry | 4 | 3 | 2 |
1 |
| NNC Infantry | 3 | 2 | 1 | NA |
| Native Horse | 3 | 2 | 2 | NA |
| Cannon (Cannons add their bonus to attached infantry) | +3 | +2 | +2 | +1 |
| Rocket | NA | Hit on 4-6, score 1-6 hits. | ||
| Gatling Gun* | 3 | 3 | 3 | NA |
| *No Gatlings were present at Islandwana, but allow for an interesting “what if” by replacing 1 Cannon. | ||||
Melee: Each player rolls 1D6 for every figure on their stand; Zulu stands without casualty markers add 1 extra die to their final total. Both sides roll simultaneously. Match off dice from highest to lowest (ala “Risk” style) ignoring any extras, removing 1 figure for each low roll. Ties go to the Zulus. If both units still have figures left they remain engaged and fight again next turn. Cannons, Gatlings and Rocket crews are eliminated by any Zulus in contact.
Watch Your Targets! The Imperials start with 100 shots. Subtract 1 shot every time a dice is rolled when shooting (include Cannons and Gatlings when firing but not Rockets. For example, subtract 1 shot when British infantry is shooting at 24”, but 4 shots when shooting within 6”, and 7 shots when shooting within 6“ and adjacent to a Cannon.
Hurry Up With That Ammo! The British player can choose to spend an activation on replenishing his ammo supply when he draws a red suite face card. The British player adds 1d6 to his remaining shots for his turn; no other action is allowed. British units cannot shoot once their ammunition is exhausted. Ian Knight suggests keeping track using spent .22 shells, which certainly lends a realistic feel to the battle. Pennies work for those without access to firearm ammunition.
Zulu Leaders: The Zulu player can always activate a section’s leader when any units in that section are activated that turn. Zulu leaders move 9” to attach themselves to any 1 Zulu unit; leaders can then move again if that unit has not previously moved. Zulu units with a leader attached ignore the first hit of every volley fired at them. Zulu units with an attached leader also add +1 to their highest melee die throw. Zulu leaders are killed if they or the unit to which they are attached are hit on an unmodified throw of double 6s from melee, rifle, Gatling or Cannon fire, or on a 6 from a rocket to-hit throw.
NNC Morale: The NNC were poorly equipped and led. The first time a NNC unit is activated within 9" of a Zulu unit it must take a morale check. Each unit must only test once per game. The unit rolls 1D6. If the roll is a 1 or 2 they rout and are removed from the table. If the roll is a 3 - 6 they fight on as normal.
British Camp: The tents of the British camp interfere with British shooting. A line of sight may be traced out of or into the British camp when shooting, but a line of sight may not be traced completely through the camp. British units fighting in the camp receive 1 extra die in melees.
The Colors: One stand that includes a British Officer, Musician and Standard bearer occupy the camp. The Colors are activated like any other unit, move like a horse unit and melee like an infantry unit with 3 figures (cannot shoot, however). The Colors can retreat off the battlefield if a Zulu unit enters the campsite. The Colors offer (but do not receive) the following bonuses to all adjacent infantry units:
+1 to dice throws when firing (4s become 5s, etc)
Ignore 1st loss in melee
Victory Conditions: The game ends in Zulu victory if the Zulus are the sole occupants of the camp when the deck is shuffled or when the last Imperial infantry unit is wiped out. The Zulus win a MAJOR victory if they have captured the Colors at that time. The game ends in British victory the moment they inflict a loss of 12 units on the Zulus, at which point they fall back to take snuff and plan another attack.
Resources: A search of the Internet, county library, and Magweb, turned up some useful resources for wargaming Isandlwana.
The Unofficial Guide to DBA by WADBAG Productions (movement rules)
Isandlwana by Matt Fritz, of Junior Generals fame (background, map and morale rules)
“The Sword and the Flame” Miniatures Game by Larry Brom (card turn sequence)
"Rorke‘s Drift" by Ian Knight, Osprey Campaign #41 (inspiration for the fire resolution rules)
"Great Zulu Battles" by Ian Knight
"Zulu" by Ian Knight, Osprey Warrior #14
"The Zulus" by Ian Knight, Osprey Elite, #21
"British Forces in Zulu Land" by Ian Knight, Osprey Elite, #32