Historical Background: After his return from exile Napoleon planned to attack the Prussian army while Marshal Ney seized the strategic crossroads at Quatre Bras to prevent Wellington and the British from joining the Prussians. However Ney was slow to move and found the crossroads controlled by the British. The French attacked and the battle was a draw, but it prevented Ney from helping Napoleon at the battle of Ligny. The failure to decisively defeat the Prussians would prove costly two days later at the battle of Waterloo.
Building the Armies: Here are some paper soldiers you can print and use. Infantry and cavalry are mounted two per base. Cavalry bases are 1.5" square, infantry bases are 3/4" x 1.5". Commanders are based singly on 3/4" x 1.5" bases.
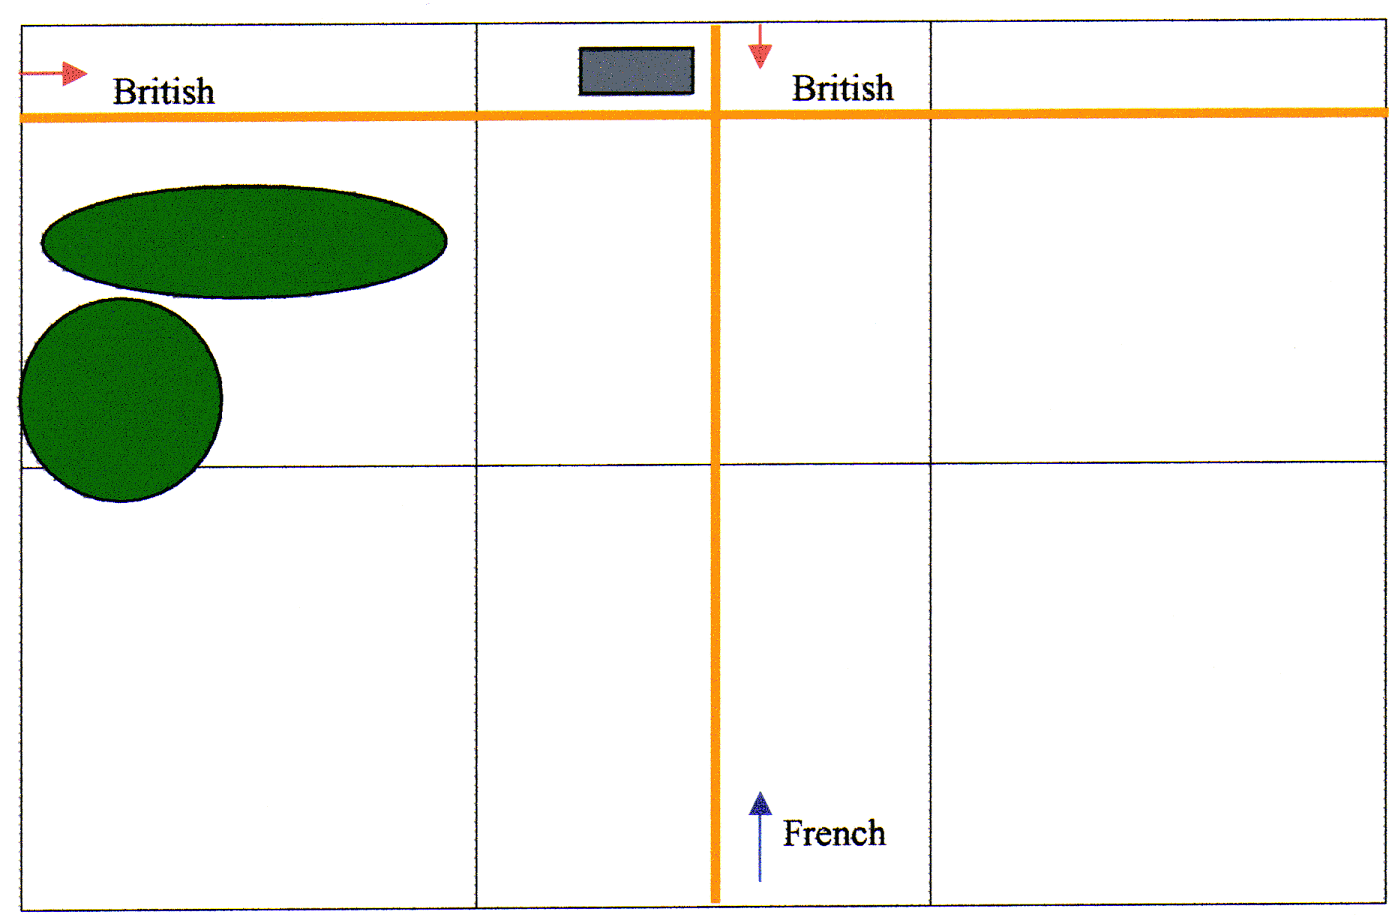
The Map: The table is 180cm by 120cm (6x4
feet)
The woods are impassable to cavalry and offer soft cover to infantry.
The built-up area by the crossroads is impassable to cavalry and offers hard
cover to infantry.
Orders of Battle: All units have six bases, Each cannon is a single gun model and one base of artillery crew. All reinforcements roll for arrival at the start of each turn. In the first turn that they could arrive they need a 5 or 6 to enter the table. On the next turn they need a 3, 4 , 5 or 6 and they automatically arrive on the third turn. The must enter by a road marked on the map.
BritishPrince of Orange (30cm deployment) |
French
Left
Flank (10cm deployment) |
Victory Conditions
The French objective is to take control of the road exits on the British side of
the table.
French control 0 exit = British victory
French control 1 exit = Draw
French control 2+ exits = French victory
Turn Sequence:
1. French Move
2. French Shoot
3. British Move
4. British Shoot
5. Charges
6. Melees
 Formations: There are only two formations for regular
infantry - line and column. The names of these formations can
be very confusing for the students. At school, when they are told
to "get in line" they line up one behind the other,
in what we call column formation. With the kids I call the formations
"firing line" (like a firing squad), and "marching
column." Lines may be single or double rank, and may bend.
Columns are single company. Units may change formation at the
start or end of their movement, but can only change formation
once per turn.
Cannons don't have formations.
Formations: There are only two formations for regular
infantry - line and column. The names of these formations can
be very confusing for the students. At school, when they are told
to "get in line" they line up one behind the other,
in what we call column formation. With the kids I call the formations
"firing line" (like a firing squad), and "marching
column." Lines may be single or double rank, and may bend.
Columns are single company. Units may change formation at the
start or end of their movement, but can only change formation
once per turn.
Cannons don't have formations.
Movement: Regular Infantry can move 6" if they are in line formation or 12" if they are in column formation. Cavalry and Commanders may move 12". Cannons can move 12" but may not fire on a turn when it was moved. A cannon which has moved and cannot fire should point away from the enemy. Cannons can pivot in place during movement and still fire. Units may not move within 1" of an enemy unit except when charging. Cavalry can not movie into the woods or built up areas
Fire: Infantry that are in line formation and artillery that didn't move this turn may fire. Range is measured from the center of a unit to the nearest part of the target unit. Units may only fire to the front and may not fire through narrow gaps between friendly units. Roll one die per infantry base or four dice per cannon. The chart indicates the number needed for a hit. Remove one base for each hit rolled by the firing unit. It takes three hits in the same turn to remove a cannon. Note that you only use the 1" firing column when shooting at a charging unit. If a unit is reduced to a single surviving base then the last base is immediately removed. Units in column are good targets. Roll two extra dice when shooting at columns. Targets in the woods or built up areas receive protection from enemy fire (see below).
Protection in Woods and Built Up Areas: Units in the woods that are shot at by enemy infantry get saving throws. Roll 1D6 for each hit, ignore the hit if the saving roll is a 5 - 6. There are no saves against cannon fire from within the woods. Units in the built up areas are protected from infantry and cannon fire. Roll 1D6 for each hit, ignore the hit if the saving roll is a 5 - 6. Cannons and cavalry are not allowed into the woods.
|
|
||||||||||||||||||||||||||||||||||||||||
Charges: Both sides may charge during the charge phase. If it matters the British charge first. Cavalry can charge 12", infantry can charge 6". Cannons do not charge. A unit may not declare a charge unless it is in line formation and can reach an enemy unit.. A player may measure to see if a unit is within charge range. One enemy unit must be chosen as the target of the charge. A unit that wishes to charge must first pass a morale check. If the unit fails moral nothing happens, it cannot charge this turn. If the unit passes its morale check then the target must pass a morale check. If the target fails it loses one base and immediately retreats 12", the charging unit is moved into the position vacated by the retreating target unit. If artillery is the target and it fails morale it is eliminated. If the target passes the morale check it has the option of firing at the chargers or counter charging. If the unit counter charges the two units meet in the middle and fight a melee. If the target decides to fire at the chargers it does so at a range of 1". If the charging unit survives the fire it moves into contact with the target and they fight a melee.
Morale Checks: If a unit has to take a morale check Roll one die and add any modifiers. If the roll is less than or equal to the number of bases (plus a commander if one is present), then it has passed. If the role is greater then it fails. Cannons pass on a roll of four.
| Guard Infantry |
|
| Cavalry |
|
Melee: If a charging unit contacts an enemy unit there will be a melee. Each side rolls a die and applies the modifiers. High roll wins. The loser removes a stand and retreats 12". If the roll is a tie each side removes a stand and rolls again. A cannon counts as three bases in melee.
| More stands than opponent | +1 |
| Hitting the flank or rear | +1 |
| Defending built up area | +1 |
| Commander leading charge | +1 |
| Cannon, or Column Formation | -1 |
| Guard Infantry, Cavalry | +1 |
Commanders: A Commander may join or leave one of his units during movement. This unit gets a +1 bonus on all melee rolls and the officer counts as a base when testing morale. Every time a unit with an attached commander is completely eliminated by enemy fire (last base removed), or is engaged in a melee (win or lose) roll one die. If the roll is a 6 the commander is a casualty and is removed from play. This is the only way a commander can be eliminated.