|
|
||||||
|
|
|
|
|
|
|
|
| Regular Guys | 1 | 6in | 1ft | A-5 | A-4 (touch) | A-2 |
| Machinegun | 5 | 6in | 2ft | A-8, Repeat | A-4 (touch) | A-3 |
| Bazooka | 3 | 6in | 1ft | A-6, Repeat | A-5 | A-6 |
| Mortar | 5 | 6in | 3ft | A-5,Repeat | A-4 (touch) | A-2 |
| Grenade | 2 | 6in | 6in | A-8,Repeat | A-4 (touch) | A-5 |
| Flamethrower | 3 | 6in | 6in | A-10,Repeat | A-4 (Pillbox:A-10) | A-8 |
| Engineer | 3 | As Regular Guy | ||||
|
|
||||||
|
|
|
|
|
|
|
|
| Cannon | 8 | none | 3ft | A-6, Repeat | A-5 | A-9 |
| Jeep | 3 | 2ft | Carry 4 guys | |||
| MG Jeep | 7 | 2ft | Fire as Machinegun Guy, no carrying ability | |||
| Truck | 6 | 1ft | Carry 10 guys & a cannon, move 2ft if entirely on road | |||
| Assault Raft | 2 | 6in | Carry 6 guys | |||
|
|
||||||
|
|
|
|
|
|
|
|
| Small Pillbox | 6 | none | Fire as Machinegun Guy | |||
| Large Pillbox | 12 | none | Fire as Cannon and Machinegun Guy | |||
| Tank Model | 20 | 1ft | Fire as Cannon and Machinegun Guy | |||
| AA Tank | 12 | 1ft | Fire as Machinegun Guy (twice) | |||
| Armored Car | 10 | 2ft | Fire as Machinegun Guy | |||
| Halftrack | 12 | 1ft | Fire as Machinegun Guy, carry 10 & a Cannon | |||
| Landing Craft | 8 | 6in | Carry 15 guys | |||
| Amphib | 15 | 6in/1ft | Fire as Machinegun Guy, carry 10. Move is water/land | |||
Sequence of Play: (players alternate, both players taking
a turn counts as one game turn)
1. Moving side moves any/all guys and models (movement over 2in
may trigger opfire)
2. Defending side fires any/all guys and models not touching enemy,
(unless already opfired). 3. Moving side's units touching enemy
fire*.
4. Defending side's units touching enemy fire, even if they already
fired this turn*.
* MGguys, Bazookaguys and Mortarguys fighting guys in phases 3&4
attack as Rguys.
Movement: Guys (only) can move thru woods. Guys move over or through anything reasonable (i.e. not high walls w/o windows). Touching units are called "groups" and may move simultaneously. After moving 2", figures or models may be fired upon by the enemy (op-fire). No unit may fire more than once (total) during phases 1 & 2, except for "(repeat)" fire.
Firing: Fire only at targets in range and in sight (use your eyes or periscope or a laser, you can't see thru wooded areas or buildings, but you can see figures at the edges (base partly in and partly out). Pull a card or roll a die, if it is within the specified numbers, then the target dies (Aces are low, which is good). If the firing number says "touch" you can only fire at that type of target in phase 3 & 4. Units touching enemy may not fire in phases 1 or 2.
Repeat Firing: When a firing unit with "repeat" hits, it can fire again but only if it can see a new guy to shoot at within 6" of the original (any but MG firing) or last (MG firing) guy fired at. Targets must be in sight and in range. Units using opfire may repeat fire on any valid target, not just targets which have moved >2".
Removing Dead Guys: Each time a guy is fired at, the attacker must say who he is firing at. If the attacker is firing on a figure who is not in a group, or the range is 3" or less, or if he hits with an ace (die roll of "1"), that exact guy dies. Otherwise, the defending player has the option to remove either the guy fired at or any other guy (that the shooter can see and is in range of) in the same group as the target.
Cover: Guys or Cannon who are shot at with bullets (MG or Rifle Guy firing) are in cover if they are even partly in woods, in a building or behind a wall or corner or sandbags, etc…. If in cover you are not hit on black cards (or on even # if using dice).
Breakdowns: Firer pulling Q of Spades (or rolling "12") draws (rolls) again. 2nd Spade (or 2nd roll of "12") kills model or replaces guy with a Rifle Guy. Rifle Guys may ignore this rule.
Loading or Unloading: Loading models don't move, loadees must start turn within 3in. Unloading costs half movement of vehicle (may move before or after unloading). Unloading guys/cannon are placed within 3" and not touching enemy and move no further. Killing vehicles kills what's inside. Loaded guys/cannon can't shoot or be shot at, except up to 2 Grenade Guys, Rifle Guys or MG Guys may fire from a halftrack.
The Basic Game (200pts): Each side places 0 to 3 pieces of terrain (6in to 2ft on a side, no player may place a terrain feature within 2ft of a feature he previously placed) on a 5ft x 8ft table. Each player draws a card. Alternate placement, with high draw placing first. After terrain is placed, draw again. Side drawing high chooses one side to be his and places his units first w/n 3in of that edge. Pillbox models may be placed further in, up to a foot. Then the other side places his units w/in 12in of opposite edge. Side which placed units first moves first. When 1/2 your guys die (Models count as 5 "guys" for this calculation) you lose.
Example:
I have 4 tanks, 2 jeeps, and 60 guys and a truck and a cannon.
This gives me 8 models and 40 guys. This means I have 5x8(models)
+ 40(actual guys) = 40+40 = 80 "potential dead guys"
(PDG's) for purposes of calculating losses. This means I lose
the game if I lose 40 "guys" worth of stuff. So If I
lose 10 models, or 8 models and 10 guys, or whatever, I lose.
Enemy units exited off of the center 4" of your side of the
table leave the game permanently but count as guys lost by YOUR
side. Example: A Russian pins down the German force listed above
and kills 10 guys. He then exits 6 T34 tanks off the German's
rear edge. This counts as 10+30=40 points inflicted on the Germans.
They lose. If nobody has won by turn 30, the game is a draw and
you need to ask yourself why you bothered playing in the first
place.
Purchasing Limits For the Basic Game: No more than 1/6
of points can go to any one type of guy except for Rifle Guys.
No more than 50% of points may be used on Tanks, AA Tanks, and
Armored Cars combined. No more than 4 jeeps, 3 cannons, 1 large
pillbox or 2 small pillboxes may be bought per 100 points. At
least 1/3 of points must be spent on Guys. No rafts or landing
craft or amphibs. You may buy up to two 4" diameter sandbagged
or similar features (counts as cover) at a cost of 5 each.
Designer's Notes:
This game is not so silly as it looks and sound tactics are rewarded.
It lends itself surprisingly well to re-creations of small scale
(or reduced scale) historical battles. Players are encouraged
to make whatever changes are necessary to model historical situations
on a case-by-case basis. For example, British tanks in North Africa
prior to Alamein should not be able to fire their cannons except
at armored targets (cost=17), KV tanks in 1941 should probably
count as "Tigers". British Bren gun carriers should
be as halftracks and allowed to carry only 4 guys and should cost
about 9, etc…
OPTIONAL RULES
Troop Quality, Command and Control: After each move of a unit or group (figures and/or vehicles which start and end touching and move in the same direction), pull a card:
| Force Quality | All movement for your side ends after card pull of: | If using "Pinning", after taking MG opfire, guy or group is pinned (no move this turn) on: | Cost |
| Elite | Don't have to check | 10 or higher | No cost |
| Regular | Jack (11) or higher | 7 or higher | +20% points to spend |
| Green | 9 or higher | 4 or higher | +40% points to spend |
Eighty-Eights: Players may select "88's" instead of regular cannon. 88's attack armored models as if unarmored, cost 15 and must be unusually large and cool-looking. 88's fire on Tigers as if the Tiger was a regular tank.
Landing Craft, Assault Rafts & Amphibs: These may move on water at 6" per turn. Amphibs can move on land too.. One raft can be dragged on land by a group for each two persons in the group. Trucks can carry a raft instead of 4 guys.
Entrenching: Groups of Guys may try to entrench instead of moving. They do not count as moving for purposes of opfire. Pull a card. Each group of at least 4 guys pulling a spade (ha-ha, funny joke!) (or rolling 1-3) gets a sandbag line or foxhole (roughly 4") put in front of or around them. Cannons may not entrench after setup. Groups with Engineers in them (or lone engineers) entrench on any black card (or roll of 1-6).
Barbed Wire: Cost is 1 pt. per 4in (roughly) segment. Guys may only move one inch when crossing barbed wire. jeeps and trucks may not pass over, other vehicles ignore it, rafts may not be dragged over. Engineers touching wire clear one segment per turn if they do not move.
Nationalities: Russian: Get 1 Rifle Guy free per 5 Rifle Guys bought. Rifle Guys entrench as engineers. If using nationalities, only Russians may buy more than one sniper. German: Only they can get Tigers and 88's. All tanks cost 2 less. Japanese: Rifle Guys kill Guys in close combat on a roll of A-8, Pillboxes cost 1 less. USA/Brit: Jeeps & trucks cost 1 less and don't count for army break (they got thousands more back at the motor pool).
Sniper Guys: As Rifle Guys with the following exceptions: They cost 4, may never touch another friendly guy or be loaded (psychological loners). If firing at a guy, they have a range of 2ft, kill on A-2, and ALWAYS kill the specified target.
Hull Down: Vehicles or cannon behind fortifications, walls or peeking over crests of hills are not hit on black cards.
Rear Armor: Tanks shot at by cannon from behind a line extending their rear edge die on a roll of 1-8 (Tigers on 1-6).
Pinning: Any individual guy or group of touching guys receiving opfire from a MG must draw a card. On a black card (die roll of 7-12), the figure or group may move no further for the rest of the turn, even if the figure or group has not yet moved. If using "Force Quality", veterans cease movement only on spades (die roll of 10-12), and green troops cease movement on clubs, hearts or diamonds (die roll of 4-12).
HISTORICAL SCENARIOS
Notes about Scenarios:
Scenario 1 - Overmatched (9/39): Polish units set up a hasty defensive position
in an attempt to stop the Panzergrenadiers of the XVI Panzer Corps
from closing on Warsaw. This is a good introductory scenario.
Polish: 20xRguy, 1xCannon, 2xMGguy, 1xMortarguy. 5xEntrenchment.
Setup: within 2ft of E edge.
Germans: 1xTank, (1xHalftrack OR 1xTruck&1xCannon),
2 Trucks, 23xRguy, 2xMG. 1xMortarguy, 4
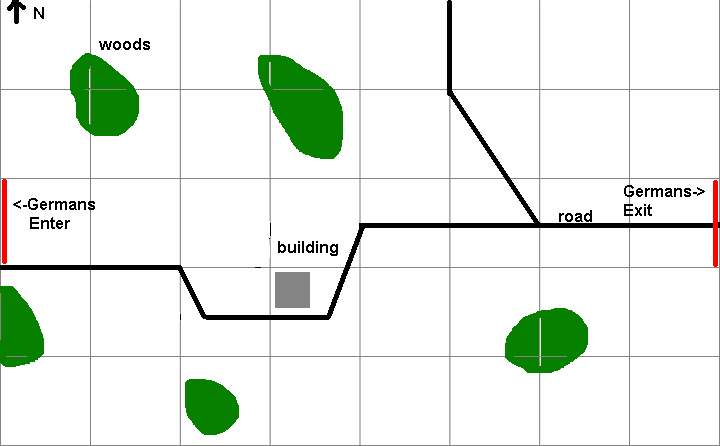
Victory: Germs move 1st, Enter W edge. They win if they get 20 guys (Tanks, Halftracks or Cannon count as 5 guys, Trucks as 0) off the East edge within 6in of the road by end of German Turn 11.
Historical Outcome: Not good. German mechanization counted more heavily than Polish elan.

Scenario 2 - Stupid is as Stupid Does
(near Florennes, France, 5/15/40):
The French 1st DCR entertains the 5th and 7th Panzer Divisions
while refueling.
French: 12xTanks (Char B), 4 Trucks.
Germans: 8xTanks (Pz38), (1xHalftrack OR 1xTruck&1xCannon),
1 Truck, 17xRguy, 1xMG 1xMortarguy, 1xGrenadeguy.
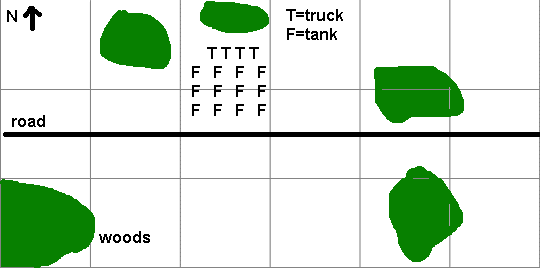
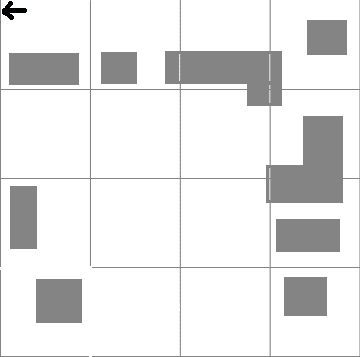
Special Rule: French tanks (F) and trucks (T) start where indicated. facing west. Trucks may not be placed touching tanks. Germans enter on road and move first. French tanks may not move, fire or pivot until a truck has STARTED the turn touching (refueling/rearming) them. Each truck may refuel/rearm only one tank per turn.
Victory: Germans win if they destroy at least 8 French tanks before the end of German turn 10, while losing five or fewer German vehicles.
Historical Outcome: German decisive victory
Scenario 3 - A Sterling Performance (11/17/41):
The British SAS decides to stop sneaking around on foot and try
a raid where they don't even have to get out of their cars.
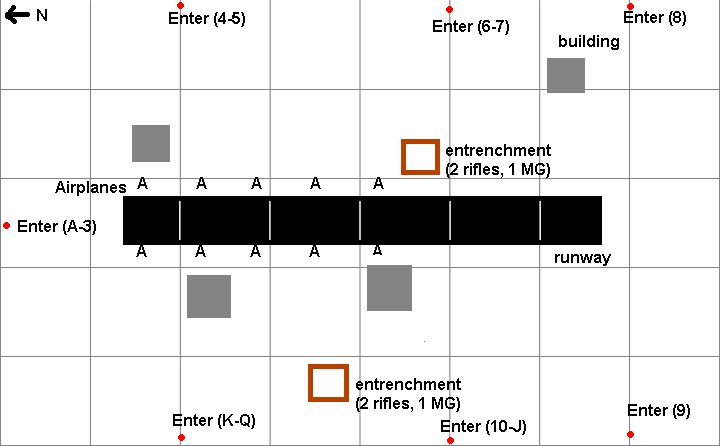
Germans: As per map, also may place a total of 6xRguys
secretly in buildings (record which prior to game start, show
when SAS units move within 1ft of building. Also draw two cards
at start of each turn starting German turn 2. First card indicates
entry point (see map). Second card indicates type of reinforcement
as follows: (A-5:4xRguys. 6-7:1xMGguy,2xRguys, 8:1xJeep,3xRguys,1xMGguy,
9:1xMortarguy,2xRguys, 10:Choice of prior, JQK: Nothing ).
SAS: 8xMG jeeps. Enter on S edge. They fire each turn as
an MGguy. SAS jeeps which start their movement in contact with
an aircraft destroy that aircraft. Aircraft are "unarmored".
Victory: SAS moves 1st. SAS wins if they destroy 6 aircraft
(count as unarmored model when shot at) and then exit 4 Jeeps
off the South edge.
Historical Outcome: Major David Sterling's troopers busted up the base pretty good. They did lose some jeeps, but they recovered the men and motored off happily into the desert night.
Scenario 4 - "A Shattering and Grievous Loss"
(6/20/42): The British retreat has been unexpected and
rapid. Have adequate forces been able to prepare Tobruk's defences
for yet another siege?.
Germans: 4xTanks, (2xArmored Cars OR 2xCannon), 2xTrucks,
60xRguys, 6xMGguys, 6xGrenadeguys, 2xFlamethrowerguys, 4xMortarguys,
5xEngineerguys. Enter S edge, turn 1.
British: 1xTank, 2xLarge Pillbox, 2x Small Pillbox, 25Rguys,
4MGguys, 2xMortarguys, 3xGrenadeguys, 2xJeep, 10xEntrenchments,
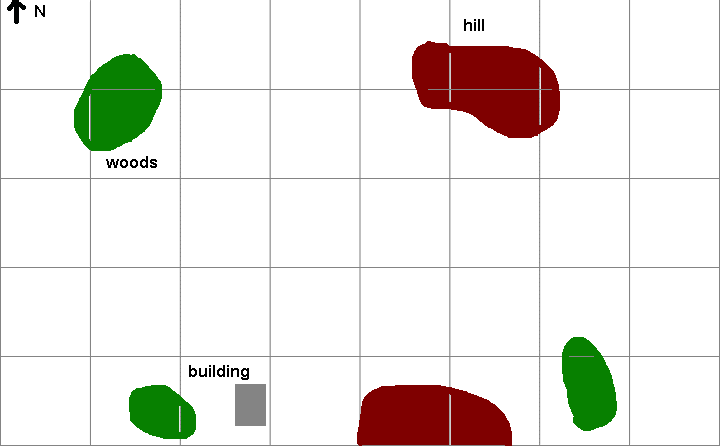
10xBarbed Wire. Set up on hill or within 2 ft of north edge.
Victory: Germans must soley occupy or have been the last
to enter 4 buildings by the end of their T12.
Historical Outcome: The scenario title (Churchill's comment) says it all.
Scenario 5 - The Assault on Red October (10/14/42, Stalingrad):
The Russians have stubbornly held the Red October factory against
repeated German attacks. The Germans now commit elements of five
divisions, including several battalions of their elite "Pioneer"
combat engineers.
Germans: 2xTank, 30xRguys, 20xGrenadeguy, 6xFlamethrowwerguy,
6xMGguys (all guys count as engineers). Set up as indicated first.
Soviets: 2xCannon, 26x Rguys, 4xMGguys, 2xSmall Pillbox,
2xGrenadeguys, 5 Snipers, 14xEntrenchments, 10xBarbed Wire. Set
up after Germans, not within 2ft of them.
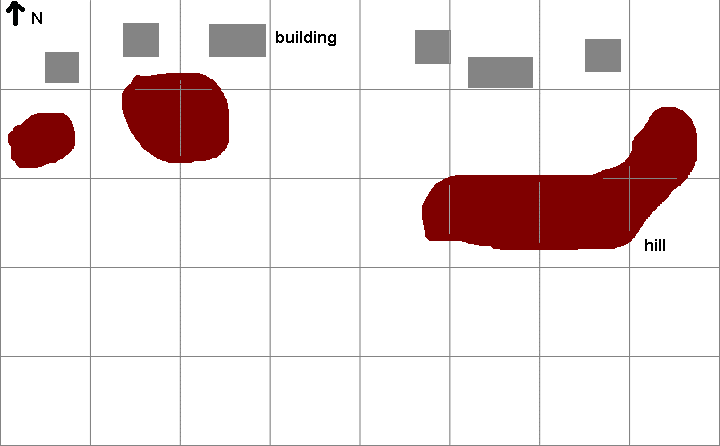
Battlefield: Each side must also place 10 small (1-2 person-sized)
obstacles on the map which may provide cover. All of these must
be in the central open area not within 3" of a building or
another placed obstacle. There are 9 buildings indicated on the
map.
Victory: Germs move 1st, game ends after Germ T10. They win if there are twice as many buildings occupied only by Germans as there are buildings occupied only by Russians
Historical Outcome: The Germans were able to eventually clear the factory, but, as was the case with many eastern front battles, the victory was a Pyrrhic (overly expensive) one at best. Within months, the German survivors were cut off and captured along with the rest of 6th Army. This combat is the subject of the large scale German assault in the film "Stalingrad". Not much in the way of tactics here. This is the designers leas favorite scenario. Warm up them cards or dice good. For bidding purposes, the Germans do not pay the extra cost for being engineers.
Scenario 6 - Kidney Ridge (10/27/42, Second Battle of El
Alamein): The British have forced a breakthrough in the
main Axis defensive belt and positioned an infantry force (2nd
Bttn, The Rifle Brigade) supported by the new 6-pounder cannon
(239 Battery, Royal Artillery) on a key German supply line. Tankers
from the famous 21st Panzer are tasked with clearing the Brits.
British: 7xCannon, 40xRguy, 6xMGguy, 3x Mortarguy, 1x Truck,
1xJeep. 14xEntrenchment. Setup: within 1ft of exact center of
table.
German (A): 5xTank, 2xTruck, 18xRguy, 2xMG.Enter NE or
SE corner, turn 1.
German (B): 5xTank, 2xTruck, 18xRguy, 2xMG.Enter NW or
SW corner, turn 1.
Battlefield: 8ft by 5ft, long axis of table going East-West.
No terrain. Mark center of battlefield.
Victory: Germs move 1st, game ends after Germ T9. They win if no Brits w/in 3in of the center at end.
Historical Outcome: 32 Irreplacable German tanks were lost, all but one of the British cannon were destroyed. Major Vic Turner (commanding) was awarded the Victoria Cross for holding the crucial position.
Scenario 7 - Kursk The Northern Spearhead
(7/10/43): The Germans press
forward into deep Soviet defensive belts. Their new lumbering
armored monstrosities (Elefants) vastly outgun and outarmor Russian
tanks, but nobody thought to add a machine gun. Whoopsie.
German: 8 "Tiger Tanks" (no MG's, move of only
6in off-road: FYI Cost=29) 18Rguys, 2 Grenadeguys 2MGguys 1 Mortarguy,
Enter where indicated Turn 1.
Soviets: 55Rguys, 2MGguys, 3Mortarguys, 2 Grenadeguys,
4Cannon, 2 Small Pillboxes, 1 Large Pillbox, 20 Entrenchments.
Set up on board at least 4ft from German entry point. Cannon can
be deployed secretly if deployed out of sight of the German entry
area. Write down location on a map and reveal when German can
see it. Hidden cannon may be entrenched, and those entrenchements
stay off-board until the cannon is spotted. The Soviets deployed
in defensive belts. At least 25 guys and 1 cannon must be within
1 foot of the East edge. At least 25 guys and 1 cannon must be
at least 4ft away from the east edge, simulating Russian doctrine
of defensive "belts".
Victory: Germans move first. Germans must exit half their force through their exit area by turn 24, otherwise Soviets win.
Historical Outcome: Some German crews got so desparate that they fired pistols and SMG's thru the bores of the 88mm cannon of their vehicles. You can guess how that went.
Scenario 8 - Kursk The Southern Spearhead
(7/12/43): The only significant
German breakthrough at Kursk occurs in the south, as the SS Panzer
Corps breaks into the open countryside near the town of Prochorovka.
Unknown to the Germans, massive enemy reserves in the form the
5th Guards Tank Army are nearby. Neither knows of the other's
presence.
German: 3 "Tiger Tanks", 9 Tanks, 4 Halftracks,
28 Rguys, 4 MGguys 2 Flamethrowers, 2 Mortarguys, 4 Grenadeguys.
Enter South edge turn 1.
Soviets: 14 Tanks, 50Rguys, 4MGguys, 4 Mortarguys, 4 Grenadeguys
1 truck, 1 cannon. Set up within 2ft of North edge.
Victory: Germans move first. Side with most tanks (including
Tigers) after Russian T 12 wins.
Special Rules: Tiger tanks have a range of 4 feet (cost=40). Every
time a J of Spades is drawn (must use cards for this scenario),
dust clouds cover the map.(or, if present, stop). In dust clouds,
nobody can see more than 1 foot.
Historical Outcome: Several hundred tanks make a lot of dust. The reduced visibility allowed for close-range combat, nullifying the superior weaponry and armor of the German heavies. The largest tank battle of the war ended with both sides severely mauled and the only German breakthrough of "Citadel" blocked. Who won? The Russians could easily replace their losses, but the Germans couldn't. Add that to the fact that the German mission (to breakthrough and exploit that breakthrough in the Russian rear) failed, and the Russians probably "won" in the grand scheme of things.
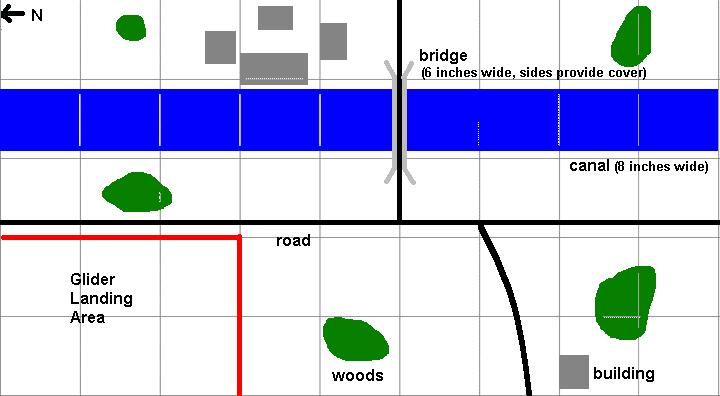
Scenario 9 - "Hold Until Relieved" (6/6/44):
British glider troops attempt to seize a critical Orne Canal Bridge
and keep it until help arrives.
British Glider Troops: 30 Rguys, 4 MGguys 8 Grenadeguys,
3 Mortarguys, 3 Bazookaguys. Start in area marked "G"
on turn 1. May not move within 2.5ft of S edge of board prior
to T8.
German Garrison: 8 Rguys, 1MGuy, 2 Small Pillboxes, 1Grenadeguy.
10Entrenchments: (5 around each end of the bridge) Start within
4" of bridge, One PB at each end of bridge, within 3"
of bridge, not on road.
German Reaction Force: 50Rguys, 4MGguys, 2 Mortarguys, 1Grenadeguy,
1 truck, 1 jeep. Enter S edge turn 8, may not move withing 4 ft
of N edge of board prior to turn 12.
British Relief Column (6th Airborne Div): 20 RGuys, 2MGguys,
4Grenadeguys. Enter turn 12 on Road at N edge
Victory: Germans set up first, British move first, player
with more guys on the bridge at the end of Germ T24 wins.
Historical Outcome: The elite British glider troops took the bridge with only two casualties. The Germans heard the landing but assumed it was the wreckage of a shot-down bomber, and were not ready (our scenario shows them as a tad more alert to give them a fighting chance). You may recognize the title quote from the voice-over in the classic film "The Longest Day", which features this action.
Scenario 10 - Dog Beach (6/6/44): The 116th Regt
(29th Inf Division) has been pinned down on Omaha Beach. Reinforcements
arrive in the form of C. Company, Provisional Ranger Group (5th
Ranger Bttn). The DD Tanks which were supposed to have supported
the landing have sunk, the preparatory gunfire was ineffective,
and the old men and rejects supposed to be opposing the landing
turn out instead to be a veteran German infantry division (the
352nd). This scenario portrays the most difficult landing sector
on the most heavily opposed beach (Omaha) on D Day. This action
was featured in "The Longest Day" and also in the first
few minutes of the film "Saving Private Ryan", although
in reality, the Captain in charge of the ranger unit was named
Goranson, not Miller. The map is fairly accurate, but exact German
equipment and forces are on a best-guess basis. The hills are
steep but scalable, with the famously difficult cliffs scaled
by 2nd Ranger Bttn off-map to the West.
German: 35xRguys, 2xGrenadeguys, 20xEntrenchments. Place
these anywhere on or South of top of hill line. In addition, see
map for placement of following: 1x Large Pillbox "[P]",
1x Small Pillbox "[p]", and 6xMGguys "M".
MG's are emplaced and may not move, although they may be abandoned
(replace MGguy with Rguy). Large Pillbox has only antipersonell
shells and cannot fire on landing craft.
116th Rgt (-): 24Rguys set up behind seawall (counts as cover),
10 more Rguys set up 14" from base of hill slope W of Veirville
Draw (the big canyon with the road thru it). No more than 4 guys
may be in any group (touching). No groups or individual guys may
be within 8" of any other groups or individual guys.
C. Co: 2xLanding Craft, 19xRguys, 2xMGguys, 4xEngineerguys,
8xGrenadeguys. Start within 6" of N edge (South is "up"
on the map).
Map: Ocean not to exceed 1ft, distance from seawall to
top of hill line should be 14", hill slope should be 4"
broad. Seawall must be 13" from top of hill line (MG's on
hill are out of Rguy range).
Special Rules: Hills represent the raised ground off the beach and really should have no reverse (south) side (more like a mesa or shelf, with the S part of the map raised). Units moving on, onto or off the hils move only 3" due to the steepness of the hills. Americans move first, win if there are more Americans than Germans in buildings at end of US turn 16.
Victory: Americans move first, win if there are more Americans than Germans in buildings at end of German Turn 15.
Historical Outcome: The Americans took Veirville over the hills and through the small draw on the East, not through the Vierville Draw.
