Historical Background: The Huns were fearsome nomadic horsemen from the steppes of Central Europe. The Hunnic tribes routinely raided and pillaged their neighbors, and each other. The famed Attila was able to unite many of the tribes under his leadership. His devastating attacks on the Christian peoples of Europe earned Attila the nickname "The Scourge of God." In 451 AD Attila led a large army west across the Rhine River. After rampaging through Gaul for a time the Huns were confronted by an army commanded by the Roman general Aetius and the Visigoth General Theodoric. At the battle of Chalons the Hunnic invasion was turned back. This decisive victory saved Western Europe from the Huns. The following year Attila led the Huns into Italy instead of trying another attack in the west. The threat of the Huns began to decline after the death of Attila in 453 AD.
Battle 1: They Huns advanced piecemeal in the center and got a bloody nose. King Sangiban and the Alans were able to gang up on the first two Hunnic units that moved up without support. But this taught Attila a valuable lesson and he turned the tables on them in a hurry. Since the Huns outnumbered the Alans the Hun commanders charged half of the Alan units, pinning them, while they ganged up and shot the rest of the Alans to bits. This blew a giant hole in the center of the Roman battle line. Hunnic units rapidly moved to exploit the opening and roll up both flanks. On the Roman left the Roman infantry were slowly winning the battle until the Huns came riding in on their flanks and rear. It was beginning to look like a rout for Attilla's boys. Leaders were going down all over the place, except for Attila himself. Aetius challenged Attila, but the Hun wisely refused to take the bait. On the other side of the board King Theodoric had prudently kept his heavy cavalry in reserve, and they hit the Huns head on. That stopped their momentum. During the last few turns it looked like the Visigoths were going to save the day, but the Huns eked out a victory.
Rules
The Miniatures: The battle can be played with plastic 1/72 scale figures. There are many fine sets of Roman figures available. Check out the Plastic Soldier Review to see all the possibilities - the HaT late Romans would be an excellent choice. HaT also makes a set of Visigoth infantry. Lucky Toys has a very nice set of mounted Huns. You may also substitute. Some of the various "barbarian" sets of figures, or Mongols could be used to fill out the armies. Figures should be mounted two per base, cavalry bases are 1.5" square, infantry bases are .75" x 1.5". Mounted commanders are based singly on .75" x 1.5" bases. All units were six bases in size - 3 bases in the front rank, three in the rear rank. Here are some paper soldiers you can print and use.
|
Romans (all units have 6 bases) Left Wing (Romans, Franks, Germans) Center (Alans) Right Wing (Visigoths) |
Huns (all units have 6 bases) Left Wing (Ostrogoths) Center (Huns) Right Wing (Gepids & Germans) |
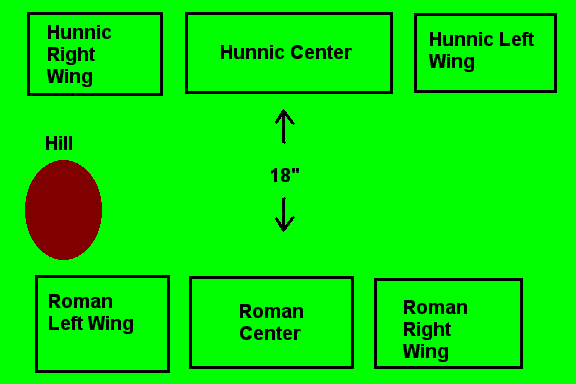
The Board: A 7.5 X 5 foot table was used. There is a hill on the Roman left which must be modeled. Otherwise the terrain can be considered flat.

Deployment: Each army must deploy in their box. No unit may start closer than 18" from the enemy.
Sequence of Play:
1. Huns Move
2. Huns Shoot
3. Romans Move
4. Romans Shoot
5. Charge into Melee
6. Melee
Movement: All infantry move and charge 6", cavalry and commanders move and charge 12". Units may not move closer than 1" from the enemy except during charges
| Infantry | 6" |
| Cavalry & Commanders | 12" |
Shooting: All the Hun units have bows and may shoot. Light cavalry and skirmish archers can also shoot. Eligible units may only fire at enemy targets that are in front of them. Roll 1D6 for each base in range (up to 12"). Every 6 is a hit and one enemy base is removed. If any part of a unit is in range the entire unit may fire. Units that are engaged in melee may not fire, and may not be targeted.
Charge into Melee: Both sides may charge into melee. If it makes a difference the Huns make their charges first. This is the only way to get into melee. Foot units may charge up to 6", cavalry may charge 12". Units may only charge if they can reach an enemy unit.
Melee: Each side rolls 1D6 for each base in the fight. The Melee table shows the number needed to score hits. Remove one enemy base for every hit. Both sides roll simultaneously. If both units still have bases left they remain engaged and fight again next turn. If a unit is attacked from the side or rear it may fight with only two bases during the first round of melee. On subsequent rounds it may fight with all bases.
| Unit | Hit # |
| Infantry, Light Cavalry, Skirmish Archers | 6 |
| Heavy Heavy Cavalry | 5-6 |
| Any vs. Skirmish Archers | 4-6 |
| Commanders | 4-6 |
Higher Ground: A unit has an advantage in melee if it is fighting on higher ground than its opponent. A unit in such a position gets to roll one extra die in melee.
Last Base: If a unit is reduced to one base this last base is removed immediately.
Commanders: Commanders may not be targeted individually. If they are attached to a unit they count as an extra base in melee (but not shooting). If the unit they are attached to is completely eliminated by shooting or fights in melee roll 1D6. If the roll is a 6 then the commander is eliminated.
Resources:
|
|
|