 Battle of Adrianople (378 AD)
Fast Play Rules for Students
Battle of Adrianople (378 AD)
Historical Background: The Roman Empire was feeling increasing
pressure from the German tribes on its border. The German tribes
were themselves suffering at the hands of the Huns. The Romans
agreed to allow the Visigoths to move through Roman territory
to escape the marauding Huns. Relations soon soured, however,
and the Visigoths began raiding the villages in their path. Valens,
the Eastern Emperor, led his army to fight the Visigoths and sent
a request for help to the Western Emperor. When Valens reached
Adrianople he decided to attack alone rather than waiting for
the Western Army. It was a fatal mistake.
 The Romans found that the Visigoths
had retired behind the protection of a wagon laager. What the
Romans didn't know was that the Goth cavalry was out foraging
for food. A messenger was sent to bring them to the rescue. The
Romans began their assault on the laager. As they were battling
the barbarians they were suddenly attacked on the flank by the
returning cavalry. The attack turned into a rout, and most of
the army was destroyed. Emperor Valens was killed. The Battle
of Adrianople was a disaster for the Romans. Aside from the tremendous
loss of life it showed the barbarians that the Romans were vulnerable.
Although the Eastern Empire would endure for many centuries the
Western Empire was doomed. The long, slow slide into oblivion
accelerated, and the Visigoths sacked Rome in 410 AD.
The Romans found that the Visigoths
had retired behind the protection of a wagon laager. What the
Romans didn't know was that the Goth cavalry was out foraging
for food. A messenger was sent to bring them to the rescue. The
Romans began their assault on the laager. As they were battling
the barbarians they were suddenly attacked on the flank by the
returning cavalry. The attack turned into a rout, and most of
the army was destroyed. Emperor Valens was killed. The Battle
of Adrianople was a disaster for the Romans. Aside from the tremendous
loss of life it showed the barbarians that the Romans were vulnerable.
Although the Eastern Empire would endure for many centuries the
Western Empire was doomed. The long, slow slide into oblivion
accelerated, and the Visigoths sacked Rome in 410 AD.
Battle 1: The Romans advanced swiftly, their cavalry moving
to envelop the laager. The Visigoths repulsed the Romans on their
left flank and launched a counterattack. General P. sent his barbarian
horde out of the laager in pursuit of the reeling Romans. In the
center General S. managed to gain a toehold inside the laager
after hard fighting. On the right General J. advanced cautiously.
Suddenly the Gothic cavalry returned and charged the Romans from
behind. For a while the Romans were trapped against the laager,
beset on all sides. General G. sent the Visigoth commander in
chief to personally lead an attack. The move was either very brave,
or reckless and foolish. His fellow generals favored the latter
assessment after the commander was slain. The loss of their commander
sent a shock through the Visigoths. General N. assumed command
of the Visigoths and sent in his reserves in a desperate attempt
to repel the Roman attackers. He was able to stabilize the situation
in the center, but barely. General J. launched a well-coordinated
Roman attack on the right flank, led by Emperor Valens himself.
He succeeded in breaking into the laager in force, and carried
the day. Although the Roman army had been savaged the Emperor
was able to claim victory.
Battle 2: The Roman attack developed slowly, especially
on the right flank. General M. of the Visigoths grew impatient
and launched a surprise counterattack. Leaving the protection
of the laager he attacked the Roman center and right flank. On
the other flank the Romans reached the laager and tried to force
their way in. Behind the Roman lines Emperor Valens was discussing
strategy with General B. Suddenly 600 Visigoths came riding over
the hill behind them. General B. escaped the surprise attack,
but the Emperor was mortally wounded. More Visigoth cavalry arrived
and attacked the Roman legions from behind while the Goth infantry
attacked from the front. It was a slaughter. The Roman commanders
refused to abandon their men and went down fighting. It was only
on the right flank that the Roman Generals were able to save some
of the army. This was a decisive Visigoth victory.
 Rules
Rules
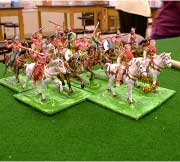
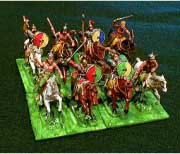
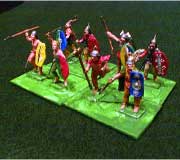
The Armies: The figures used were 1/72-scale plastics mounted two per stand, a mix from several sets. Skirmishers were arranged in single rank lines (3-5 stands), formed infantry and cavalry were in double rank lines (6-10 stands). The Romans were divided into four infantry commands each containing 22 infantry stands, four stands of skirmishers, and a General. There were 18 stands of Roman cavalry and a cavalry General. One of the Roman Generals was designated as Emperor Valens. The Visigoths started with four infantry commands which each included 21 stands of infantry and a general. They also started the battle with 6 stands of cavalry, and 8 stands of skirmishers. Another 20 stands of Goth cavalry entered the battle later as reinforcements. Here are some paper soldiers you can print and use.
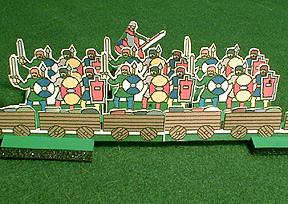
The Board: The terrain was flat and a 7.5 X 5 foot table was used.. A large circular wooden laager was in the middle of the board. All Visigoths except the cavalry had to start inside the laager. The laager provided protection for units defending the walls from the inside. For every hit inflicted against such a unit roll 1D6. If the roll is a 5 or 6 the hit is ignored. The Romans start along one long side of the table and may deploy within 12" of the board edge. Here's a section of wagon laager you can print and use.
Sequence of Play:
1. Roman Move
2. Roman Shoot
3. Visigoth Move
4. Visigoth Shoot
5. Charge into Melee
6. Melee
Movement: All infantry units move 6", cavalry move 12". Skirmish units may move in any direction. Formed units are limited to wheels and obliques of 45 degrees.
 Shooting: Only skirmishers are allowed to shoot.
Roll 1D6 for each stand in range. Every 6 is a hit and one enemy
stand is removed. If any part of a unit is in range the entire
unit may fire. Units that are engaged in melee may not fire, and
may not be targeted.
Shooting: Only skirmishers are allowed to shoot.
Roll 1D6 for each stand in range. Every 6 is a hit and one enemy
stand is removed. If any part of a unit is in range the entire
unit may fire. Units that are engaged in melee may not fire, and
may not be targeted.
Charge into Melee: Both sides may charge into melee. This is the only way to get into hand-to-hand fighting. Foot units may charge up to 6", cavalry may charge 12". Units may only charge if they can reach an enemy unit.
Melee: Each side rolls 1D6 for each stand in the fight. The Close Combat table shows the number needed to score hits. Remove one enemy stand for every hit. Both sides roll simultaneously. If both units still have stands left they remain engaged and fight again next turn.
Last Stand: If a unit is reduced to one stand this last stand is removed immediately.
Generals: Generals may not be targeted individually. If they are attached to a unit they count as an extra stand in melee (but not shooting). If the unit they are attached to loses stands in melee roll 1D6. If the roll is a 6 then the General is eliminated.
 Cavalry
Flank Attacks: Cavalry units that charge an enemy foot unit
on the flank or rear gain an advantage. The foot unit may only
fight back with two stands, and the cavalry hits on a roll of
4-6. These advantages apply only on the first turn of melee.
Cavalry
Flank Attacks: Cavalry units that charge an enemy foot unit
on the flank or rear gain an advantage. The foot unit may only
fight back with two stands, and the cavalry hits on a roll of
4-6. These advantages apply only on the first turn of melee.
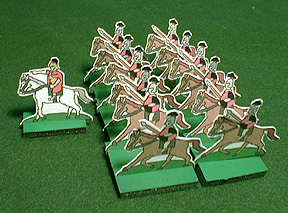
Goth Cavalry Returns: Twenty stands of Goth cavalry enter the battle as reinforcements. Their arrival should be a surprise to the Roman players, if this is possible. They should enter 3 or 4 turns after combat begins. Wait until the Roman infantry starts assaulting the laager before allowing them to enter the board. They are allowed to enter the board in any direction during the Visigoth move. A General accompanies them.
Resources: I drew inspiration from a DBA scenario written by Chris Jones that I found on the Fanaticus web site (http://fanaticus.org/DBA/index.html).
|
|
|