Battle of Tsushima Strait
(1905)
Monte Carlo on the High Seas
< Home
>
By Pete Pellegrino
(Naval War College)
 Introduction: The Battle of Tsushima Strait was one of the most
decisive naval battles in history. In July of 1904 Admiral Rozhdestvenski
set sail with the Russian Baltic fleet to replace losses incurred
by the Far East Fleet in the Pacific at the beginning of the Russo-Japanese
War. After sailing around the Cape of Good Hope and across the
Indian Ocean, the Russians were sighted by Admiral Togo's Japanese
Combined Fleet on May 26, 1905, who then engaged the Russians
the following day. Of the 45 ships in the Russian fleet, only
two destroyers, a light cruiser, and six other smaller vessels
survived the ensuing battle, while the Japanese only lost three
torpedo boats. Japanese casualties were approximately 600 compared
to the 6000 Russians killed or wounded.
Battle Report (playtest): The great fleets steamed right at each other before
breaking left and right to bring their broadsides to bear on the
enemy. Both sides steamed slowly past each other, pounding away
with their main guns. The Japanese were unable to make good use
of their superior maneuverability. Fuji and Shikishima took the
brunt of the initial Russian salvo, while Borodino, Navarin, and
Kniaz Suvorov suffered greatly from the return fire. Soon Fuji
and Suvorov were both sinking, and the Nisshin, Vladimir Monomakh,
and Sissio Veliki were burning out of control and had to be abandoned.
Slowly the Russians gained the upper hand in the grueling slugfest.
Twice the Japanese tried to reverse things by sending in their
destroyers and torpedo boats for an attack, but without results.
In desperation the Idzumo and Tokiwa resorted to ramming their
Russian opponents, but to no avail. This battle was a surprising
victory for Russia.
List of Equipment Needed
1. Rules
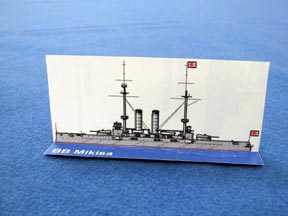
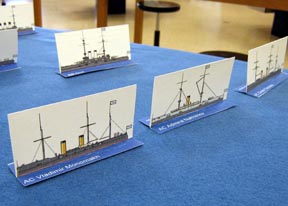
2. Ship models or counters: here are some
paper
ships you can print and use (print at 50% for use on a
5' x 7' table)
3. Playing surface, e.g. table with blue sheet
4. 7 six sided (D6) dice
5. Deck of ordinary playing cards
6. Red, white and blue poker chips or similar markers
Setting Up
Card Deck Preparation: Divide the red suits (Japanese) from the black
suits (Russian). From the Japanese deck retain the King and Ace
of Diamonds, and all cards valued three through six. Discard the
rest. From the Russian deck retain the King and Ace of Spades,
and all cards valued two through five. Discard the rest. Shuffle
each deck separately and place face down.
Fleet Order of Battle
|
Japan - Admiral Togo |
Russia - Admiral Rozhdestvenski |
|
Battleships |
Armored Cruisers |
Battleships |
Armored Cruisers |
Mikasa
Asahi
Shikishima
Fuji |
Nisshin
Kasuga
Yakumo
Azuma
Tokiwa
Asama
Idzumo
Iwate |
Kniaz Suvorov
Ore
Borodino
Alexander III
Osliabia
Sissio Veliki
Navarin
Nikolai I
General Admiral Graf Apraksin
Admiral Ushakov
Admiral Senayvin |
Dimitri Donskoi
Vladimir Monomakh
Admiral Nakhimov |
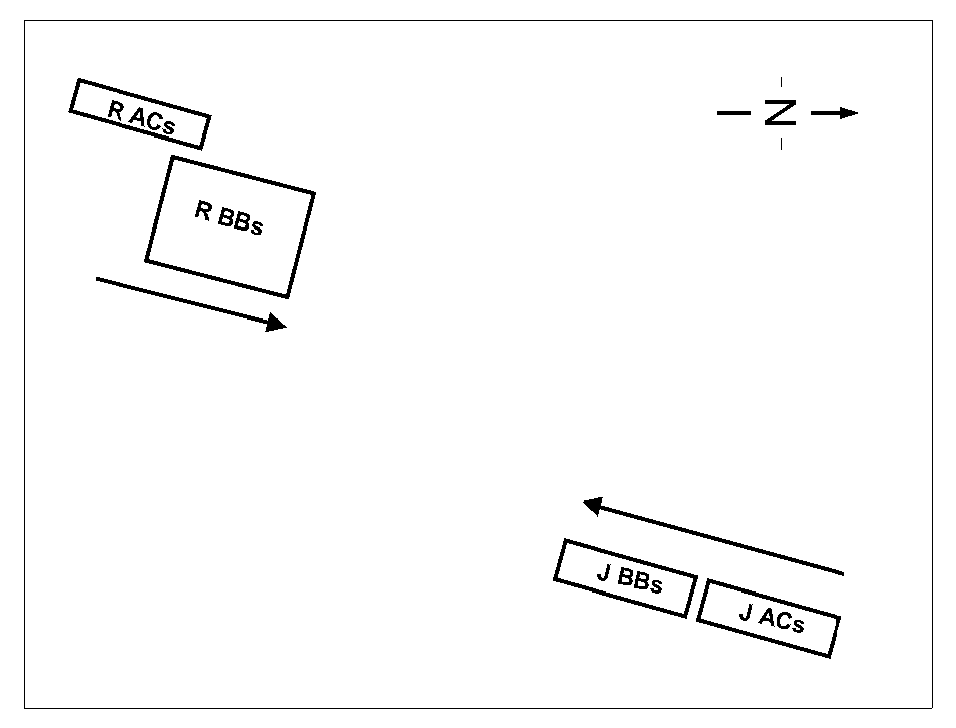
Map: On
a 5' x 7' table, position the fleets as indicated below. All units,
with the exception of the Russian battleships, should be in line
ahead; while the Russian battle ships can be bunched roughly as
two parallel lines ahead.
Combat Points: Ships
have "combat points," or CPs, which can be 'spent' on
movement, gunnery, defense and damage control. A ship may allocate
its CPs in any manner, as long as it does not exceed the maximum
in any given category (gunnery, armor, movement). Any unused points
at the end of a turn can be dedicated to repairs.
- Battleships: 8
combat points. Maximum of 3 gunnery points (1 battery forward
or aft, 3 broadside), 2 armor/defensive points, and 2 movement
points.
- Armored Cruisers: 6 combat points. Maximum of 2 gunnery points (1
battery forward or aft, 2 broadside), 1 armor/defensive point,
and 3 movement points.
- Destroyers & Torpedo Boats: Both the Russian and Japanese fleets have destroyer/torpedo
boat flotillas. While the flotillas are not physically represented,
they make their presence felt through torpedo attacks.
 Sequence
of Play
1. Initiative Phase: Players turn over cards.
The winning player (or side) that has the initiative and is called
the Offense for the current turn, the other player (or side) the
Defense.
2. Prime Action Phase: Offense moves AND attacks with as many
ships as his initiative allows.
3. Alternating Action Phase: After the Offense has completed the
prime moves, each player, starting with Defense, moves and attacks
with one ship in alternation.
4. Repair Phase: Ships that are burning try to fight the fires.
Ships taking on water attempt to stop the flooding.
5. Damage Phase: Ships that are still burning suffer fire damage,
and ships with flooding take on water.
6. Reload Phase: Ships reset CPs balances in preparation for the
next Initiative Phase.
Determine Initiative: Shuffle the red Japanese deck and
the black Russian deck. A card from each deck is turned over.
The higher card has the initiative and may move and fire from
as many ships as the difference in the card values. Example: Japan
turns over the Nine of Diamonds, Russia turns over the Five of
Spades. Japan has the initiative, and may employ 9 - 5 = 4 ships
in the Prime Action Phase. After the fourth Japanese ship moves,
players would then enter the Alternating Action Phase, starting
with the Defense until all Offensive ships have moved (all ships
capable of movement must move). Any unmoved Defensive ships move
in order at this time. In the event of a tie, turn over another
card. When the last card of a deck is turned over, reshuffle the
deck and continue play.
Aces are LOW (1 point) and have special
consequences. See torpedo rules. Admirals (Kings) have no point
value; however if an Admiral appears, the player drawing the King
sets the card aside and draws another card to determine initiative.
If that player earns the initiative, add +1 to all gun or torpedo
dice rolls that turn. If the Admiral does not gain the initiative,
add +1 to all defensive armor rolls that turn. At the end of the
turn, add the King back into the discard pile.
Movement and Turning: Ships move forward and/or turn. Movement ahead
is measured in base lengths; one length costs one CP. A ship may
turn up to 90 degrees; each turn costs one CP. Battleships can
turn once per move, cruisers twice. To turn, a ship moves forward
½ length, and then pivots about the right or left center
edge of the base. If ships collide, both lose 1 CP, begin flooding,
and are done for the turn. Ships can only move forward, and may
make any combination of aheads and turns within their individual
limits.
After the long transit from the Baltic,
Russian ships were in poor mechanical condition, with fouled bottoms
and corroded boilers. As a result, the Japanese were able to maneuver
faster than their Russian counterparts. Therefore, Japanese ships
get an additional free movement at the beginning of a ship's turn,
i.e. Japanese ships may move forward 1 length or turn at no CP
cost, then take up to the standard 2 moves for battleships or
3 moves for cruisers (turn restrictions still apply).
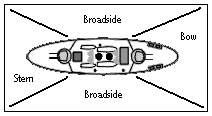 Gunnery: All ships are considered
to be within gunnery range at all times. Ships roll 1D6 for gunnery
fire off the bow or stern (plus or minus 45 degrees), and up to
2D6 for broadside fire (plus or minus 45 degrees of the beam).
Battleships may fire an additional secondary battery broadside
for a total of 3D6. Ships may not fire over interposing ships,
including abandoned or surrendered ships. Each dice rolled costs
1 CP. Due to the excellence of Japanese gunners, Japanese battleships
may re-roll once any 1's.
Targeted ships automatically 'roll' free
(no CP cost) imaginarry armor dice equal to the number of attacking
dice rolled. These default dice always have a value of 1. The
target ship may chose to roll real dice in place of the default
dice up to their armor/defensive point maximum; each real dice
rolled costs 1 CP. Each player's highest dice are paired and compared
after adding any Admiral bonuses; if the attacker's is greater,
the defender is hit and surrenders 1 CP. Ties are scored as misses.
If the winning dice is greater by 4 or more, a critical hit has
occurred. Roll 1D6 again, 1-4 indicates a fire, 5-6 flooding.
Gunnery damage takes immediate effect (see "Combat Points,
Damage and Repairs"). Compare the next highest dice, real
or imaginary, in similar fashion.
Torpedoes:
When a player turns over an Ace during the Initiative Phase, the
opposite side has the Offense and may opt to launch torpedoes
in lieu of a normal move (i.e. take the initiative based on the
value of their high card with the ace counting as 1 point). If
choosing to launch torpedoes, each side turns over another card.
If the initiative remains with the previous Offensive player,
then the difference in card values indicates the number of torpedo
attacks. If the initiative shifts, then the new Offensive player
can either choose to launch torpedoes attacks equal to the difference
currently displayed OR play a normal turn. If the Offensive player
turns over his ace when attempting to determine if he retains
the initiative, the initiative automatically goes to the other
side, and the new Offensive player may make the torpedo-or-not
decision with the showing ace counting as a 1 for the purposes
of determining the difference in card values. If two aces are
turned over simultaneously, then it is treated as a tie, another
set of cards is turned over and no torpedoes may be launched.
If either player turns over a King following an ace, the king
is set aside and another card turned over until an initiative
winner can be decided. In this case the King, if with the Offense,
would add +1 to his torpedo rolls, or if with the Defense, +1
to his counter torpedo rolls.
The Offensive players conducting torpedo
attacks select target ships, and then roll 3D6 against each targeted
ship. No more than one attack per target ship. Defending ships
may expend CPs and roll dice up to their maximum movement points.
Compare the single highest dice from each side after any Admiral
bonuses are applied. If the attacker has the highest single dice,
then the target ship loses 2 CPs in damage and receives 2 flooding
hits. If the defender has the highest dice, the attack misses.
If the Defensive player spends no CPs on defense, torpedoes only
miss if three 1's are rolled. No other Action Phases occur that
turn, and both sides move to the Repair Phase.
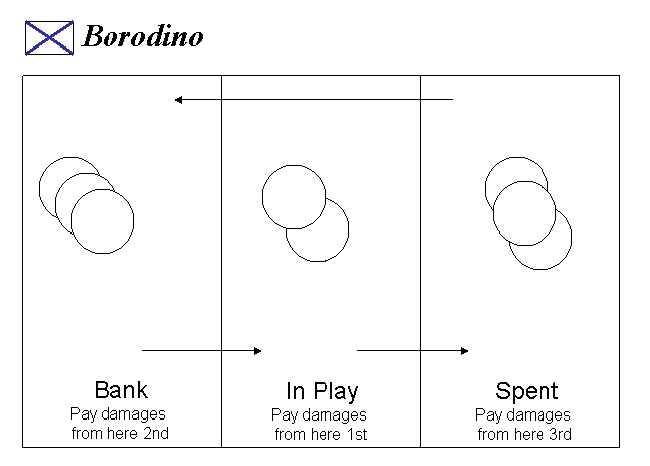 Combat Points, Damage and Repairs:
Poker chips or similar markers (coins, etc.) can be used as damage
markers and CPs. Use red chips for fire, blue for flooding, and
white for CPs, surrendering 1 white chip for each CP lost due
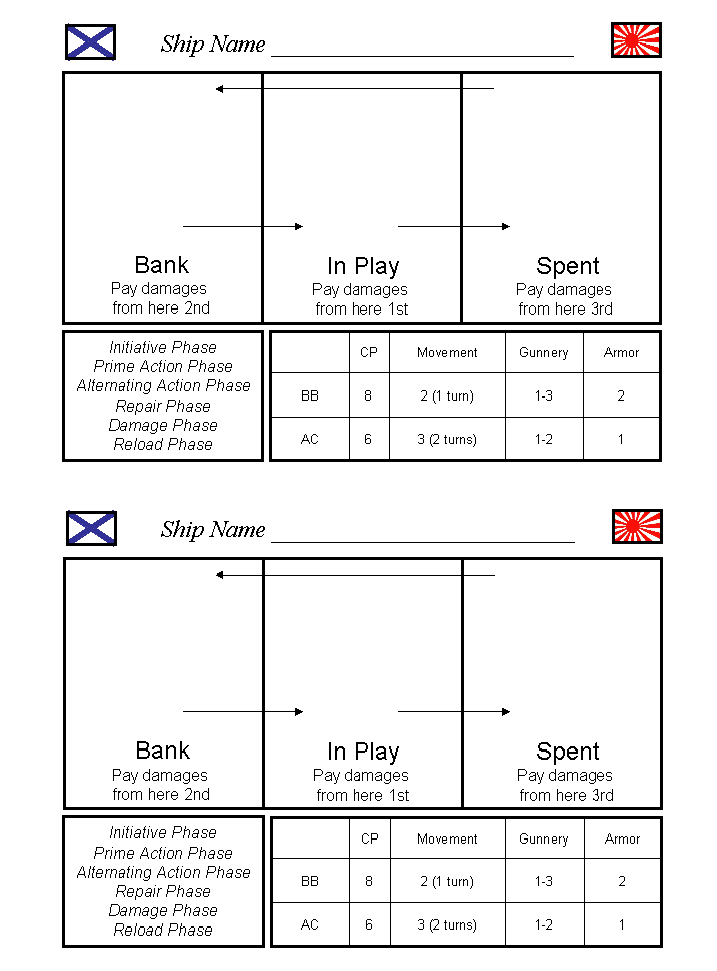
to damage. CPs are either stacked in the "Bank Pile"
meaning that they have not yet been used that turn (stacked behind
the ship), the "In Play Pile" meaning that they are
being used right now for a specific purpose and the outcome has
not yet been determined (staked beside the ship), the "Spent
Pile" meaning that they were utilized to attack, defend,
or repair (stacked in front of the ship), or "Lost"
meaning they were permanently surrendered due to gun hits, fire,
or flood (and removed from play). Alternatively, players can make
a sheet of paper labeled with the ship's name and divided into
three boxes marked Bank, In Play and Spent, and stack their chips
on this tracking sheet in lieu of stacking
them next to their ship.
When using CPs to attack, move, or repair,
a player takes the appropriate number of tokens from his Bank
Pile, sets them beside the ship in the In Play Pile, moves or
rolls the dice, and then places the tokens in the Spent Pile.
If using CPs to defend, the player similarly moves tokens from
his Bank Pile to the In Play Pile. If he is required to pay CPs
for damages received in that roll, payment first comes from tokens
in the In Play Pile, then from the Bank Pile, and finally from
the Spent Pile.
During the Repair Phase, a player may roll
as many dice as CPs remaining in the Bank Pile. A single fire
or flood token is repaired/removed with each roll of 4 or better.
Repairs can only be used to stop fires or floods and cannot be
used to regain lost CPs. During the Damage Phase, each unchecked
fire or flood costs 1 CP of damage, paid first from the Bank Pile,
then the Spent Pile. During the Reload Phase, all tokens in the
Spent Pile are moved back to the Bank Pile.
If a ship loses its last CP with no active
fires or flooding, it is considered to have surrendered; it remains
afloat, but no longer participates in combat. If a ship has no
CPs and there is an active fire, it remains afloat but burns uncontrollably
and is abandoned. If there is active flooding, then it sinks and
is removed from the table. If burning and flooding, then it sinks.
Notes:
This format combines traditional miniature gaming with probability
and calculated risk. If players are astute, they will realize
that there is an advantage to 'card counting' to predict whether
they are likely to turn over a high card following an ace, or
more likely to turn over a low card, hence should 'play it safe'
and take the normal move. Likewise, players have to budget their
chips (CPs). The more spent on gunnery means less available for
defense and repairs should their ship come under fire during the
opposition's move!
These rules are adapted from Mike Adams'
Naval
Wargame Rules for the Russo-Japanese War, September 2003;
Mike Fischer's EasyShips,
copyright 2003, and Matt Fritz's Jutland,
History Lessons for Junior Generals. For more information about
the battle visit the Russo-Japanese
War Research Society web page.

 Introduction: The Battle of Tsushima Strait was one of the most
decisive naval battles in history. In July of 1904 Admiral Rozhdestvenski
set sail with the Russian Baltic fleet to replace losses incurred
by the Far East Fleet in the Pacific at the beginning of the Russo-Japanese
War. After sailing around the Cape of Good Hope and across the
Indian Ocean, the Russians were sighted by Admiral Togo's Japanese
Combined Fleet on May 26, 1905, who then engaged the Russians
the following day. Of the 45 ships in the Russian fleet, only
two destroyers, a light cruiser, and six other smaller vessels
survived the ensuing battle, while the Japanese only lost three
torpedo boats. Japanese casualties were approximately 600 compared
to the 6000 Russians killed or wounded.
 Sequence
of Play
 Gunnery: All ships are considered
to be within gunnery range at all times. Ships roll 1D6 for gunnery
fire off the bow or stern (plus or minus 45 degrees), and up to
2D6 for broadside fire (plus or minus 45 degrees of the beam).
Battleships may fire an additional secondary battery broadside
for a total of 3D6. Ships may not fire over interposing ships,
including abandoned or surrendered ships. Each dice rolled costs
1 CP. Due to the excellence of Japanese gunners, Japanese battleships
may re-roll once any 1's.
 Combat Points, Damage and Repairs:
Poker chips or similar markers (coins, etc.) can be used as damage
markers and CPs. Use red chips for fire, blue for flooding, and
white for CPs, surrendering 1 white chip for each CP lost due
to damage. CPs are either stacked in the "Bank Pile"
meaning that they have not yet been used that turn (stacked behind
the ship), the "In Play Pile" meaning that they are
being used right now for a specific purpose and the outcome has
not yet been determined (staked beside the ship), the "Spent
Pile" meaning that they were utilized to attack, defend,
or repair (stacked in front of the ship), or "Lost"
meaning they were permanently surrendered due to gun hits, fire,
or flood (and removed from play). Alternatively, players can make
a sheet of paper labeled with the ship's name and divided into
three boxes marked Bank, In Play and Spent, and stack their chips
on this