Historical Background:
The Fortress of Louisbourg was one of the largest fortifications the French constructed in North America. The founding of the town and fortress was a result of France losing Acadia to Britain in the Treaty of Utrecth which ended the War of Spanish Succession in 1713. The French lost their colonies in Acadia, as well as fishing ports in Newfoundland. They were able to establish a settlement on Cape Breton Island which was named Isle Royale by the French. Construction of the fortress began in 1720. Louis XV was quoted as saying that the fortress would be so large that he would see it in Versailles. Louisbourg was destined to fall to a New England army in 1745 and a professional British Army in 1758.
The 1745 siege was conducted by an army raised by the colonial governments of New England who raised, equipped, supplied and transported their army to Louisbourg in the summer of 1745. They only had some naval help from the British. This army of farmers, tradesmen and craftsmen were able to defeat and capture an important French settlement. However their efforts were in vain as due to geopolitical events in Europe and India, the fortress was returned to France with the Treaty of Aix- la Chapelle of 1748 in exchange for Madras, India. This event would help fan the fires of rebellion 30 years later.
The siege of 1758 was as a result of the British Government's strategy of weakening France by capturing her overseas Empire. A British army of 15,000 soldiers and sailors was dispatched from Britain to Halifax, Nova Scotia to train and then launch an attack on the Fortress. The French this time were ready for an invasion and had prepared beach defenses. However, the British were still able to land and after a seven week siege, the French surrendered. The French commander had achieved his objective of delaying the British advance on Quebec for another year. Today 1/3 of the original fortress has been reconstructed and is North America's largest historic reconstruction. It is now a part of the Canadian National Park service and portrays the summer of 1744 with a living history component. It has also hosted large living history re-enactments in 1995 and 1999.
Battle 1:
The game began with
the French team astonished to see the British army lined up outside the walls of Louisbourg. In stunned disbelief, they watched as the 58th Regt
marched towards the forward trenches of the defenses and then fired a tremendous
volley into the Mik-Maq warriors posted there. Sending them fleeing back into
the fortress, Gen. Lawrence halted his men in a line and let the French cut it
down with musket and artillery fire. The supporting regiments didn’t budge and
the French simply kept up the cannon fire, which blew great gaps into the
British ranks. The Royal Artillery then began counter battery fire and knocked
out half of the French artillery. It was only then, after Gen. Amherst had a
heated discussion, wherein he struck one of his fellow officers, a coup de grace
occurred, and Gen Wolfe took command of the army. He led a general advance on
the Dauphin Gate but by the time he had reached the walls, night had fallen.
Louisbourg was safe for another day.
Battle 2:
Once again, the French were surprised that the British
would once again attempt an assault on the city. This time, Amherst ordered an
all out assault on the Dauphin gate. This ensured that massive casualties would
result, but with his Grenadiers leading the charge, and the Fraser`s Highlanders
giving covering fire, they were able to make it up to the gate. The Royal
Artillery, reduced to only 2 guns, were surprisingly accurate in finding the
French guns. With a breach made, and only the Volunteer Etranger holding a line,
Louisbourg bowed to the inevitable and fell for the second time to an invading
army.
Rules
The Miniatures: Sources of figures for this game can be either plastic, metal, or paper soldiers in 1/72. Plastic figures can be found by looking on Plastic Soldier Review. Revell, Accurate, Strelets and Italeri all make 18th century figures now which can be painted as is or modified with paint or a modeling knife. There are several metal manufacturers who make French and Indian War figures and of course, the paper figures which are found on this website. Louisbourg forces featured New England, British, French, French Colonial and Amerindian cultures.
Figures should be base 2 figures per base which should measure 2cm X 2cm. Artillery units are based on one cannon with two figures. Louisbourg did not see cavalry in either siege, so this is just an infantry and artillery game. The British can receive naval gun support. (see firing table)
The Fortress: You can use the paper castle parts on this website. Many other paper castle models are available for free on the web. There's a good looking one made by By Rob Lazzaretti, Dennis Kauth, and Todd Gamble available from Wizards of the Coast. If you don't like that one try looking for a paper castle at freepapertoys.com. If you want plastic walls and towers you can use Zvezda's Ancient Stone Fortress. For about $40 you get four square towers, two gatehouses, and a bunch of wall sections. They sell additional wall sections and towers separately. If this is too rich for your blood then it's not too hard to scratch build a decent castle. Rob Dean, in Saga #67, reports making a castle from heavy cardboard and oatmeal containers for a class of fourth graders. Lego or other building blocks can also be used.
|
1745 Siege |
|
|
|
|
1758 Siege |
|
|
|
The Board:
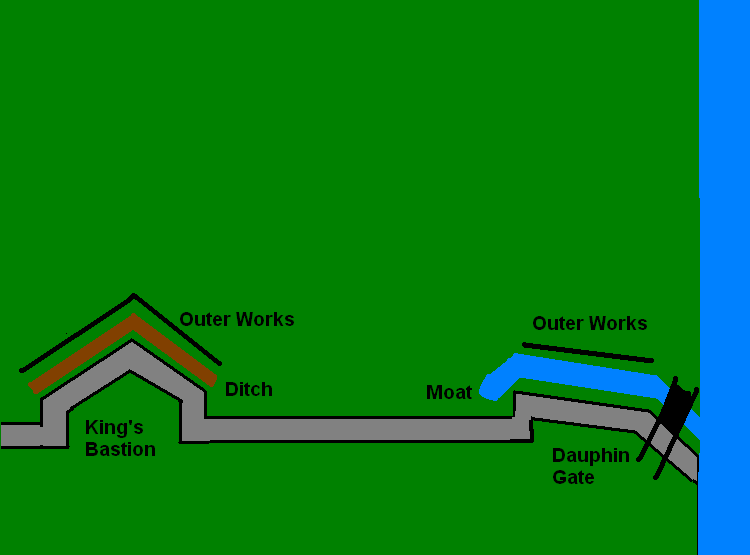
The game table is 2 meters by 1 meter. On one side of the board, Louisbourg harbor should be marked by blue felt, or by a blue ribbon outlining the waters edge. Since a full representation of the siege is impossible to do in a 45 minute lesson, just model the Dauphin gate as well as the curtain wall, and the Kings Bastion. You can build the gate and bastion out of lego blocks, castle parts which Matt has made, or play dough. Louisbourg`s walls were stone but were topped with earth embankments. Near the Dauphin gate there was a wet moat drawing water from the harbor. The remaining ditch was dry. There was also a line of outer defenses which can be modeled with toothpicks stuck in play dough, or represented by a strip of black ribbon, cloth or paper.

 Sequence of Play:
1. French Move
2. French Shoot
3. New England / British Move
4. New England / British Shoot
5. Charges
6. Melee
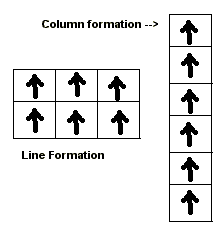
Formations: There were only two formations in the 18th century; line and column For the kids just refer to column as make a line and line as firing line, deploy your troops to fire. Inside the fortress walls, the French can deploy as a continuous line if they wish. Units may change formation at the start of or end of their movement turn, but can only change formation once per turn.
Movement: Infantry can move 15cm if they are in line or 24 cm if in column. Commanders may move 24cm. Light cannons can move 15cm but cannot fire on the same turn they move. Cannons can pivot in place during movement and still fire. Units may about face once per turn. Units can advance up to 5 cm from an enemy unit and still fire. They may then decide to charge.
Crossing the Moat and Ditch: Only infantry can cross the moat or ditch. A unit that reaches the moat or ditch must stop at the edge. On its next move it may cross the moat or ditch. On the following turn it may move normally.
Shooting: Units that are in line formation and artillery that didn't move (but who could pivot) may fire. Range is measured from the center of a unit to the nearest part of the target unit. Units may only fire to the front and my not fire through gaps between friendly units, or over the heads of friendly units (unless they are in the walls of the fortress). Roll one die per infantry base or two dice per gun model. The chart indicates the number needed for a hit. Remove one base for each hit rolled by the firing unit. It takes three hits in the same turn to remove a gun model.
| Shooting |
|
|
|
|
| Muskets |
|
|
|
|
| Light Cannon |
|
|
|
|
| Medium Cannon |
|
|
|
|
| Heavy Cannon |
|
|
|
|
Defensive Cover: French units in the outerworks or on the fortress walls are partially protected from enemy fire. When a unit in the outerworks or on the wall receives hits roll 1 die for each hit. Each roll that is a 5 or 6 is ignored.
Charges: Both sides may charge during the charge phase. A unit may not declare a charge unless it is in line formation and within 15cm of and Enemy unit. If it matters the British charge first. A player may measure to see if a unit is within charge range. One enemy unit must be chosen as the target of the charge. A unit that wishes to charge must first pass a morale check. If the unit fails morale nothing happens, it cannot charge this turn. If the unit passes it's morale check, then the target must pass a morale check. If the target fails, it loses one base and immediately retreats 24cm, the charging unit is moved into the position vacated by the retreating target unit. If artillery is the target and it fails morale, it is eliminated . If the target passes the morale check, it has the option of firing at the chargers or counter charging. If the unit counter charges, the two units meet in the middle and fight a melee. If the target decides to fire at the chargers, it does so at a range of 5cm. If the charging unit survives the fire, it moves into contact with the target and they fight a melee
Morale Checks: If a unit has to take a morale check, roll one die and add any modifiers. If the roll is less than or equal to the number of bases (plus a commander if one is present) then it has passed. If the role is greater then, it fails. Artillery must roll a four or less to pass a morale check.
| Grenadiers, Highlanders, Rangers | -1 |
Melee: If a charging unit contacts and enemy unit there will be a melee. Each side rolls a die and applies the modifiers. High roll wins. The loser removes a stand, and retreats 24cm. He must spend the next turn reforming. If the roll is a tie, each side removes a stand and rolls again.
| More bases than opponent | +1 |
| Hitting the flank or rear | +1 |
| Commander leading charge | +1 |
| Militia unit or artillery crew | -1 |
| Defending Fortress Wall or Dauphin Gate | +2 |
| Grenadier or Highlander | +1 |
Attacking the Walls: There are several ways to attack the walls. You can allow the attackers to have a breach in the walls at the start of the battle. The breach can be attacked using a charge, as if it was open terrain. Attackers can use ladders to climb the walls. Any unit that reaches the walls is assumed to have scaling ladders. On the turn after reaching the walls they can climb up during their movement and melee any defenders at the top. The attackers can assault the Dauphin Gate. The gate can be charged, but the defenders get a +2 melee bonus.
Commanders: A commander may join or leave one of his units during movement. This unit gets a +1 bonus on all melee rolls and the officer counts as a base when testing morale. Every time a unit with an attached commander is completely eliminated by enemy fire, (last base removed) or is engaged in a melee (win or lose) roll one die. If the roll is a 6, the commander is a casualty and is removed from play. This is the only way a commander can be eliminated.
Resources: