 Counting
Coup on Custer
Counting
Coup on CusterFast Play Rules for the Little Big Horn Battle
Counting
Coup on CusterVersion 2: I made some changes to these rules. The original version can be found here. The main changes were to the turn sequence to eliminate simultaneous shooting, and the Indian victory points.
Historical Background: During the Civil War George Custer was one of the rising stars of the Union army. After that war ended he headed west to take command of the 7th cavalry. His scouts reported finding a large Indian village. Ignoring their warnings, he split his force into three columns. Custer rode into the valley of the Little Big Horn with about 200 men. None of them made it out alive. The Cheyenne and Sioux, outnumbering the troopers by at least 15 -1, fulfilled Sitting Bull's prediction and wiped them out. The death of Custer, his two brothers and nephew, and 200+ troopers in a single engagement shocked the nation. The Plains Indians war would continue. The final chapter was written in 1890 at Wounded Knee.
 After Action Reports: This battle was played with two different
groups of middle school students.
After Action Reports: This battle was played with two different
groups of middle school students.
Battle 1: The cavalry troopers quickly realized they were surrounded by angry Indian warriors. Capt. Yates led C company in an ill advised counterattack. His command was quickly overwhelmed and annihilated by Chief Gall and his Unkpapa Sioux. Gall continued his rampage by riding alone into a cluster of terrified troopers. The mighty warrior succeeded in counting coup on them and capturing their guidon before he was joined by the rest of his war band. The other cavalry companies were doing their best to avoid a deadly close encounter with the other Indian war bands, but the situation was hopeless. The troopers were worn down by bullets and arrows, and stalked by Indian warriors who used the hills as cover to get close to the troopers. Custer and his entourage managed to survive as they attempted a fighting retreat, but the other companies were destroyed. Finally Custer and his men found their escape blocked. Sioux and Cheyenne warriors charged in from all sides, and the battle was over.
Battle 2: Companies C and L linked up at the start of the battle and formed skirmish lines, back to back, to keep the Indians at bay. It worked for a while but eventually a band of Cheyenne warriors charged into the troopers. A desperate melee was fought and the Indians were driven back. Elsewhere the cavalry retreated slowly towards the center of the battle field, using their firepower to prevent the Indians from closing in to land a knock out blow. This tactic was effective, but the Indians used their rifles and bows to return fire. The troopers could not replace their casualties, but a steady supply of new Indians arrived to keep up the pressure. Eventually the defense faltered, and the Indian charges began to hit the troopers in waves. After savage hand to hand fighting Custer and his surviving troopers were defeated.
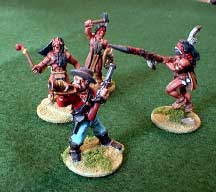
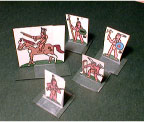
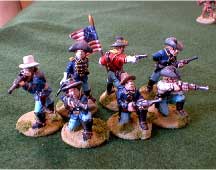
The Forces: Adjust the number of Indian and Cavalry groups to suit the number of players in your game. Just make sure there are plenty of Indians. For this battle I used some 25mm metal figures that I had already painted. 1/72 scale plastic figures are available from Imex. Here are some paper soldiers you can print and use.
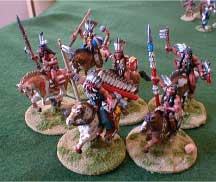
 Indians: We played the game with six Indian bands
representing the Northern and Southern Cheyenne, plus the Ogallala,
Hunkpapa, Minneconjous, Brule, and Sans Arc Sioux. Each band had
10 - 12 warriors on foot and one mounted Chief. The warriors had
a mix of bows, rifles, and melee weapons. A marker was placed
along the board edge for each band to mark their entry point.
The bands should be spread all around the board so that Indians
are entering the board from all directions.
Indians: We played the game with six Indian bands
representing the Northern and Southern Cheyenne, plus the Ogallala,
Hunkpapa, Minneconjous, Brule, and Sans Arc Sioux. Each band had
10 - 12 warriors on foot and one mounted Chief. The warriors had
a mix of bows, rifles, and melee weapons. A marker was placed
along the board edge for each band to mark their entry point.
The bands should be spread all around the board so that Indians
are entering the board from all directions.
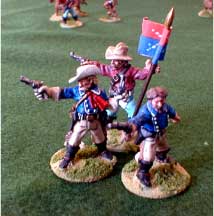
The cavalry: Custer and a trooper holding his guidon were placed at the center of the board. Five Groups of 10-12 troopers were placed in random directions about 12" from Custer. These represent the surviving members of companies C, E, F, L and I. Each has a guidon and an officer.
The Board: We played the battle on a 7.5' x 5' table. The battlefield should include plenty of low hills. You can use felt to represent these if necessary. Hills block line of sight for shooting, but don't effect movement.
Objective: Since this is a one-sided battle the goal isn't simply to win. Instead, each player is competing against his teammates. The Indians are competing to see which war band can win the most honors; the cavalry are competing to see who can last the longest. Indian bands can earn honor points for defeating an enemy in melee, capturing a guidon, or for a chief counting coup. (see table). The band that earns the most points is the Indian winner. The Cavalry company that keeps its guidon the longest is the Cavalry winner.
| Defeat enemy figure in melee |
|
| Chief counts coup successfully |
|
| Capture guidon |
|
| Capture Custer's guidon |
|
 Turn
Sequence:
Turn
Sequence:
1. Cavalry move
2. Cavalry move or shoot
3. Melee
4. Indians move
5. Indians move or shoot
6. Melee
Move: Foot figures may move up to 6". Mounted figures may move12".
Move or Shoot: Each figure may either move again (6" for foot, 12" for mounted figures) OR they may shoot, if eligible. All cavalry troopers have carbines and pistols and are eligible to shoot. Only those Indians with bows or rifles are eligible to shoot. Indian chiefs are assumed to have rifles, even if the figure doesn't show it. The range is unlimited. Roll 1D6 for each figure firing. The table show the number needed to score a hit. The playing receiving the hits picks the figures to remove.
| Shooting |
|
|
| Indians |
|
|
| Cavalry |
|
|
 Melee: Melees are fought as one-on-one battles.
The attacker matches his figures against his opponent's figures.
However the guidon carrier may not be engaged unless all the other
troopers in his group already have an opponent. Each rolls a die
and adds any modifiers. High roll wins, and the loser is removed.
Indians win ties.
Melee: Melees are fought as one-on-one battles.
The attacker matches his figures against his opponent's figures.
However the guidon carrier may not be engaged unless all the other
troopers in his group already have an opponent. Each rolls a die
and adds any modifiers. High roll wins, and the loser is removed.
Indians win ties.
| Officer or Chief | +1 |
| On a Horse | +1 |
Indian casualties: Indians that are hit are removed from the board and enter again next turn from their starting point. This is to represent additional Indians arriving from the village to join the battle. The first time a chief is hit he loses his horse, the second time he is hit he is removed from play permanently.
Counting Coup: A chief that is in melee may attempt to count coup. This must be declared before the dice are rolled. A chief that is counting coup forfeits all his Die roll bonuses. If the chief wins his opponent remains on the board, but his band earns two honor points. If he loses, he is a casualty. A chief may not count coup more than once on the same figure.
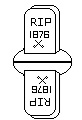
 Markers: The Little Bighorn battlefield is a national
monument. Gravestones mark where the cavalry troopers fell. Bill
Molyneaux had the great idea of putting up a little marker each
time a cavalry trooper is eliminated in the game. When the battle
is over the table should look a bit like the real battlefield.
You can fashion your own markers, or print and use this one: marker colored, marker
black & white.
Markers: The Little Bighorn battlefield is a national
monument. Gravestones mark where the cavalry troopers fell. Bill
Molyneaux had the great idea of putting up a little marker each
time a cavalry trooper is eliminated in the game. When the battle
is over the table should look a bit like the real battlefield.
You can fashion your own markers, or print and use this one: marker colored, marker
black & white.
Useful Resources:
Son of the Morning Star by Evan S. Connell
Killing Custer by James Welch
"Painting the Plains" by Mark Copplestone
"Custer's Luck" by Mark Hannam, The Gauntlet
#20
"Sioux Wars" by Pete Panzeri, After Action Review
#2-8
The American Plains Indians, Osprey Men-at-Arms Series
# 163 by Jason Hook & Richard Hook