 "We
are the Flank" - The Big Fight for Little Round Top
"We
are the Flank" - The Big Fight for Little Round TopFast and Easy Rules for Replaying Part of the Battle of Gettysburg
"We
are the Flank" - The Big Fight for Little Round TopHistorical Background: The Confederate attack on Devil's Den and Little Round Top was the subject of considerable controversy. It began late in the day and was marked by confusion and a general lack of coordination. The terrain was partly responsible for this. Law's Brigade, with belated support from Robertson's Brigade, fought Ward's Brigade in and around Devil's Den. The fighting was fierce. The Confederates eventually drove the Union away but the timely arrival of the 40th NY prevented them from exploiting their success.
Benning's Brigade maneuvered to
attack Little Round Top from the flank. By the time they arrived
Vincent and Weed had arrived to defend the crucial position. Oates'
15th Alabama was given the difficult task of assaulting up the
hill. They ran into Chamberlain's 20th Maine, which was defending
the far left flank of the Union army. Several charges were turned
back. Finally, with his men low on ammunition, Chamberlain ordered
a bayonet charge, which finished off the weary confederates.
The confederate's failure to take Little Round Top set in motion
the famous events of the next day. Lee ordered a frontal assault
on the Union center. Pickett's charge would go down in history
as a bloodbath of legendary proportions. The Union stopped the
attack, inflicting horrendous casualties on the confederates.
 Battle
1: The rebels came up
with a clever plan - a pinning attack on Devil's Den and the Union
right coupled with an aggressive attempt to turn the Union left
flank. The Union commanders realized what was happening almost
immediately. Union reserves moved to block the flank attack while
other units shifted to bolster the vulnerable left flank. Some
poor communication resulted in a hole in the Union lines. The
third Confederate brigade arrived and raced for the hole on the
Union right. A regiment was sacrificed to slow them down just
long enough to deploy a battery in the gap. The 4th Texas regiment
captured the cannons but suffered heavy losses.
Battle
1: The rebels came up
with a clever plan - a pinning attack on Devil's Den and the Union
right coupled with an aggressive attempt to turn the Union left
flank. The Union commanders realized what was happening almost
immediately. Union reserves moved to block the flank attack while
other units shifted to bolster the vulnerable left flank. Some
poor communication resulted in a hole in the Union lines. The
third Confederate brigade arrived and raced for the hole on the
Union right. A regiment was sacrificed to slow them down just
long enough to deploy a battery in the gap. The 4th Texas regiment
captured the cannons but suffered heavy losses.
Meanwhile Devil's Den was turning into a bloodbath. Two rebel regiments were massacred trying to take the position. It only fell when the 15th Alabama managed to flank it and the Confederates charged the Den from two directions, overwhelming the defenders. The Rebel flanking maneuver also ran into trouble as the Union reserves poured withering fire into the columns as they ran for Little Round Top. The men of the 20th Georgia regiment managed to get to the summit before Union reinforcements, led by Strong Vincent and the 83rd Pa., pushed them off. Joshua Chamberlain led the 20th Maine in a counterattack that recaptured the Union battery and stabilized the Union right flank.
Battle 2: The Confederate commanders opted for a wide flanking maneuver. Their timid attack was a dismal failure. As they trudged through the woods and up and over Big Round Top the Union had time to bring on their reinforcements. Hopefully next time the commanders will be more aggressive. Robert E. Lee was not pleased.
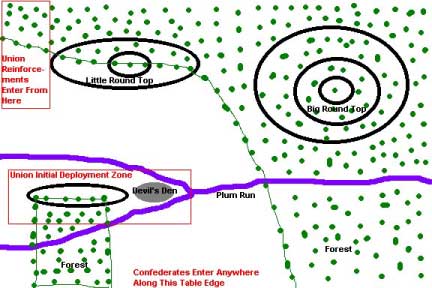
Victory Conditions: The side that controls Little Round Top at the end of the game is the winner.
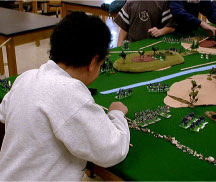
The Map: I started by making the map entirely out of felt. Green was used for the main tablecloth, blue for the stream, gray for Devil's Den, and tan/brown/black for the hills. All of this was glued onto the main cloth using spray on adhesive. I outlined the boundaries of the forest with a black magic marker. This was sufficient to run the game, but I also had some hills of the correct size and shape, which I added for effect. When it was time for the game I simple unrolled the map, spread some gravel in Devil's Den and used model railroad trees to line the forest boundaries.
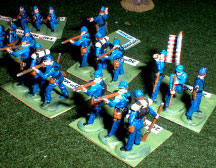
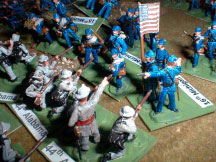
Building the Armies: I decided to go with cheap 1/72 scale
plastic figures for this game. The children tend to be rough on
the figures, so it would be a waste to spend a lot of time and
money on metal miniatures. The 1/72-scale figures are large enough
for the kids to handle easily. Five boxes of Imex Union and Confederate
Infantry ($10) and one box of Imex Union and Confederate Artillery
($5) provided all the figures I needed. You can find these boxes
at a discount of 20% or more if you shop around.
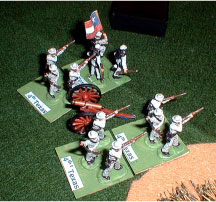
The uniforms for the sharpshooters were painted green.
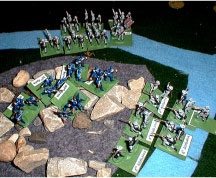
Three figures were put on each stand, with the commanders based individually. The bases were painted green to match the felt on the gaming table. Each stand was then given a ID label using computer generated mailing labels. The labels were color coded by regiment using colored pencils. Each regiment includes a figure carrying a flag. My flags came from Warflag (www.warflag.com). The flagstaffs were made from paperclips. Here are some paper soldiers you can print and use.
OOB: each stand represents about 50 men (fudged to make them equal)
|
Union - all union regiments are 6 stands except the Sharpshooter regiments, which are 4 stands each Ward's Brigade Enter on Turn 3: 40th NY and 6th NJ Enter on Turn 4: Vincent's Brigade Enter on Turn 5: Weed's Brigade |
Confederates - all Confederate regiments are 7 stands except the 15th AL, which has 8 stands Law's Brigade Robertson's Brigade Reinforcements Enter Turn
2: |
 Turn
Sequence:
Turn
Sequence:
1. Charge Moves
2. Confederate Normal Move
3. Union Normal Move
4. Confederate Fire
5. Union Fire
6. Melees
Charge Movement: A unit may not declare a charge unless it can contact an enemy unit with a charge move. A player may measure to see if a unit is within charge range. One enemy unit must be chosen as the target of the charge. A unit that wishes to charge must be in line formation and must pass a morale check first. Roll one die. If the check fails then the unit must stand in place during this turn. If the roll is less than or equal to the number of stands then the unit may charge. Move the charging unit into contact with the target of its charge. The unit being charged must now check morale. If it passes then it will be able to fire at the charging unit at point black range during its Fire Phase. If it fails its morale check it immediately moves 12" directly back, facing away from the enemy, and one stand is removed.
Normal Movement: Units may move the following distances:
Infantry Line: 6"
Infantry charging in line: 9"
Infantry Column: 12"
Limbered Artillery: 12"
Unlimbered Artillery: 0", but may change facing
A unit's movement is reduced by 3" if it crosses a stream
or hill during the turn or if it changes formation (including
artillery that limbers or unlimbers. Only one formation change
is allowed during a turn. An about face maneuver costs 3"
of movement.
 Fire: Units that have not moved this turn may
fire. Range is measured from the center of a unit to the nearest
part of the target unit. Units may only fire to the front. Units
in column may only fire one stand. Roll one die per stand or gun
model. The chart indicates the number needed for a hit. Remove
one stand for each hit rolled by the firing unit. It takes two
hits in a turn to remove an artillery stand.
Fire: Units that have not moved this turn may
fire. Range is measured from the center of a unit to the nearest
part of the target unit. Units may only fire to the front. Units
in column may only fire one stand. Roll one die per stand or gun
model. The chart indicates the number needed for a hit. Remove
one stand for each hit rolled by the firing unit. It takes two
hits in a turn to remove an artillery stand.
|
|
|
|
|
| Infantry | 5-6 |
|
|
| Sharpshooters | 5-6 | 5-6 |
|
| Artillery | 4-6 | 5-6 |
|
Morale Checks:
Roll one die for each unit that has lost a stand. If the roll
is less than or equal to the number of stands then the unit passes.
Each artillery stand counts double for morale checks. If the roll
is greater than the number of stands then the unit has failed
morale. It immediately moves 12" backwards, facing away from
the enemy, and one stand is removed. Artillery that fails a morale
check while unlimbered will abandon the guns.
 Melee: Each unit in the melee rolls one die.
Modify the roll as follows:
Melee: Each unit in the melee rolls one die.
Modify the roll as follows:
Has More Stands than the enemy: +1
Confederates Charging: +1
Terrain Advantage (higher ground, in cover, etc.): +1
Officer attached: +1
Hitting the flank or rear: +1
Highest modified roll wins. The loser immediately loses a stand and retreats 6", facing the enemy. The winner may occupy the enemy position. If the roll is a tie then each side loses a stand and you roll again.
Officers: Each Brigade Commander is represented on the table. A Brigade Commander may attach himself to one of his units. This unit gets a +1 bonus on all melee rolls and the officer counts as a stand when testing morale. Every time a unit with an attached officer loses one or more stands due to enemy fire, or is engaged in a melee (win or lose) roll one die. If the roll is a 6 the officer is a casualty and is removed from player. All the units in his brigade must make an immediate morale check. The units in his brigade may not move, fire, or charge during their next turn. They may act normally on all subsequent turns. Special Case: Joshua Chamberlain is treated as an exceptional Regimental Commander. He must be attached to the 20th Maine at all times. He counts as a stand when performing morale checks, and adds +1 to melee rolls, just like a Brigade Commander. He is subject to the same officer casualty rules as an attached Brigade Commander, with the same consequences to his regiment if he is a casualty.