Historical Background: The British, under the command of General Cornwallis, were successful in their battles in the southern colonies. Their adversary, General Greene, could not defeat the British but he was determined to deny the British a decisive victory so that his army could remain a potential threat. The largest engagement took place near Guilford Courthouse in North Carolina. Greene deployed his men in three lines, with the militia in the first two lines. The British drove the Americans from the field but suffered heavy casualties, and Greene was able to withdraw his surviving army before it could be destroyed. The British said of the battle that "another such victory would ruin the British Army." Next Cornwallis marched his army into Virginia where he would be trapped by General Washington and his French allies at the battle of Yorktown.
Battle 1: The British attacked aggressively, confident that
they could chase away the American militia in short order. The
militia proved tougher than expected, and inflicted heavy casualties
on the British before running for their lives. The British attack
faltered on the flanks, but Cornwallis pushed his men forward
in the center of the American line, determined to break them.
The militia were ordered to charge in a rash attempt to slow the
British. The spoiling attacks backfired and several militia units
skedaddled rather than follow their orders to charge the intimidating
red line. At last the British staggered through to meet the American
third line. They found the Continental line to be a much tougher
opponent. The Americans quickly surrounded the British and began
tightening the noose. Trapped and suffering terribly from musket
fire from all directions Cornwallis was forced to surrender. The
Americans celebrated their great victory, noting that they'd forced
Cornwallis to surrender seven months early.
Victory Conditions: The British must drive the Americans
from the field while suffering as few casualties as possible.
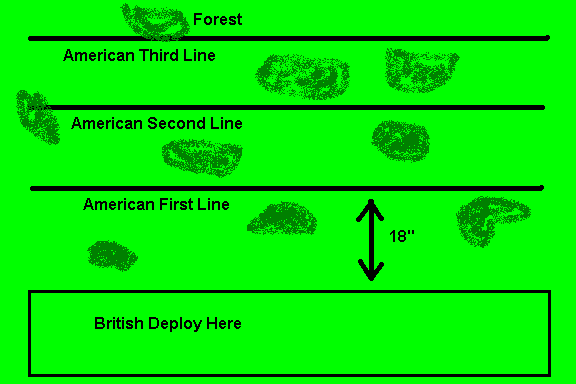
The Map: The board is 7.5' x 5' and mostly clear terrain. There patches of forest, and these played a role in the battle. Create a few forested areas and scatter them around the battlefield. You could represent the woods using model railroad trees, pieces of green felt, or drawing the outline in marker. I placed lichen (from model railroad store) along the edges of the forested areas. The British must deploy in the area shown on the map. The Americans must start deployed in three lines as indicated in the Order of Battle

Building the Armies: I used Imex's plastic 1/72 scale Revolutionary War figures. The cannons were from Imex's civil war sets and the crew were modified revolutionary war figures. I mounted the figures two per base, commanders were one per base. My flags came from Warflag (www.warflag.com). The flagstaffs were made from paperclips. Here are some paper soldiers you can print and use.
Orders of Battle: The number of bases in each unit is indicated inside the parentheses.
BritishGeneral Cornwallis (Overall
Commander) Col. O'Hara Lt. Col. Webster Maj. Gen. Leslie |
AmericansMaj. Gen. Greene (Overall Commander) First Line Second Line Third Line |
 Turn
Sequence:
1. British Move
2. British Shoot
3. Americans Move
4. Americans Shoot
5. Charges
6. Melees
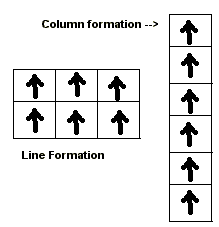
Formations: There are only two formations - line and column. The names of these formations can be very confusing for the students. At school, when they are told to "get in line" they line up one behind the other, in what we call column formation. With the kids I call the formations "firing line" (like a firing squad), and "marching column." Lines are double rank, and may bend. Columns are single company. The British light infantry, Jaegers, and Virginia Rifles may deploy in line with up to one stand width between stands. Units may change formation at the start or end of their movement, but can only change formation once per turn. Cannons do not have formations. Dragoons are always in line formation but they may be mounted or dismounted. Dragoons may mount or dismount at the beginning or end of their turn, but not both. If a Dragoon unit is dismounted this is marked by leaving one base behind the unit to represent the horse holders. This base doesn't count for shooting or melee. Dismounted dragoon units move 6" unless they decide to remount.
Movement: Infantry can move 6" if they are in line formation or 12" if they are in column formation. Commanders may move 12". Cannons can move 6" but may not fire on a turn when it was moved (they may pivot in place and still fire). Dragoons can move and charge 12". Units may about face (turn 180 degrees) once per turn. Units may move backward while still facing to the front at half speed. Units may not move within 1" of an enemy unit except when charging.
| Movement |
|
|
|
| Infantry |
|
|
|
| Dragoons |
|
|
|
| Commanders |
|
|
|
| Cannons (can't fire if moved) |
|
|
|
Fire: Units that are in line formation and artillery that didn't move this turn may fire. Dragoons may fire only if dismounted. Range is measured from the center of a unit to the nearest part of the target unit. Units may only fire to the front and may not fire through narrow gaps between friendly units, or over the heads of friendly units. Roll one die per base or two dice per cannon. The chart indicates the number needed for a hit. Remove one base for each hit rolled by the firing unit. It takes three hits in the same turn to remove an artillery base. Note that you only use the 1" firing column when shooting at a charging unit. If a unit is reduced to a single surviving base then the last base is immediately removed unless it is a cannon.
| Shooting |
|
|
|
| Infantry & Dismounted Dragoons |
|
|
|
| Virginia Rifles |
|
|
|
| Cannon |
|
|
|
Charges: Both sides may charge during the charge phase. A unit may not declare a charge unless it is in line formation and within charge range of an enemy unit. If it matters the British charge first. A player may measure to see if a unit is within charge range. One enemy unit must be chosen as the target of the charge. A unit that wishes to charge must first pass a morale check. If the unit fails moral nothing happens, it cannot charge this turn. If the unit passes its morale check then the target must pass a morale check. If the target fails it loses one base and immediately retreats 12", the charging unit is moved into the position vacated by the retreating target unit. If a cannon is the target and it fails morale it is eliminated. If the target passes the morale check it has the option of firing at the chargers or counter charging. If the unit counter charges the two units meet in the middle and fight a melee. If the target decides to fire at the chargers it does so at a range of 1". If the charging unit survives the fire it moves into contact with the target and they fight a melee.
Morale Checks: If a unit has to take a morale check Roll one die and add any modifiers. If the roll is less than or equal to the number of bases (plus a commander if one is present), then it has passed. If the role is greater then it fails. Cannons must roll a 4 or less to pass a morale check. If a unit of American Militia fails a morale check it runs away and is removed from the battle.
| Militia or Loyalists |
|
| Dragoons, Light Infantry, Virginia Rifles, Guards |
|
| Commander attached to unit |
|
Melee: If a charging unit contacts an enemy unit there will be a melee. Each side rolls a die and applies the modifiers. High roll wins. The loser removes a base and retreats 12". He must spend the next turn reforming. If the roll is a tie each side removes a base and rolls again. If American Militia loses a melee the unit runs away and is removed from the battle.
| More stands than opponent | +1 |
| Hitting the flank or rear | +1 |
| Commander leading charge | +1 |
| Militia unit, Loyalists, or cannon | -1 |
| Defending Woods | +1 |
| Guards, Light Infantry, Mounted Dragoons | +1 |
Commanders: A Commander may join or leave one of his units during movement. This unit gets a +1 bonus on all melee rolls and the officer counts as a base when testing morale. Every time a unit with an attached commander is completely eliminated by enemy fire (last base removed), or is engaged in a melee (win or lose) roll one die. If the roll is a 6 the commander is a casualty and is removed from play. This is the only way a commander can be eliminated.
Useful Resources: